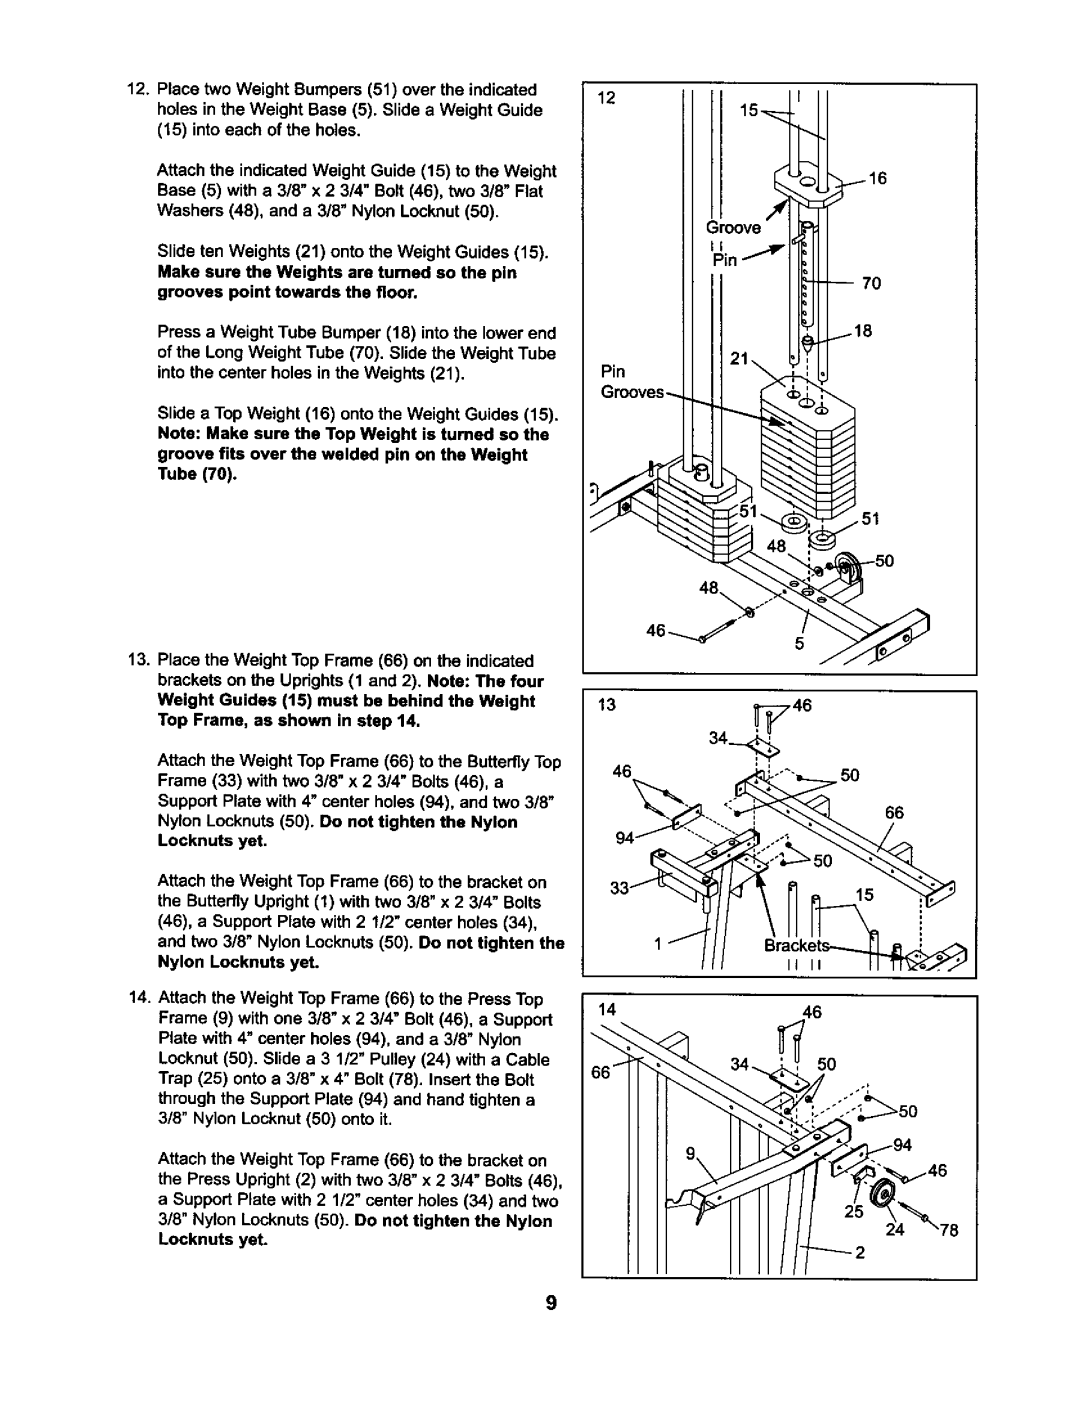
12.Place two Weight Bumpers (51) over the indicated holes in the Weight Base (5). Slide a Weight Guide
(15)into each of the holes.
Attach the indicated Weight Guide (15) to the Weight Base (5) with a 3/8" x 2 3/4" Bolt (46), two 3/8" Flat
Washers (48), and a 3/8" Nylon Locknut (50).
Slide ten Weights (21) onto the Weight Guides (15). Make sure the Weights are turned so the pin grooves point towards the floor.
Press a Weight Tube Bumper (18) into the lower end of the Long Weight Tube (70). Slide the Weight Tube into the center holes in the Weights (21).
Slide a Top Weight (16) onto the Weight Guides (15). Note: Make sure the Top Weight is tumed so the groove fits over the welded pin on the Weight Tube (70).
13.Place the Weight Top Frame (66) on the indicated brackets on the Uprights (1 and 2). Note: The four
Weight Guides (15) must be behind the Weight Top Frame, as shown in step 14.
Attach the Weight Top Frame (66) to the ButterflyTop Frame (33) with two 3/8" x 2 3/4" Bolts(46), a Support Plate with 4" center holes (94), and two 3/8"
Nylon Locknuts (50). Do not tighten the Nylon Locknuts yet.
Attach the Weight Top Frame (66) to the bracket on the ButterflyUpright (1) with two 3/8" x 2 3/4" Bolts (46), a Support Plate with 2 1/2" center holes (34), and two 3/8" Nylon Locknuts (50). Do not tighten the Nylon Locknuts yet.
14.Attach the Weight Top Frame (66) to the Press Top Frame (9) with one 3/8" x 2 3/4" Bolt (46), a Support Plate with 4" center holes (94), and a 3!8" Nylon Locknut (50). Slide a 3 1/2" Pulley (24) with a Cable
Trap (25) onto a 3/8" x 4" Bolt (78). Insert the Bolt through the Support Plate (94) and hand tighten a 3/8" Nylon Locknut (50) onto it.
Attach the Weight Top Frame (66) to the bracket on the Press Upright (2) with two 3/8" x 2 3/4" Bolts (46), a Support Plate with 2 1/2" center holes (34) and two
3/8" Nylon Locknuts (50). Do not tighten the Nylon Locknuts yet.
12
Pin
51
5
1334_46
46,. _¢U-o'_'=_.50
9