DEALER SERVICE Cont’d

Assemble Blade Spindle

IMPORTANT

Bearing adjustment is set by pressing sleeve against bearing cone until proper adjustment is attained.

Improper positioning of seals can cause seal failure.

1.Bearing cups and cones are designed to work together. It is important to position them so the bear- ing cone taper mates with bearing cup taper.

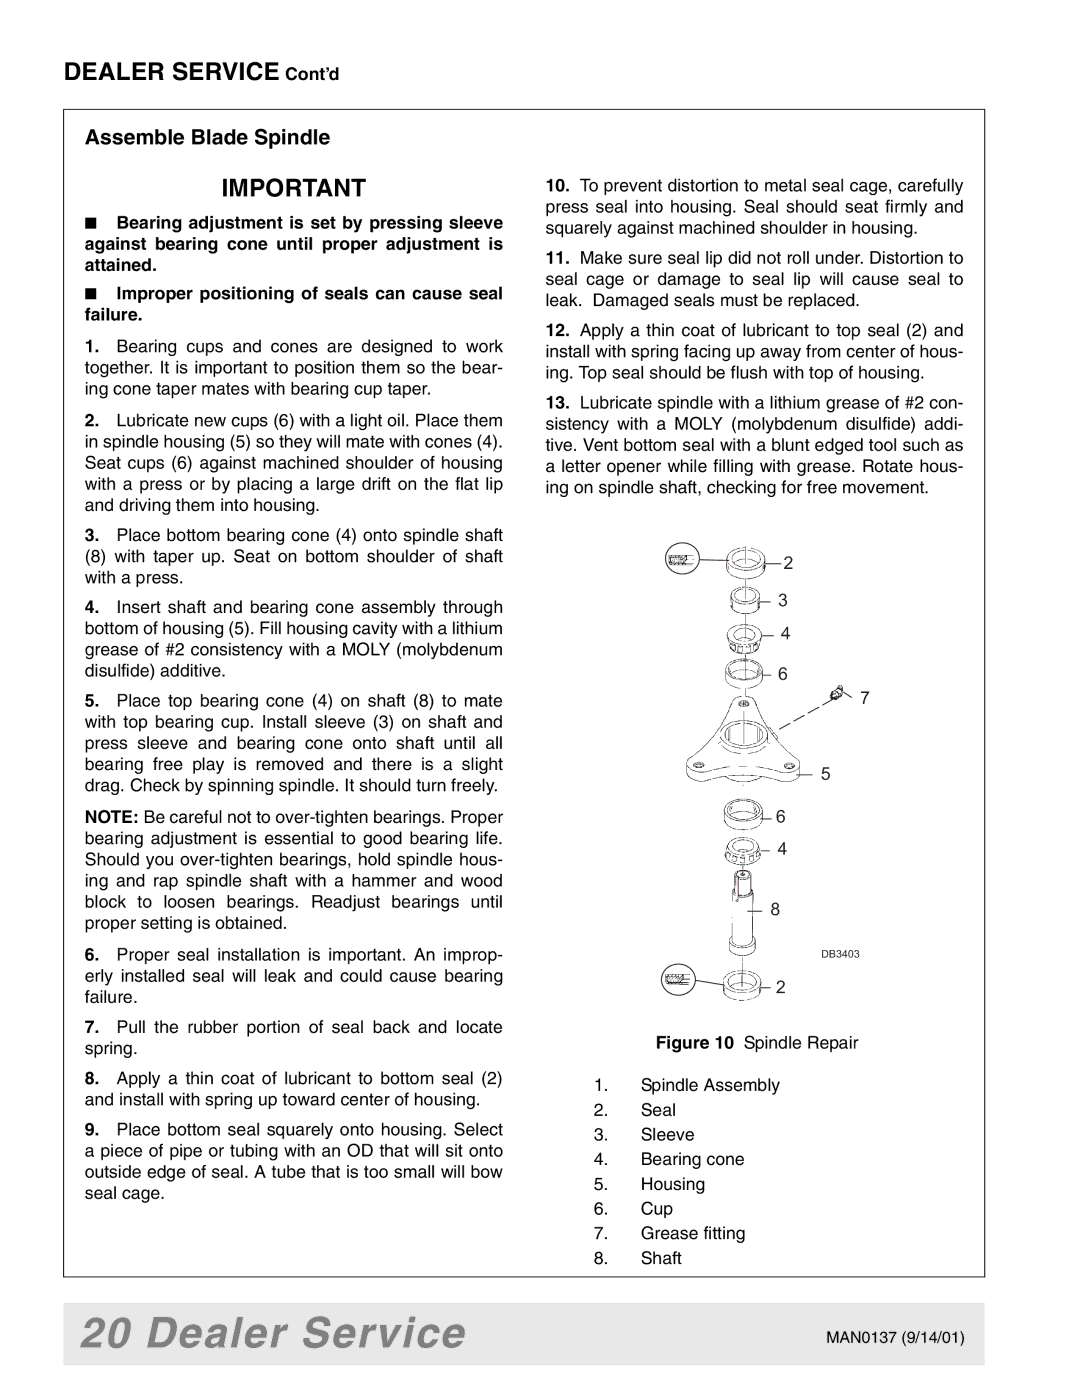
2.Lubricate new cups (6) with a light oil. Place them in spindle housing (5) so they will mate with cones (4). Seat cups (6) against machined shoulder of housing with a press or by placing a large drift on the flat lip and driving them into housing.

3.Place bottom bearing cone (4) onto spindle shaft

(8) with taper up. Seat on bottom shoulder of shaft with a press.

4.Insert shaft and bearing cone assembly through bottom of housing (5). Fill housing cavity with a lithium grease of #2 consistency with a MOLY (molybdenum disulfide) additive.

5.Place top bearing cone (4) on shaft (8) to mate with top bearing cup. Install sleeve (3) on shaft and press sleeve and bearing cone onto shaft until all bearing free play is removed and there is a slight drag. Check by spinning spindle. It should turn freely.

NOTE: Be careful not to over-tighten bearings. Proper bearing adjustment is essential to good bearing life. Should you over-tighten bearings, hold spindle hous- ing and rap spindle shaft with a hammer and wood block to loosen bearings. Readjust bearings until proper setting is obtained.

6.Proper seal installation is important. An improp- erly installed seal will leak and could cause bearing failure.

7.Pull the rubber portion of seal back and locate spring.

8.Apply a thin coat of lubricant to bottom seal (2) and install with spring up toward center of housing.

9.Place bottom seal squarely onto housing. Select a piece of pipe or tubing with an OD that will sit onto outside edge of seal. A tube that is too small will bow seal cage.

10.To prevent distortion to metal seal cage, carefully press seal into housing. Seal should seat firmly and squarely against machined shoulder in housing.

11.Make sure seal lip did not roll under. Distortion to seal cage or damage to seal lip will cause seal to leak. Damaged seals must be replaced.

12.Apply a thin coat of lubricant to top seal (2) and install with spring facing up away from center of hous- ing. Top seal should be flush with top of housing.

13.Lubricate spindle with a lithium grease of #2 con- sistency with a MOLY (molybdenum disulfide) addi- tive. Vent bottom seal with a blunt edged tool such as a letter opener while filling with grease. Rotate hous- ing on spindle shaft, checking for free movement.

2

3

4

6

7

5

6

4

8

DB3403

2

Figure 10 Spindle Repair

1.Spindle Assembly

2.Seal

3.Sleeve

4.Bearing cone

5.Housing

6.Cup

7.Grease fitting

8.Shaft

20 Dealer Service

MAN0137 (9/14/01)


Page 22
Image 22
Woods Equipment 7000, 7192, 7194, 7195, 7200, 7205 manual Dealer Service Cont’d, Assemble Blade Spindle

7000, 7192, 7194, 7195, 7200, 7205 specifications

Woods Equipment has long been a pioneer in the agricultural and landscaping industry, consistently delivering high-quality implements designed to enhance productivity and efficiency. The Woods Equipment 7000 series and its notable models—7192, 7194, 7195, 7200, and 7205—represent the culmination of innovative technology, rugged design, and operator comfort.

The Woods 7000 series is renowned for its versatility and durability, making it an ideal choice for both large-scale agricultural applications and smaller landscaping tasks. One of the most significant features across these models is their robust build quality, designed to withstand the rigors of daily use in various environments. The heavy-duty construction ensures longevity and reliability, minimizing downtime and maintenance needs.

The 7192 and 7194 models are particularly noted for their high-performance capabilities. Both include advanced hydraulic systems that provide powerful lift and speed, allowing operators to tackle even the toughest tasks with ease. The 7195 model takes this a step further by incorporating an innovative mount system that enhances compatibility with a range of tractors, ensuring seamless operation.

The Woods 7200 and 7205 models focus on precision and ease of use. They come equipped with features such as adjustable cutting heights and user-friendly controls that allow operators of all skill levels to manage their equipment effectively. The enhanced maneuverability of these models is complemented by high-quality tires that provide excellent traction on varied terrains.

All models feature cutting-edge technology aimed at improving overall efficiency. The use of high-strength materials contributes to reduced weight, which can enhance fuel efficiency without sacrificing performance. Additionally, many of these machines are designed to facilitate quick attachment changes, allowing users to switch implements in minutes, thus saving time and increasing productivity.

Woods Equipment also prioritizes operator comfort. Ergonomically designed controls and comfortable seating options minimize fatigue during long working hours. These thoughtful features ensure that users can focus on the task at hand rather than being distracted by discomfort.

In summary, the Woods Equipment 7000 series, including the 7192, 7194, 7195, 7200, and 7205 models, represents an exceptional blend of power, versatility, and user-centric design. These implements demonstrate Woods Equipment's commitment to quality and innovation, making them a mainstay for professionals in agriculture and landscaping alike.