58025 Hose Kit
Verify Control Movements |
|
|
|
|
|
| ||
|
|
|
|
|
| |||
1. | Mount loader to tractor: Remove mount pins |
|
|
|
|
|
| |
| from loader uprights. Align tractor with loader and |
|
|
|
|
|
| |
| slowly drive tractor into loader. Shut off tractor. |
|
|
|
|
|
| |
2. | Connect loader feedline hoses to tractor remote |
|
|
|
|
|
| |
| control couplers. See Figure 9. |
|
|
|
|
|
| |
|
|
|
|
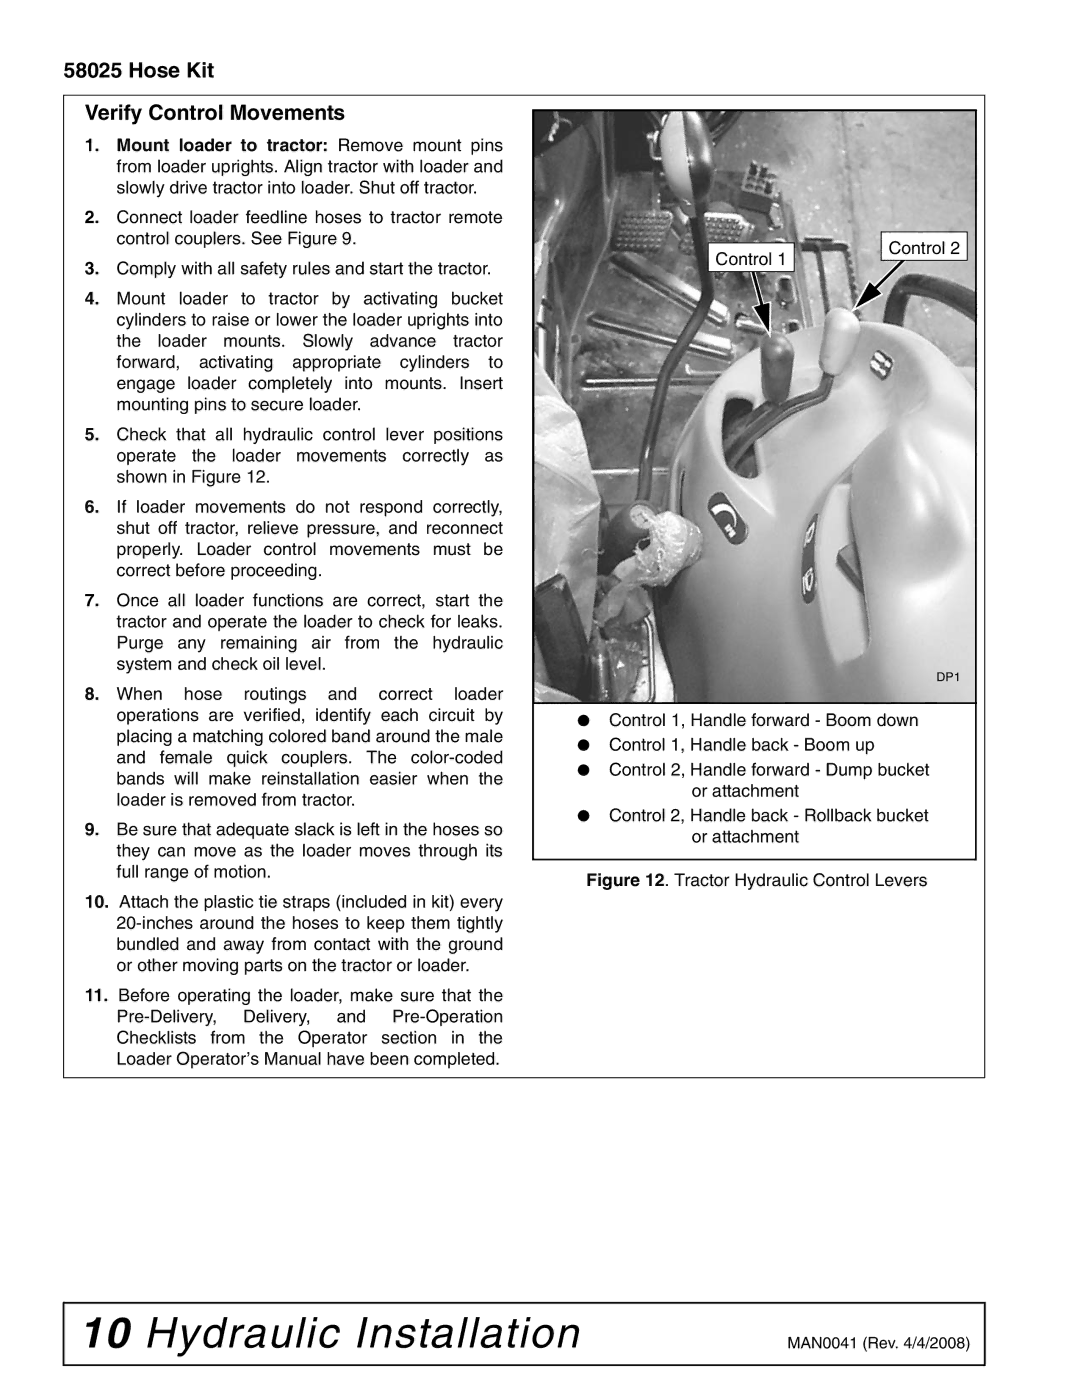
| Control 2 |
| ||
3. |
|
|
| Control 1 |
|
| ||
Comply with all safety rules and start the tractor. |
|
|
|
|
| |||
|
|
|
|
|
| |||
|
|
|
|
|
| |||
4. | Mount loader to tractor by activating bucket |
|
|
|
|
|
| |
| cylinders to raise or lower the loader uprights into |
|
|
|
|
|
| |
| the loader mounts. Slowly advance tractor |
|
|
|
|
|
| |
| forward, activating appropriate cylinders to |
|
|
|
|
|
| |
| engage loader completely into mounts. Insert |
|
|
|
| CM1570 | ||
| mounting pins to secure loader. |
|
|
|
| |||
|
|
|
|
|
|
| ||
5. | Check that all hydraulic control lever positions |
|
|
|
|
|
| |
| operate the loader movements correctly as |
|
|
|
|
|
| |
| shown in Figure 12. |
|
|
|
|
|
| |
6. | If loader movements do not respond correctly, |
|
|
|
|
|
| |
| shut off tractor, relieve pressure, and reconnect |
|
|
|
|
|
| |
| properly. Loader control movements must be |
|
|
|
|
|
| |
| correct before proceeding. |
|
|
|
|
|
| |
7. | Once all loader functions are correct, start the |
|
|
|
|
|
| |
| tractor and operate the loader to check for leaks. |
|
|
|
|
|
| |
| Purge any remaining air from the hydraulic |
|
|
|
|
|
| |
| system and check oil level. |
|
|
|
| DP1 | ||
8. | When hose routings and correct loader |
|
|
|
| |||
|
|
|
|
|
| |||
| operations are verified, identify each circuit by | ● | Control 1, Handle forward - Boom down | |||||
| placing a matching colored band around the male | |||||||
| ● | Control 1, Handle back - Boom up |
|
| ||||
| and female quick couplers. The |
|
| |||||
| ● | Control 2, Handle forward - Dump bucket | ||||||
| bands will make reinstallation easier when the | |||||||
|
| or attachment |
|
| ||||
| loader is removed from tractor. |
|
|
| ||||
| ● | Control 2, Handle back - Rollback bucket | ||||||
9. | Be sure that adequate slack is left in the hoses so | |||||||
| or attachment |
|
| |||||
| they can move as the loader moves through its |
|
|
| ||||
|
|
|
|
|
|
| ||
| full range of motion. | Figure 12. Tractor Hydraulic Control Levers | ||||||
|
| |||||||
10.Attach the plastic tie straps (included in kit) every
11.Before operating the loader, make sure that the
10 Hydraulic Installation | MAN0041 (Rev. 4/4/2008) |
|
|