OWNERS MANUAL
Page
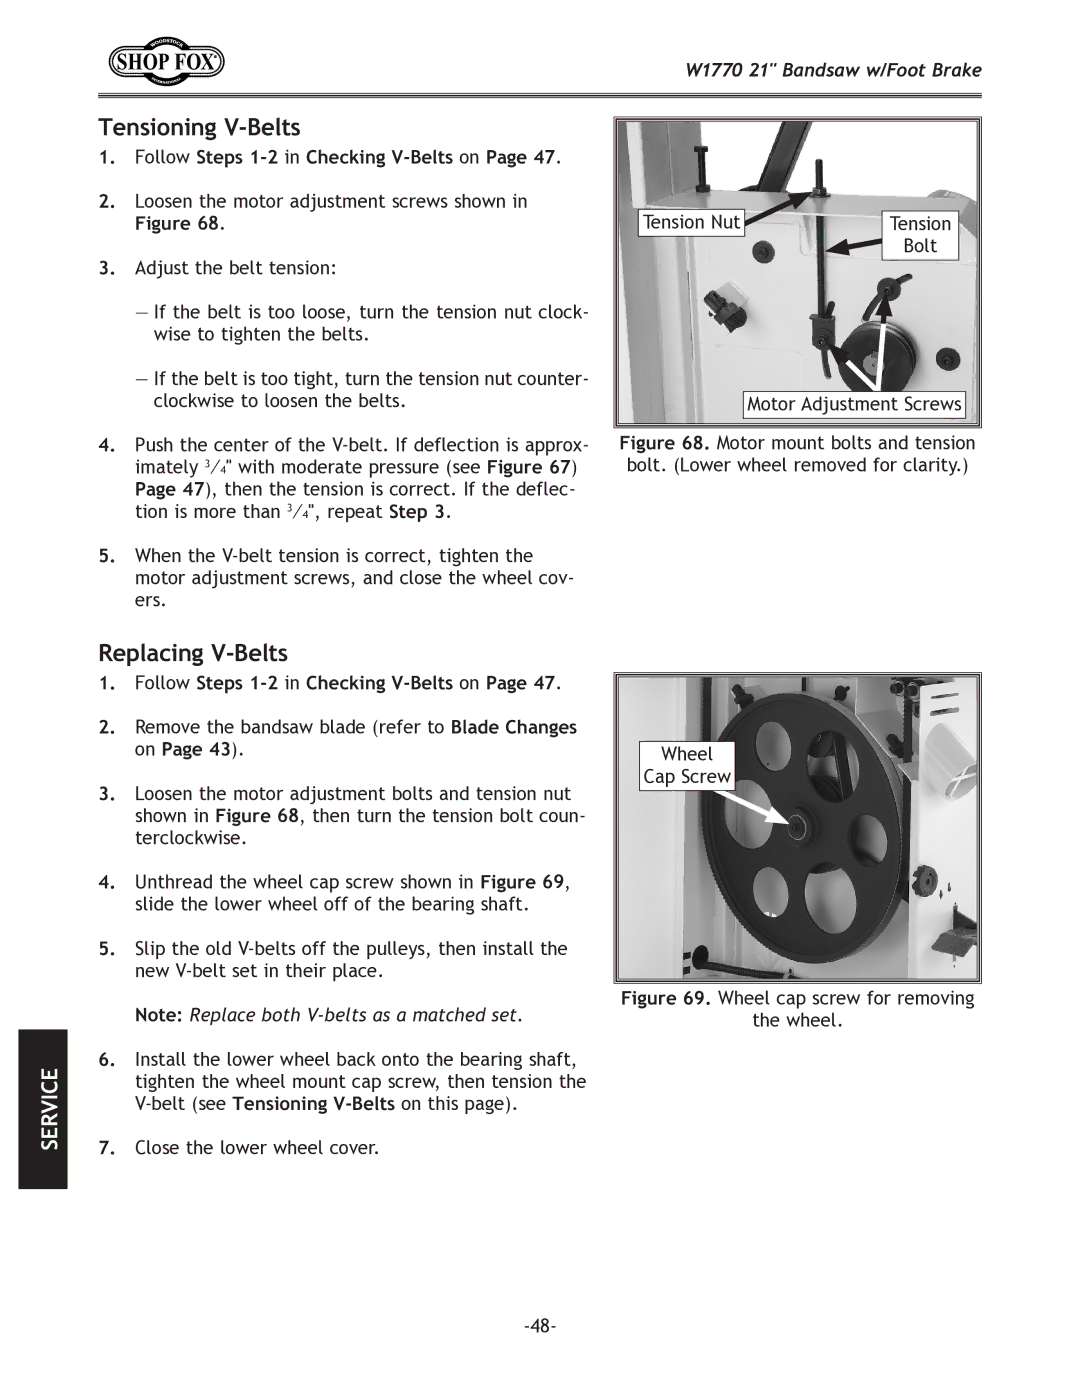
Contents
Woodstock Technical Support
Functional Overview
Machine Specifications
W1770 21 Bandsaw w/Foot Brake
Controls and Features
Safety Safety
Always Lock Mobile Bases if Used Before Operating Machinery
Additional Safety for Bandsaws
Use push blocks when necessary
Use push sticks whenever possible
Extension Cords
Electrical Specifications
220V Operation
Description Qty
Items Needed for Setup
Unpacking
Hardware and Tools
Inventory
Box Inventory Figure Qty
Machine Placement
Cleaning Machine
Lifting & Moving
Lifting the bandsaw 2x4
Mounting to Shop Floor
Bolting to Concrete Floors
Guide Post Handwheel
To install the fence, do these steps
Fence
Changes in the blade tension may change the blade tracking
Blade Tracking
To center track the blade, do these steps
Positive Stop
To set the positive stop, do these steps
Dust Collection
To connect the dust collection hoses, do these steps
Test Run
To test run the machine, do these steps
Resetting the switch
To tension the bandsaw blade, do these steps
Adjusting Blade Guide Bearings on
Tensioning Blade
Adjusting Blade Guide Bearings
To adjust the upper blade guides, do these steps
Adjusting Support Bearings
To adjust the upper support bearing, do these steps
Blade aligned 0.016 away from Bearing edge
To adjust the lower support bearing, do these steps
Lower support bearing controls
Aligning Table
Cap screws securing table to Trunnion
Aligning Fence
Cap screws securing rail to
To calibrate the pointer, do these steps
Calibrating Fence Pointer
Calibrating Miter Gauge
To calibrate the miter gauge, do these steps
To install the resaw fence, do these steps
Enough to slide on the resaw fence
Control Panel
General
Basic Controls
Front Controls Figure
Rear Controls Figure
Workpiece Inspection
Cutting wood with minor Warping
Bandsaw is capable of performing the following cuts
Cutting Overview
Basic Cutting Tips
Foot Brake
Guide Post
Correcting Blade Lead
Fine Tune Tracking
Blade Lead
Aligning Table on Page 27 and Aligning Fence on
To shift the table, do these steps
To tilt the table, do these steps
Table Tilt
Rip Cutting
To make a rip cut, do these steps
To make a 90˚ crosscut, do these steps
Crosscutting
Resawing
To resaw a workpiece, do these steps
To complete a stacked cut, do these steps
Cutting Curves
Stacked Cuts
Tooth Style
Blade Length
Blade Width
Blade Breakage
Tooth Pitch
Blade Care
Most common causes of blade breakage are
To replace a blade, do these steps
Blade Changes
To remove a blade, do these steps
Brushes
Cleaning
Table & Base
Lubrication
Lubricant Frequency Quantity
Tension Adjustment Assembly
Blade Guide Rack and Pinion
To lubricate the trunnion, do these steps
Table Tilt Rack and Pinion Assembly
Trunnion
Tools Needed
Checking and Tensioning Belts
Checking V-Belts
Follow Steps 1-2 in Checking V-Belts on
Tensioning V-Belts
Replacing V-Belts
Adjusting Tension Lever
To adjust the tension lever, do these steps
Adjusting Wheel Blade Brushes
To adjust the brushes, do these steps
To replace the brake shoe
Replacing Brake Shoe
Components and Hardware Needed
Follow Steps 1-4 in Replacing V-Belts on
Aligning Wheels
Checking Coplanarity
Shimming Upper Wheel
Gauge
Adjusting Lower Wheel
To adjust the lower wheel, do these steps
Power supply terminal box
Electrical Components
See Figure
Wiring Diagram
See ,
Troubleshooting
Motor & Electrical
Machine Operations
Cutting Tips on
Parts
Labels & Cosmetic Parts
Blade Guides-Cover Breakdown
Guide Post-Table Tilt Breakdown
Parts
Table-Trunnion Breakdown
Body Breakdown
Body Parts List
Capacitor Cover
Motor Cord 12AWG X 3C
Resaw Fence Breakdown
Warranty Registration
Comments
Woodstock international inc. p.o. box Bellingham, wa
Warranty