Freedom HF InvChg Owners Guide.book Page 12 Tuesday, April 29, 2014 12:10 PM
Freedom Inverter/Charger Configuration
To change the charger’s charging current setting:
By default the charging current is set to for Freedom HF 1000, for Freedom HF 1055, and for Freedom HF 1500/1800 models.
1.Press and hold the Inverter Power button for five seconds. The LED screen will flash “” intermittently.
2.Press the Select button once.
The LED screen will display the present charging current setting.
Example, “” for a 40 A setting.
3.Press the Select button again to change to the next setting.
The LED screen shows the next setting. Example, “” for a 2 A setting.
4.Continue pressing the Select button to cycle through each of the available settings – “”, “”, “”, and “”, such as in the case of Freedom HF 1800, until you reach the desired setting.
5.Press and hold the Select button for five seconds to make the setting permanent.
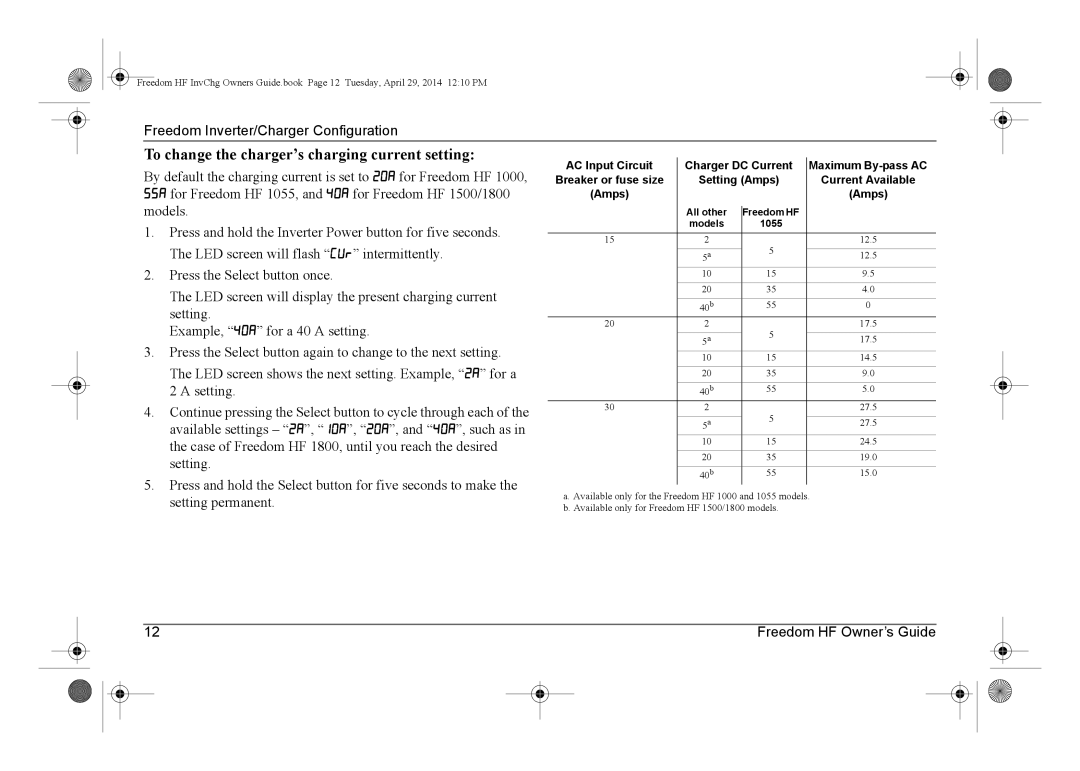
AC Input Circuit | Charger DC Current | Maximum | ||
Breaker or fuse size | Setting (Amps) | Current Available | ||
(Amps) |
|
|
| (Amps) |
| All other |
| Freedom HF |
|
|
|
| ||
| models |
| 1055 |
|
|
|
|
|
|
15 | 2 |
| 5 | 12.5 |
| 5a |
| 12.5 | |
|
|
| ||
| 10 |
| 15 | 9.5 |
| 20 |
| 35 | 4.0 |
| 40b |
| 55 | 0 |
20 | 2 |
| 5 | 17.5 |
| 5a |
| 17.5 | |
|
|
| ||
| 10 |
| 15 | 14.5 |
| 20 |
| 35 | 9.0 |
| 40b |
| 55 | 5.0 |
30 | 2 |
| 5 | 27.5 |
| 5a |
| 27.5 | |
|
|
| ||
| 10 |
| 15 | 24.5 |
| 20 |
| 35 | 19.0 |
| 40b |
| 55 | 15.0 |
a.Available only for the Freedom HF 1000 and 1055 models.
b.Available only for Freedom HF 1500/1800 models.
12 | Freedom HF Owner’s Guide |