AUTO SETUP (IntelliBeam)

Installing the IntelliBeam microphone

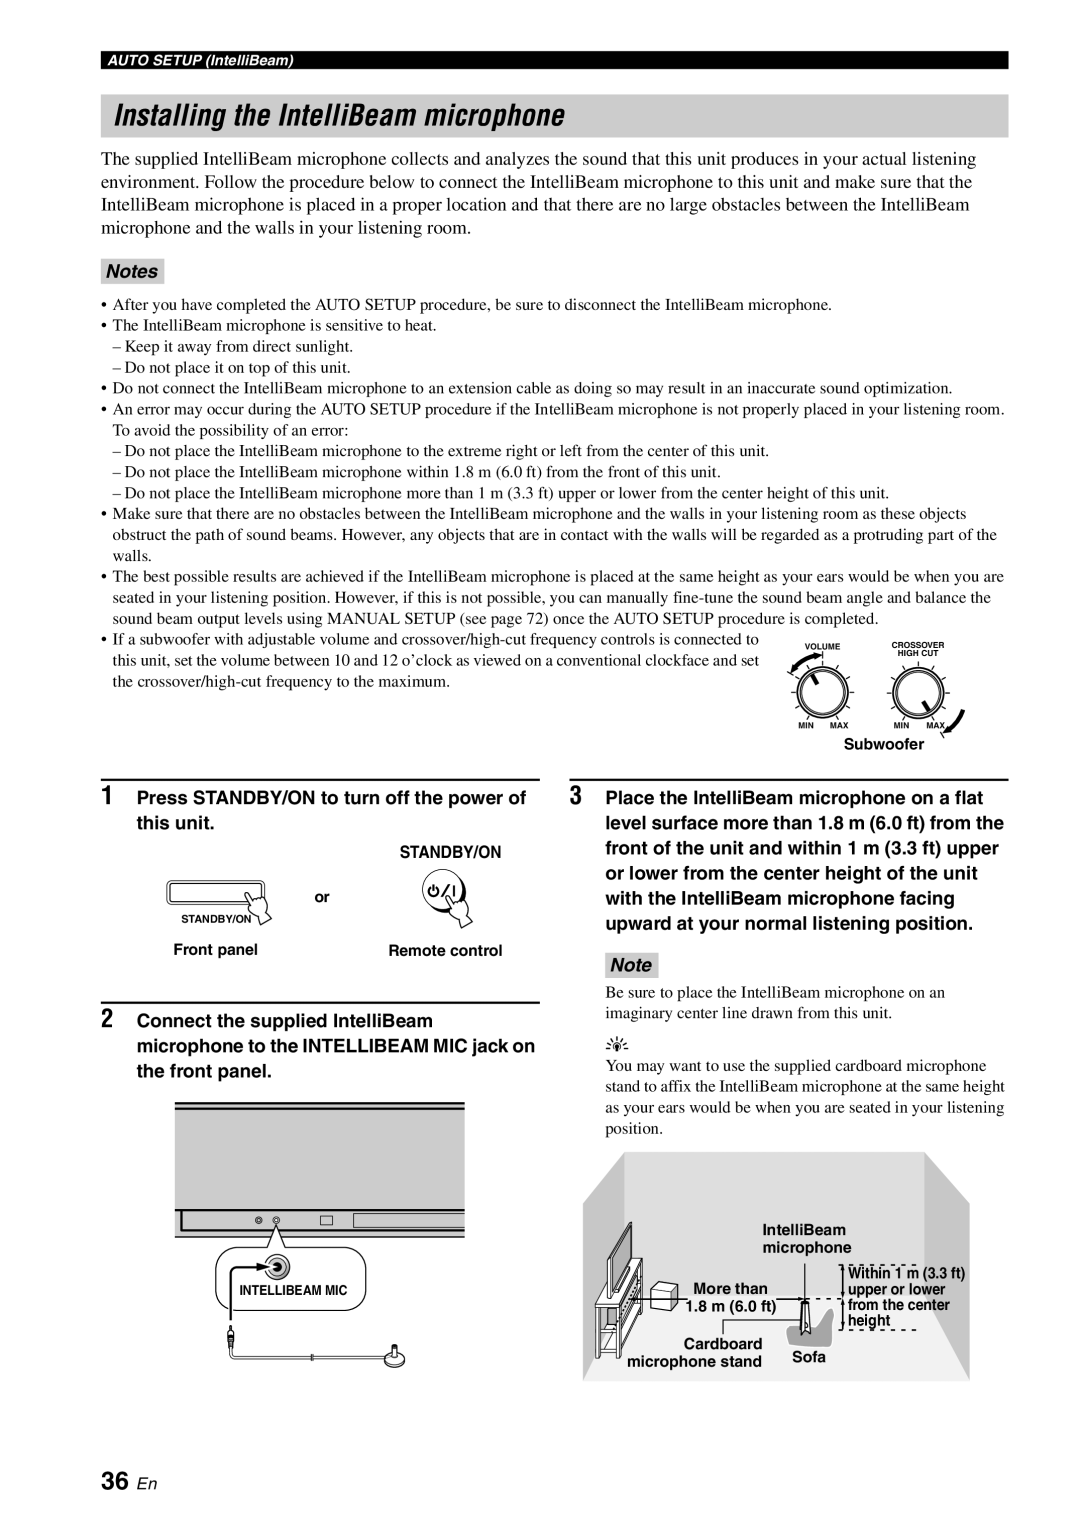
The supplied IntelliBeam microphone collects and analyzes the sound that this unit produces in your actual listening environment. Follow the procedure below to connect the IntelliBeam microphone to this unit and make sure that the IntelliBeam microphone is placed in a proper location and that there are no large obstacles between the IntelliBeam microphone and the walls in your listening room.

Notes

After you have completed the AUTO SETUP procedure, be sure to disconnect the IntelliBeam microphone.

The IntelliBeam microphone is sensitive to heat.

Keep it away from direct sunlight.

Do not place it on top of this unit.

Do not connect the IntelliBeam microphone to an extension cable as doing so may result in an inaccurate sound optimization.

An error may occur during the AUTO SETUP procedure if the IntelliBeam microphone is not properly placed in your listening room. To avoid the possibility of an error:

Do not place the IntelliBeam microphone to the extreme right or left from the center of this unit.

Do not place the IntelliBeam microphone within 1.8 m (6.0 ft) from the front of this unit.

Do not place the IntelliBeam microphone more than 1 m (3.3 ft) upper or lower from the center height of this unit.

Make sure that there are no obstacles between the IntelliBeam microphone and the walls in your listening room as these objects obstruct the path of sound beams. However, any objects that are in contact with the walls will be regarded as a protruding part of the walls.

The best possible results are achieved if the IntelliBeam microphone is placed at the same height as your ears would be when you are seated in your listening position. However, if this is not possible, you can manually fine-tune the sound beam angle and balance the sound beam output levels using MANUAL SETUP (see page 72) once the AUTO SETUP procedure is completed.

• If a subwoofer with adjustable volume and crossover/high-cut frequency controls is connected to

VOLUME

CROSSOVER

this unit, set the volume between 10 and 12 o’clock as viewed on a conventional clockface and set


HIGH CUT


the crossover/high-cut frequency to the maximum.


MIN MAX

MIN MAX


Subwoofer

1Press STANDBY/ON to turn off the power of this unit.


STANDBY/ON


or

STANDBY/ON


Front panel

Remote control

2Connect the supplied IntelliBeam microphone to the INTELLIBEAM MIC jack on the front panel.

INTELLIBEAM MIC

3Place the IntelliBeam microphone on a flat level surface more than 1.8 m (6.0 ft) from the front of the unit and within 1 m (3.3 ft) upper or lower from the center height of the unit with the IntelliBeam microphone facing upward at your normal listening position.

Note

Be sure to place the IntelliBeam microphone on an imaginary center line drawn from this unit.

y

You may want to use the supplied cardboard microphone stand to affix the IntelliBeam microphone at the same height as your ears would be when you are seated in your listening position.

IntelliBeam microphone

More than

Within 1 m (3.3 ft)

upper or lower

1.8 m (6.0 ft)

from the center


height

Cardboard

Sofa

microphone stand

36 En

Page 38
Image 38
Yamaha YSP-3000 Installing the IntelliBeam microphone, 36 En, Press STANDBY/ON to turn off the power of this unit

YSP-3000 specifications

The Yamaha YSP-3000 is a revolutionary digital sound projector that has carved a niche for itself in the realm of home theater audio systems. Launched as a versatile sound solution, the YSP-3000 integrates cutting-edge technology to deliver an immersive audio experience that mimics that of traditional multi-speaker surround sound systems.

One of the main features of the YSP-3000 is its unique Digital Sound Projector technology. It utilizes a series of miniature speakers arranged in an array to create a broad sound stage. This allows the YSP-3000 to project sound around the room, simulating the effect of surround sound without the need for additional speakers positioned throughout the space. The system employs sophisticated digital signal processing, which fine-tunes the audio output to achieve optimal acoustics tailored to the room’s characteristics.

An impressive characteristic of the YSP-3000 is the inclusion of 7-channel surround sound capabilities. This configuration ensures that users receive an immersive audio experience with clear dialogue and rich sound effects, ideal for movies, music, and gaming. The built-in subwoofer further enhances the low-end frequencies, providing deep bass that adds a layer of excitement to any audio playback.

The YSP-3000 also features Yamaha’s proprietary YSP sound field processing, which allows users to choose from multiple sound field modes to match their audio content. From gaming to music listening, users can select the option that best complements their experience. The system also supports various audio codecs including Dolby Digital and DTS, ensuring compatibility with a wide range of media formats.

Connectivity options are another strong point of the YSP-3000. It includes multiple HDMI inputs, enabling seamless integration with various devices such as Blu-ray players and gaming consoles. Additionally, it features optical and analog audio inputs, making it versatile enough for older audio devices. The included remote control offers intuitive navigation through settings and modes, making operation easy for users of all levels.

Overall, the Yamaha YSP-3000 stands out as a user-friendly and feature-rich solution for anyone looking to elevate their home theater audio experience without the hassle of multiple speakers and complex wiring. With innovation at its core, the YSP-3000 delivers a sound experience that is both convenient and captivating.