Husqvarna 15V2s AWD manual Checking the tyre pressure, Checking the engine’s cooling air intake

Page 26

Maintenance

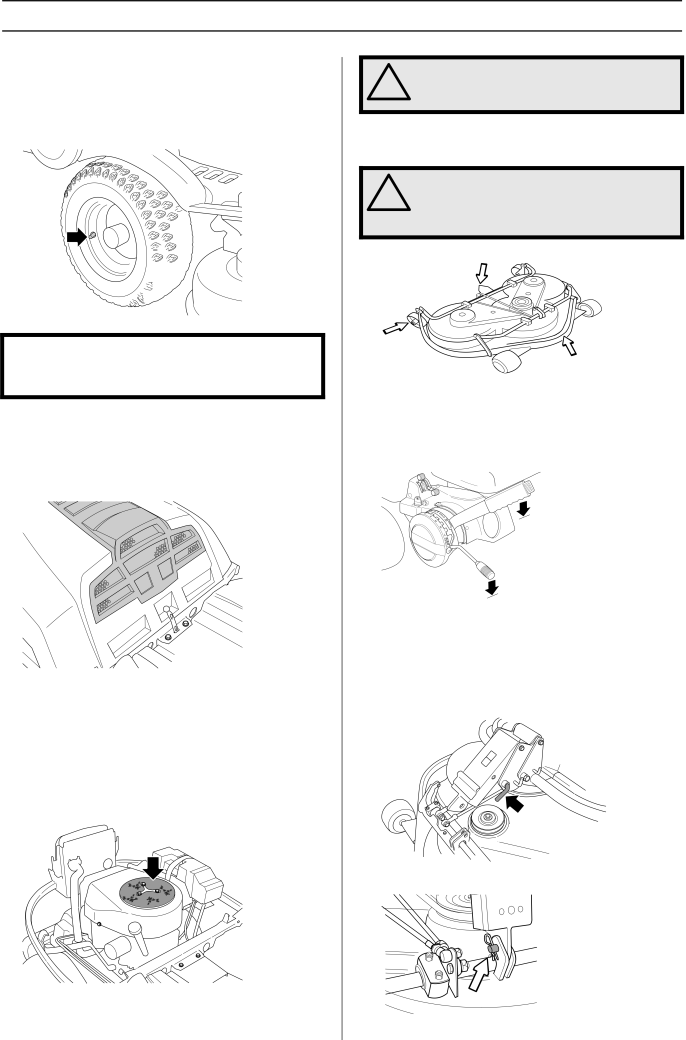
Checking the tyre pressure

The tyre pressure should be 60 kPa (0.6 kp/cm2/8.5 PSI) all round. To improve driving the pressure on the rear tyres can be reduced to 40 kPa (0.4 kp/cm2/5.6 PSI). The maximum tyre pressure is 100 kPa (1,0 kp/cm2/14 PSI).

IMPORTANT INFORMATION

Different tyre pressures on the front tyres will result in the blades cutting the grass at different heights.

Checking the engine’s cooling air intake

Clean the air intake grille in the engine cover behind the driver’s seat.

Open the engine cover.

Check that the cooling intake is free from leaves, grass and dirt.

Check the air duct, located on the inside of the engine cover, ensure it is clean and does not rub against the cooling air intake.

A blocked cooling intake will interfere with the cooling of the engine, which can damage the engine.

WARNING! The cooling air intake rotates

!when the engine is running. Mind your fingers.

Fitting the cutting head

WARNING! Wear protective glasses when

!fitting the cutting unit. The spring which tensions up the belt may break and cause personal injury.

3

1

2

1Place the Rider on a flat surface and apply the parking brake.

2Check that the lever for setting the cutting height is in the lowest position and that the lifting lever for the cutting unit is in mowing position.

Make sure the support wheels (1) are fitted to the cutting unit.

3Grasp the handle at the front or hold the frame of the cutting unit (2) and slide the unit underneath the rider mower.

4Check that the pin is fitted correctly.

5Insert the bolt and secure it with a locking pin.

26 – English

Image 26
Contents Rider 15V2 Rider 15V2 AWD Rider 15V2s AWD EnglishContents After the first 8 hours Service journalPre-delivery service Driving and transport on public roads IntroductionDear Customer TowingGood service Serial NumberKEY to Symbols SymbolsBrake Starting instructions Insure your Rider Safety InstructionsSafety instructions General useDriving on slopes This is what you doMaintenance ChildrenTransport What is WHAT? Location of the controlsPresentation Lifting lever for the cutting unit Cutting height adjustment leverCutting unit LightsRelease lever Exercise care and refuel outdoors see safety instructionsFuelling Release lever Rider 15V2 AWDStart the engine DrivingBefore starting Driving the Rider Starting the engine with a weak batteryConnecting the jump leads Remove the cables in the reverse orderOther objects which can be thrown out by the blades Cutting tipsStop the engine Maintenance Maintenance scheduleRemoving of the machine hoods CleaningChecking and adjusting the steering wires Checking and adjusting of throttle wire Adjusting the parking brake RiderAdjusting the parking brake Rider 15V2 AWD Can result in reduced braking abilityReplacing the air filter Checking and adjusting the choke wireReplacement of fuel filter Cool before starting to replace the air filterIgnition system Check the level of the battery acid Dry-charged batteryChecking the fuel pump’s air filter Replacing the spark plugCheck the safety system Replacing the light bulbs Main fuseChecking the engine’s cooling air intake When the engine is running. Mind your fingersChecking the tyre pressure Fitting the cutting headRemoving the cutting unit Trapping your handReplacing the cutting unit belts Adjusting the parallelism of the cutting unitChecking the cutting unit’s parallelism Service position for the cutting unit Placing in the service positionRemoving the BioClip plug Restoring from service positionChecking the blades Changing the oil filter LubricationChecking the engine’s oil level Replacing the engine oilGeneral lubrication Lubricating the belt adjusterChecking the transmission oil level Troubleshooting schedule Problem ProcedureWinter storage ServiceStorage GuardTechnical data EC-declaration of conformity Applies to Europe only Page ´z+S!r¶6H¨ Page 1151018-26 ´z+S!r¶6H¨ ´z+S!r¶6H¨