Kodak i30 / i40 manual Manager, Configuring functions

Page 27

Kodak Button

Manager

Configuring functions

Kodak Button Manager allows you to assign an associated application with the numbers (1 through 9) displayed in the function window on the scanner. Once the numbers are assigned, you can launch scanning applications and utilities by using the Start button on the control panel. Up to 9 different applications can be launched.

After the scanner, software drivers, and application software are properly installed and the PC has been rebooted, a scanner icon will be displayed on the system tray.
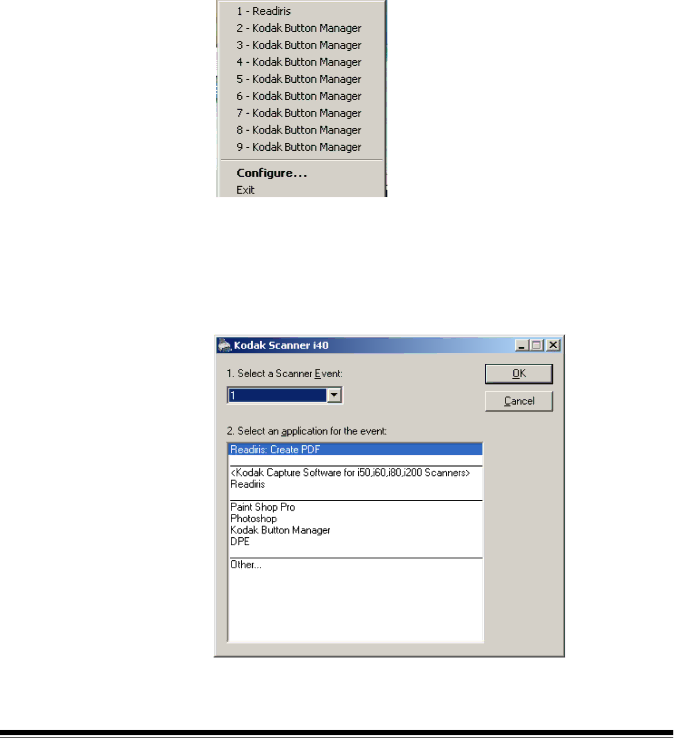
Click on the scanner icon to display a listing of the predefined button assignments.

You can click on one of the functions to launch the application or you can select Configure to assign or reassign a function.

The Configuration dialog box allows you to set or change the applications associated with the function number. When you select Configure from the Kodak Button Manager menu, the Configuration dialog box will be displayed.

Select a Scanner Event — select the number (1 through 9) that you want to assign an application to.

24

A-61512 May 2006

Image 27
Contents User’s Guide Contents Maintenance Introduction Scanner features Safety information Safety and regulatoryAgency approvals EMC statements United StatesJapan European Union Power systemAcoustic emission ConnectionWhat’s in the box System requirements Getting StartedAttaching the input tray Installing the Kodak Driver Software Select Install Scanner SoftwareAttaching the output tray and special document feeder Page Page Select USB Test United States Canada China power cord Cable Connecting the USBPage Software Installing applicationFront view Scanner componentsBack view Inside viewTurning the scanner on and off Adjusting the input and output traysFront-feed minimum/center alignment 6.35 x 5.08 cm 2.5 x 2.0 Start and stop scanningVerifying your scanner installation Page Page Application software Viewing test imagesManager Configuring functionsPage Configuring Readiris InstallingSelect Scanner Model Page Numbers Assigning functionUsing function numbers Scanning your documents Scanning documents using the special document feeder Overview Common termsBi-tonal or Binary black-and-white Color Making cameraSelections Example 1 scanning a two-sided color document both sidesStarting the Scan Validation Tool Scan Validation Tool dialog box Using the Twain Datasource Kodak Scanner Properties dialog boxButtons on the Kodak Scanner Properties dialog box Imaging tab Page Disabled No Noise Filter Used Dpi 80 Threshold 200 dpi Contrast 100 Page Page Cropping values Paper tabPage 61512 May Page Dropout tab Better, Best, SuperiorRemove Red, Remove Green, Remove Blue Multifeed tab Options tab Tool, via the Twain Datasource Setup tabInfo tab Box Using the Isis DriverScanner Settings dialog Settings dialog boxCamera Settings area Page Page Fixed thresholding ATP disabled Dpi 80 Threshold 20 Contrast Dpi 80 Threshold 100 Contrast More Scanner Settings dialog box Image Control options Black on White polarity White on Black polarity Color Dropout options Options Scanner ControlDialog box Multi-Feed DetectionDefining the Scan area Area Maintenance Cleaning the feed module Cleaning the rollersCleaning the calibration area Module Replacing the feedSupplies and consumables Clearing a document jam Indicator lights and error codesProblem Possible Solution Problem solving61512 May Scanner not working Page Page Testing for a USB Connection\program files\Kodak\Document Imaging\usbtst.exe Your operating system only supports USB SolutionsUSB will not work You do not need to install any additional USB cardsAppendix a Specifications Eastman Kodak Company