AMX Precis SD instruction manual Discovering a System, To discover a system

Page 52

Appendix A – Managing Configuration Files

4.Select XNConnect.

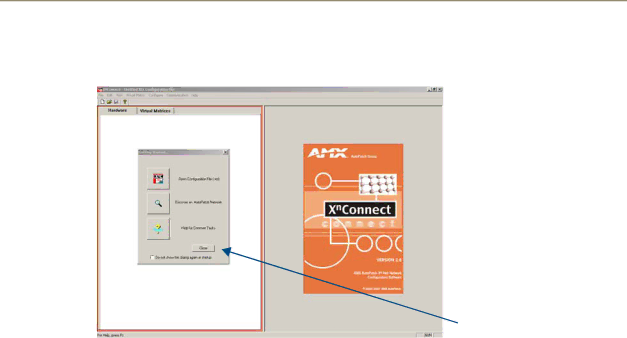
The XNConnect program opens.

Getting Started dialog box

When XNConnect is open, you can do either of the following: Discover the system (recommended); see below.

Open an .xcl file that is compatible with the system (located on the AMX AutoPatch CD); see page 48.

Discovering a System

The discovery process queries the attached system for configuration information and properties, including information regarding assigned signals and virtual matrix (level) definitions. The discovery process may take several minutes to complete.

We recommend disconnecting any third-party control devices from the enclosure’s serial ports before starting the discovery process.

To discover a system:

1.Disconnect any third-party control devices from the enclosure’s CONTROL (DB-9) port.

2.Connect the enclosure to the PC (see page 20).

3.(If not already open) launch XNConnect (see page 46).

4.Open the Communication menu; select Serial Port.

5.Open the Communication menu again; select Change Comm Settings. Check the settings for the selected port (the default is Com 1, baud rate 9600) and adjust if necessary.

6.Optional – Click the Test button to verify that communication has been established with the Precis SD system. Click OK.

7.From the File menu, select Discover System (the discovery may take a few minutes).

8.From the File menu, select Save to save the discovered configuration information as an .xcl file to the PC.

9.From the File menu, select Save As and make a duplicate copy of the file with a new name and save it to the PC. (We strongly recommend making a duplicate copy every time the file is modified.)

The new configuration file is ready to be modified. Whenever changes are made, the new file must be loaded onto the system to implement the changes (see page 54).

Precis SD Instruction Manual

47


Image 52
Contents Precis SD AMX Limited Warranty and Disclaimer Software License and Warranty Agreement Contents Appendix a Managing Configuration Files ESD Warning Important Safety Information & Instructions Information et directives de sécurité importantes Liability Notice Copyright NoticeUsfcc Notice Lithium Batteries Notice Trademark NoticesPage Overview & General Specifications Precis SD FeaturesApplicability Notice Product NotesPrecis SD Control Features Front ViewRear View Components Rear ViewCPU/Control Hardware Input & Output Connectors Power Receptacle & SpecificationsSystem Serial Number Precis SD General Specifications General SpecificationsConfiguration Information & Control Options Front Control PanelAMX Control Devices AMX Control SoftwareBCS Serial Control Protocol Third-Party Controllers Overview & General Specifications General Hazard Precautions Installation & SetupSite Recommendations Unpacking Circuit OverloadingReliable Earthing Grounding Unpacking TipsRack Installation & System Setup Required items for rack installationOptional items for rack installation Installation RecommendationsInstallation Procedure To install and set up a Precis SD system in a rackAdditional Installation Options Attaching External Controllers RS-232 Pin Diagram Attaching Serial ControllersPC Requirements for APControl PC Requirements for BCSChange the enclosure’s settings instead, use XNConnect see Communication Cable Requirements Attaching External XNNet ControllersTo establish a Remote port connection with an XNNet device Signal Types & Connectors Attaching Inputs & OutputsCabling Video Connectors To connect video inputs and outputsWiring Audio Connectors Wiring Sources & DestinationsAttaching Wires To attach stereo audio input and output wiresApplying Power & Startup Power-Up Sequence To apply powerSerial Control Device Startup APControlAPWeb HyperTerminalExecuting a Test Switch Executing a Test SwitchTo execute a test switch using the control panel Control PanelAMX Control Device APControl 3.0 or APWebBCS Commands To disconnect the factory default switch using BCS commandsTo execute a test switch using BCS commands TroubleshootingTechnical Support AMX Contact InformationUltra-Wideband 500 MHz Specifications Signal SpecificationsSync Specifications Standard Audio Specifications Standard Audio Signal SpecificationsPrecis SD Control Panel Operation OverviewAudio Adjust Keys optional Control KeysModes of Operation Virtual Matrices LevelsExecuting & Disconnecting Switches Switching LevelExecuting a Switch To execute a switch selecting input source firstDisconnecting Outputs To execute a switch selecting output destination firstTo disconnect an output Verifying Signal Status To verify the status of a signalExecuting Macros Local Presets Adjusting Output Volume Adjusting AudioTo adjust output volume Adjusting Digital Input Gain To adjust digital input gain to equalize input levelsTo adjust digital input gain Purpose & Uses of Input GainTo lock the control panel Locking & Unlocking the Control PanelTo unlock the control panel Precis SD Control Panel Operation Appendix a Managing Configuration Files Applicability NoticeInstalling & Launching XNConnect To install XNConnect from the AMX AutoPatch CDSystem Requirements To launch XNConnectDiscovering a System To discover a systemOpening an .xcl Configuration File To open an .xcl fileHardware View Navigating the InterfaceVirtual Matrix View Modifying Source & Destination Channel Names Modifying an .xcl Configuration FileTo customize the channel names Setting the Control Panel Password To set the control panel passwordCreating Local Presets Macros To create a new local presetAppendix a Managing Configuration Files Loading an .xcl Configuration File Device Discovery SupportAppendix B Programmer’s Interface for System Diagnostics System Component InformationUsing BCS to Access System Diagnostic Information ExampleSplash Screen Examples Display for v1i1 verbosity 1, componentDisplay for v3i5 verbosity 3, component It’s Your World Take Control