14 EN INDEX
Remote Control | P Recording Mode Button (REC MODE) A pg. 37, 40 |
| Q Display Button (DISPLAY) A pg. 29, 38 |
| |
| R Automatic Satellite Programme Recording Button (SATj) |
| A pg. 51 |
|
|
|
| CABLE/SAT |
| S VPS/PDC Recording Button (VPS/PDCj) A pg. 48 | |
|
|
|
| TV | DVD | V | |
|
|
|
| T Audio Button (AUDIO) A pg. 30 | |||
|
|
|
|
|
| ||
A | OPEN/ |
|
| STANDBY ON | W | U Subtitle Button (SUBTITLE) A pg. 30 | |
| TV AV | TV/CBL/SAT | DVD | ||||
| CLOSE |
| V TV/CABLE/SAT/DVD switch A pg. 22 | ||||
|
|
|
|
|
|
| |
B |
|
| VIDEO |
|
| X | W DVD STANDBY/ON Button (DVDA) |
|
|
|
| X TV/CBL/SAT STANDBY/ON Button (TV/CBL/SATA) | |||
C | HDD |
|
|
| DVD | Y | |
|
|
| A pg. 68 | ||||
|
|
|
|
| TV |
| Y DVD Button* A pg. 26 |
|
|
|
|
|
|
| |
|
|
|
|
|
| Z | * This button will not function during navigation mode or set up mode. |
|
|
|
|
|
| Z TV Volume Buttons (TV8 | |
D |
|
|
|
|
|
| a Programme Buttons (PR |
|
|
|
|
|
|
| b Memo Button (MEMO) A pg. 53, 57 |
|
|
|
|
| PR |
| Mark Button (MARK) A pg. 29 |
|
|
|
|
|
|
| c Programming Button (PROGRAMME) A pg. 47, 49, 50 |
E | CANCEL |
| AUX | MEMO/MARK |
| a | d Edit Button (EDIT) A pg. 53 |
|
|
|
| e Navigation Button (NAVIGATION) A pg. 52 | |||
F |
|
|
|
|
|
| |
|
|
|
|
| b | f Enter Button (ENTER) A pg. 19 | |
G | LIVE |
| DUBBING | EDIT | PROGRAMME | c | g Return Button (RETURN) A pg. 30, 33, 47 |
| h Forward Skip Button (T) A pg. 27, 45 | ||||||
|
|
|
|
| |||
H |
|
| TV |
|
| d | Next Button (NEXT) A pg. 30 |
|
|
|
|
|
| i Forward Search Button (N) A pg. 27, 45 | |
|
|
|
|
|
|
| |
I |
|
|
|
|
| e | Forward Slow Button (SLOW +) A pg. 28 |
| TOP MENU |
| NAVIGATION |
| j Play Button (I) A pg. 26, 42 | ||
J |
|
|
|
|
|
| Select Button (SELECT) A pg. 59 |
|
| ENTER |
|
| k Pause Button (W) A pg. 26, 42 | ||
|
|
|
|
|
| f | l Stop Button (o) A pg. 26, 42 |
K | MENU |
|
|
| RETURN | g | Clear Button (CLEAR) A pg. 35 |
|
|
|
|
| m Skip Search Button (v) A pg. 28, 45 | ||
| PREVIOUS |
| NEXT |
| n Help button (?) A pg. 81 | ||
L |
| h | o One Touch Replay Button (w) A pg. 45 | ||||
|
|
|
|
| |||
| SLOW |
| PLAY/SELECT | SLOW | i | p | |
|
| q Set Up Button (SET UP) A pg. 22 | |||||
M |
|
|
|
|
| ||
|
|
|
|
| j | r Progressive Scan Button (PROGRESSIVE SCAN) A pg. 73 | |
|
|
|
|
|
| ||
| REC |
| STOP/ CLEAR | PAUSE | s Angle Button (ANGLE) (DVD deck only) A pg. 29 | ||
|
| k | |||||
N |
|
|
|
|
| Live Check Button (LIVE CHECK) A pg. 45 | |
| JUMP |
|
| l | How To Use | ||
|
|
|
| ||||
O |
|
|
|
|
| m | |
| REC MODE |
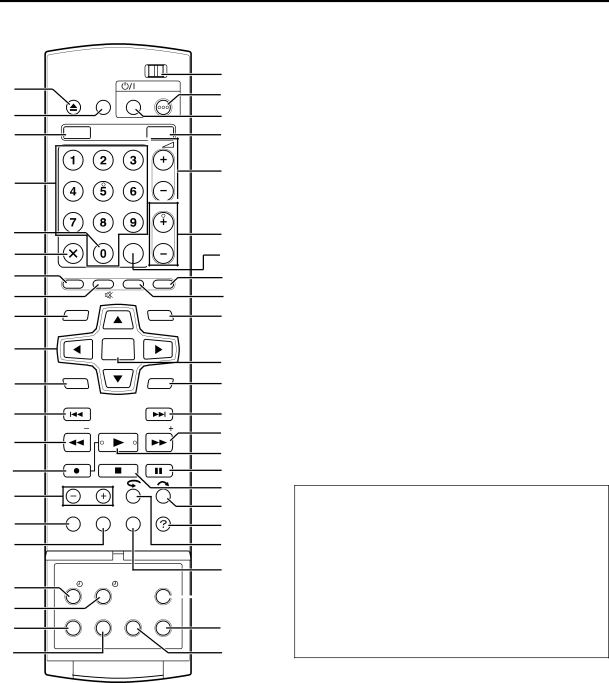
| DISPLAY | ON SCREEN | HELP | Before use, insert two AA size batteries into the remote control | |
|
|
| with the polarity (F and G) matched correctly as indicated on | ||||
P |
|
|
|
|
| n | |
|
|
|
|
| the battery compartment or on the lid. | ||
|
|
|
|
|
|
| |
Q |
|
|
|
|
| o | The remote control can operate most of your unit’s functions, as |
|
|
|
|
|
| p | well as basic functions of TV sets and satellite receivers and |
R |
|
|
|
|
| other brands. (A pg. 68) | |
SAT | VPS/PDC |
| SET UP |
| ● Point the remote control toward the receiving window. | ||
S |
|
|
|
|
| q | ● The maximum operating distance of the remote control is |
AUDIO |
| SUBTITLE | ANGLE | PROGRESSIVE |
| about 8 m. | |
|
| SCAN |
| NOTE: | |||
T |
|
|
|
|
| r | |
|
|
|
|
| If the remote control doesn’t work properly, remove its batteries, | ||
|
|
|
| LIVE CHECK |
|
| |
|
|
|
|
|
| wait a short time, replace the batteries and then try again. | |
U |
|
|
|
|
| s | |
|
|
|
|
|
| ||
AOpen/Close Button (M) A pg. 9
BTV AV/VIDEO Button A pg. 38, 41
CHDD Button* A pg. 40
*This button will not function during navigation mode or set up mode.
DNumber Keys A pg. 37, 40
EAuxiliary Button (AUX) A pg. 49, 74
FCancel Button (CANCEL(L)) A pg. 35
GLive Button (LIVE) A pg. 45
HDubbing Button (DUBBING) A pg. 60 TV Muting Button (TVd) A pg. 68
ITop Menu Button (TOP MENU) A pg. 27
JSelection Keys (FGDE) A pg. 19
KMenu Button (MENU) A pg. 27
LReverse Skip Button (S) A pg. 27, 45, 43 Previous Button (PREVIOUS) A pg. 30
MReverse Search Button (O) A pg. 27, 45 Reverse Slow Button (SLOW
NRecord Button (R) A pg. 37, 40
OJump Button (JUMP