If a subject cannot be recognized or captured
Depending on the characteristic or condition of a subject, the camera might hardly recognize the subject. If the AT function still does not work after the procedures mentioned in pages 14 and 15 are repeated, select an ENTRY mode that is matched to conditions under which the camera is used.
Normally, select the ENTRY 1.
1 Press the AT ON/OFF button to enter into the AT setting mode.
The frame and setting value appear. If the setting value does not appear, press the DATA SCREEN button to have the value displayed.
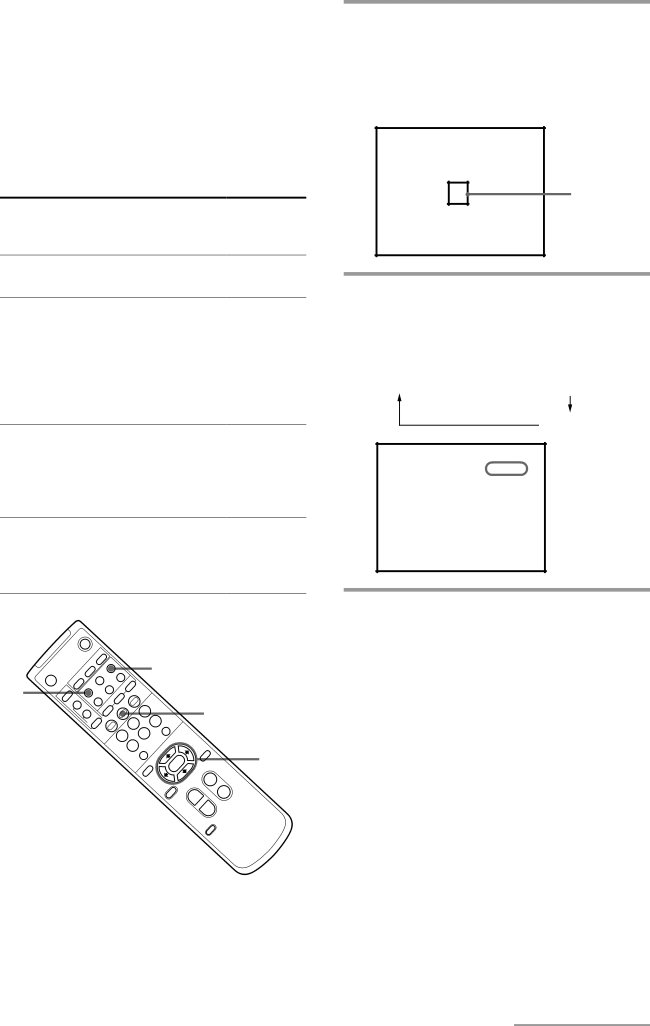
AT MODE | |
SETTING | ENTRY1 |
| 32 |
Frame
Problem
A subject cannot be recognized because its color is too thin.
The camera repeats mistakenly recognizing a near object whose color is almost identical to that of a subject. (The frame moves from the subject to an object whose color is almost identical to that of the subject.)
The camera repeats mistakenly recognizing the backdrop such as the wall or ceiling. (The frame moves from the subject to the backdrop.)
The camera does not capture a subject correctly when the brightness of the subject changes as the position of the subject changes.
ENTRY mode to be selected
ENTRY 2
ENTRY 2
ENTRY 4
ENTRY 3
CHASE 1
2 Repeat pressing the ENTRY button to select a desired ENTRY mode.
Each time that button is pressed, the mode is cyclically changed as follows:
ENTRY 1 ![]() ENTRY 2
ENTRY 2 ![]() ENTRY 3
ENTRY 3
ENTRY 4
AT MODE |
| |
SETTING |
| ENTRY4 |
| 52 | |
|
|
|
|
|
|
CHASE 1
3 Have the camera memorize a subject by
POWER
pressing the arrow button to move the
1
BACK | LIGHT |
|
|
|
| SELECT |
| 3 | ENTRY |
|
|
|
|
|
| ||
|
| CAMRA |
| 2 |
|
|
|
|
| ZOOM |
|
|
| |
|
| 1 |
| OFFSET | AE | AUTO |
| DETECT | DISPLAY | |||||
|
|
|
|
|
|
|
|
| ||||||
FOCUS |
| ON/OFF |
|
|
|
|
|
|
|
|
| |||
|
| AT |
|
|
|
| ERAME |
|
|
|
| |||
AUTO |
|
| CHASE |
|
|
|
| FRAME |
|
| ||||
| FAR | NEAR |
|
| MD |
| START/STOP |
|
| 3 | ||||
|
|
|
|
|
| ON/OFF |
|
|
|
|
|
|
| |
|
|
| MANUAL | DETA | SCREEN |
|
| REV | 2 | |||||
|
|
|
|
|
|
|
|
|
| 5 | ||||
|
|
|
|
|
|
|
| STD |
| 1 |
|
| ||
|
|
|
|
|
|
|
|
|
|
|
| |||
|
|
|
|
|
|
|
|
|
|
| 4 |
| ||
|
|
|
|
|
|
|
|
|
|
|
|
| PRESET | |
|
|
|
|
|
|
|
|
|
|
|
|
|
| |
|
|
|
|
|
|
|
|
|
|
|
|
|
| MENU |
2
6 | RESET |
|
|
| |
POSITION |
| |
PAN |
| HOME |
|
| |
|
| 4 |
| ||
PAN |
|
|
RESET |
| |
ZOOM· | FAST |
|
| T | |
3
subject into the frame.
The position to which you place the subject varies depending on an ENTRY mode you select.
ENTRY 2: Place the subject so that the portion uniform to a certain extent in color and brightness is in the frame.
CURSOR
SLOW· | T |
| W |
|
| ||
|
| W | SET |
|
| L/R | |
|
|
| |
|
| DIRECTION |
|
ENTRY 3: Place the subject so that it hangs over the frame slightly.
ENTRY 4: Place the subject so that it becomes largest within the frame, its backdrop being out of the frame.
continue to next page 17EN