JVC CA-UXJ55MD, GVT0104-002A manual Adjust the volume level, Volume setting appears on Display

Page 60

English

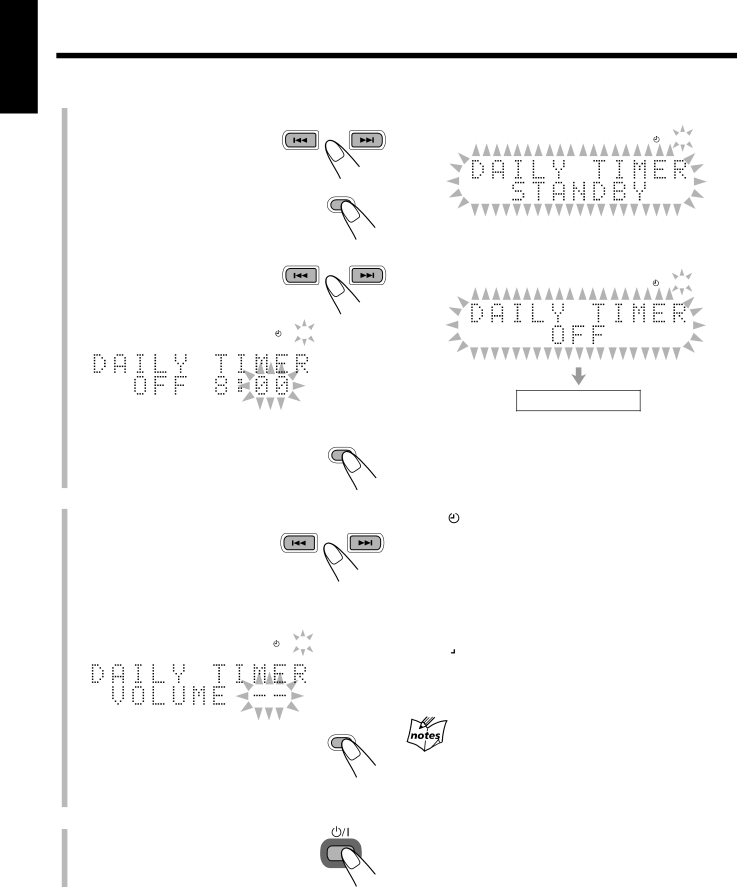
5 Set the shut-off time.

1)Press ¢or 4repeatedly to adjust the hour.

You can also adjust the hour using the number buttons.

2)Press SET.

The minute digits start flashing.

3)Press ¢or 4repeatedly to adjust the minute.

You can also adjust the minute using the number buttons.

GROUP SKIP

GROUP SKIP

SET

GROUP SKIP

GROUP SKIP

DAILY

Before the start time, the DAILY indicator and “DAILY TIMER STANDBY” start flashing on the display.

DAILY

Before the shut-off time, the DAILY indicator and “DAILY TIMER OFF” start flashing on the display.

DAILY

Clock indication

Ex.: When you set shut-off time to 8:00.

4)

Press SET.


SET


The volume setting appears on the


display.


6 Adjust the volume level.


1)

Press ¢or 4repeatedly

GROUP SKIP

GROUP SKIP

to adjust the volume level.

You can adjust the volume level to “– –” or within the

range of 0 (silent) to 40 (maximum).

When you select “VOLUME – –,” the volume is set to the volume level when you turn off the unit.

DAILY

To turn off the Daily Timer after its setting is done

1Press CLOCK/TIMER repeatedly until “DAILY TIMER” appears on the display.

2Press CANCEL.

The (timer) and DAILY indicators go off from the display.

To turn on the Daily Timer again

1Press CLOCK/TIMER repeatedly until “DAILY TIMER” appears on the display.

2Press SET repeatedly until the settings are shown on the

display for your confirmation.

The(timer) and DAILY indicators light up on the display.

2)Press SET.

The DAILY indicator stops flashing and remains lit. The contents of this setting appear on the display for your confirmation.

7 Press STANDBY/ON to turn off the unit if you have set the timer with the unit turned on.

SET

STANDBY/ON

Adjusting the hour and minute of the start and shut-off time using the number buttons in steps 4 - 1), 4 - 3), 5 - 1), and 5 - 3)

Ex.: To adjust the hour/minute to 5, press 5.

To adjust the hour/minute to 12, press +10, then 2.

To adjust the hour/minute to 20, press +10, then 10 (or press +10 twice, then 0).

If the unit is kept turned on when the start time comes Daily Timer does not work at all.

Daily Timer will be canceled and the unit will not turn off automatically in the following cases:

When you change the source.

When you enter the MD editing or title entry mode.

When you turn off the Daily Timer (see above).

57

Image 60
Contents CA-UXJ55MD Page Important for Laser Products Precautions IntroductionAbout This Manual Contents Location of the Buttons and Controls Front PanelFront panel Display window on the front panel Display windowRemote Control See pages in parentheses for detailsConnecting Antennas Getting StartedUnpacking FM antennaConnecting Speakers AM antennaTo connect an outdoor AM antenna To connect speakersConnecting External Equipment Putting the Batteries into the Remote ControlTo connect external equipment To play the other equipment through this unit, connectSetting the Clock Basic and Common OperationsTo change the clock again To check the clock time with tonesTo turn off the clock indication Power Save On the remote controlTurning On/Off the Key-touch Tone To turn off the unit automatically Auto StandbyAdjusting the Volume Level Reinforcing the Bass SoundAdjusting the Tone Press BASS/TREBLE to adjust the BassChanging the Display Brightness Bass or treble levelTuning in to a Station To change the FM reception modeListening to FM and AM Broadcasts Press and hold ¢or 4for more than 1 secondPresetting Stations Tuning in to a Preset StationWhen playing a CD-R or CD-RW Playing Back Discs on the 5-CD ChangerPlaying Back All the Discs Continuous Play Loading DiscsBasic Disc Operations To change a disc during playback of another discTo start playing a disc during playback of another disc To locate a particular point in a track during playTo go to another track directly using the number buttons Programing the Track Playing Order -Program PlayTo change the information shown on the display To check the program contents Playing at Random-Random PlayTo modify the program To erase the entire programProhibiting Disc Ejection-Disc Lock Repeat PlayPlaying Back MDs Playing Back the Entire MD -Normal PlayBasic MD Operations To stop play for a momentWhile playing or pausing When the MD recorder stopsPress ¢or 4repeatedly Load an MD Until MD Program appears On the displayPress the number buttons to select the tracks Repeat to program other tracks you wantPlaying Tracks in a Group-Group Play Until MD Random appears On the displayLoad an MD including groups Until MD Group appears on DisplayRepeating Tracks-Repeat Play Searching for Tracks to Play MD Title SearchPress Title Search Enter the characters to search for the trackAvailable symbols are as follows Press EnterTo prohibit MD ejection-MD Lock To enter a C or c, pressTo play both sides-Reverse Mode Playing Back TapesPlaying Back a Tape Press Tape 2Listening to External Equipment Listening to External EquipmentRecording on MDs Before You Start Recording on an MDAbout the track marks To avoid erasing important recordingsPrecautions for performing long-hour stereo recording Stereo Long-Hour Recording MdlpAbout High-Speed Recording To check the remaining recording timeSetting MD Recording Modes To set group recording modeTo set the recording length mode To set LP-prefix addition modePress CD REC Mode to select the CD REC Recording modePress MD REC when the selected Recording mode in is still Shown on the displayPress CD REC Mode to select Track mark entry modePrepare the source to record from Press MD RECRecording on Tapes Before You Start Recording on a TapeTo protect your recordings To keep the best recording and playback sound qualityReverse mode Recording CD onto a Tape CD-Tape Synchronized RecordingRecording onto a Tape Press Tape REC whenTo record a single track of a CD/MD during play Press Tape RECCD Synchronized Recording Press MD&TAPE RECFor the MD For the cassetteUsing MD Groups as a separate item How to make up GroupsEditing MDs Guidance-MD Group FunctionsIntroducing Group Editing Functions Forming a Group-FORM GR To cancel the setting, press CANCEL, then repeat from You can also select the track usingRepeatedly until Entry GR ? Appears on the display TrackDividing a Group-DIVIDE GR Repeatedly until Divide GR? Appears on the displayTrack as the dividing Point To join the divided groups, see the Join GR function onWhen Cannot Join appears on the display in step Joining Two Groups-JOIN GRRepeatedly until Join GR ? Appears on the display Moving a Group-MOVE GR Repeatedly until Move GR ? Appears on the displayPress Group Skip ¢or Group Skip 4while holding Shift to select the groupTo cancel the setting, press Cancel Ungrouping Tracks-UNGROUPDissolving All Groups-UNGR ALL Repeatedly until Ungroup ? Appears on the displayErasing Tracks in a Group-ERASE GR Repeatedly until Erase GR ? Appears on the displayIntroducing Track Editing Functions Dividing a Track-DIVIDE Joining Two Tracks-JOIN Insert an MD you want to edit into the MDLoading slot Until Join ? appears on DisplayPosition where you want To move the track to Moving a Track-MOVEUntil Move ? appears on Display Track you want to moveErasing Tracks-ERASE Erasing All Tracks-ALL EraseUntil ERASE? appears on Display Track you want to eraseTitle entry mode Selected title entry modeAssigning Titles to an MD Press or To changePress Cancel to exit from Enter charactersPress Enter to finish the current Title entryChanging the Title Follow steps 1 to 4 onSelect the character you Want to correct, by pressingUsing the Timers Using Recording TimerHow Recording Timer actually works Set the start time Set the shut-off timeUsing Daily Timer How Daily Timer actually worksPress CLOCK/TIMER repeatedly Until Daily Timer appearsAdjust the volume level Volume setting appears on DisplayTo adjust the volume level To turn off the Daily Timer after its setting is doneUsing Sleep Timer Timer PriorityHow Sleep Timer actually works Maintenance To clean the discStains on the unit English Scms Serial Copy Management System Hcms High-speed Copy Management SystemMD limitations CD/MD Messages Cannot REC x1 REC onlyCannot REC x1 or x2 only Troubleshooting NON Audio or DVDSpecifications EN, CS Victor Company of JAPAN, Limited 0803AIMMDWJEM