Craftsman 509399, 509398 owner manual On-Product Safety Labels

Page 10

Safety

On-Product Safety Labels

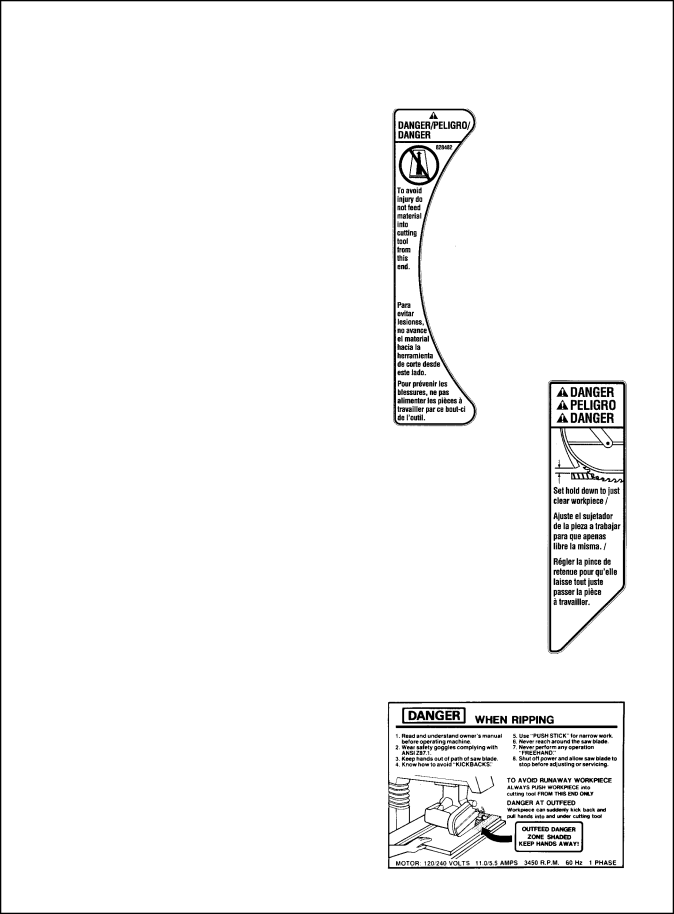
There are several safety labels on the saw. They alert the user to hazards explained in the manual and remind the user how to avoid the hazard.

At the outfeed side, to the right of the guard near the saw handle is this safety label to alert you to wrong way feed:

On the infeed side of the guard is this safety label to remind you to lower the hold down to just clear the top of the workpiece for ripping:

On the side of the motor, is this safety label to alert you to outfeed zone hazard:

Note where they are located on the saw. Read and follow the safety information and instructions in these labels. Refer to the manual for detailed explanations and instructions.

10

Image 10
Contents Inch Radial SAW Guard KIT Table of Contents Read and follow all safety information and instructions SafetySafety Symbol and Signal Words Major HazardsKickback Hazard Guard Function and Features Guard Features IncludeHazards Associated with Clear Por- tion of Guard Personal Safety Instructions Safety InstructionsWork Area Safety Instructions Saw Safety Instructions Workpiece Safety InstructionsBlade Safety Instructions On-Product Safety Labels Safety Identify Parts AssemblyList of loose parts with model Remove Sawblade and Guard Remove Original Table Boards, and Mounting SupportsPositioning Table Supports Installing Front Table Make Front Table Flat Reposition U-Clip to New Hole Location Leveling Front Table Assembly Making Front Table Flat X 13 Lock Nut Assembly Assembly Installing Guard Adapter Installing Blade/Squaring Crosscut Travel Framing Square Must Be TrueInstall Fence, Rear Tables, and Table Clamps Install GuardGuard Installation Steps/Align Riving Knife to Blade AlignmentControls Requires yellow keyLock before ripping Blade partially protects against Control Function Guard Tab Crosscutting Crosscutting SafetyCrosscutting Defined Crosscut Kerfs Keep one hand on saw handle through stepMaking Crosscuts Repetitive Crosscutting Ripping Workpiece Positioning Push Sticks and Push BlocksKickback To reduce risk of kickback Wrong Way FeedHold Down Function Pawls and Riving Knife FunctionRipping Set-up Procedure Follow these steps before rippingRemove workpiece from table Ready push stick or push block Making Rip CutsIn-Ripping Edging Dado Blades, Molding HeadsRipping Hints Cutting Aides Putting it together Making the HandleAuxiliary Fence Featherboard This Side Clean sawdust from the slot and slider MaintenanceReplacing Pawls #509398 & #509399 Repair PartsKey Description Repair Parts Guard RZQHU·V Inch Radial SAW Guard KIT Pdqxdo