Craftsman 509399, 509398 owner manual Dado Blades, Molding Heads, Edging, Ripping Hints

Page 44

Ripping

Dado Blades, Molding Heads

See Accessories for information on safety, installation and use of dado blades and molding heads.
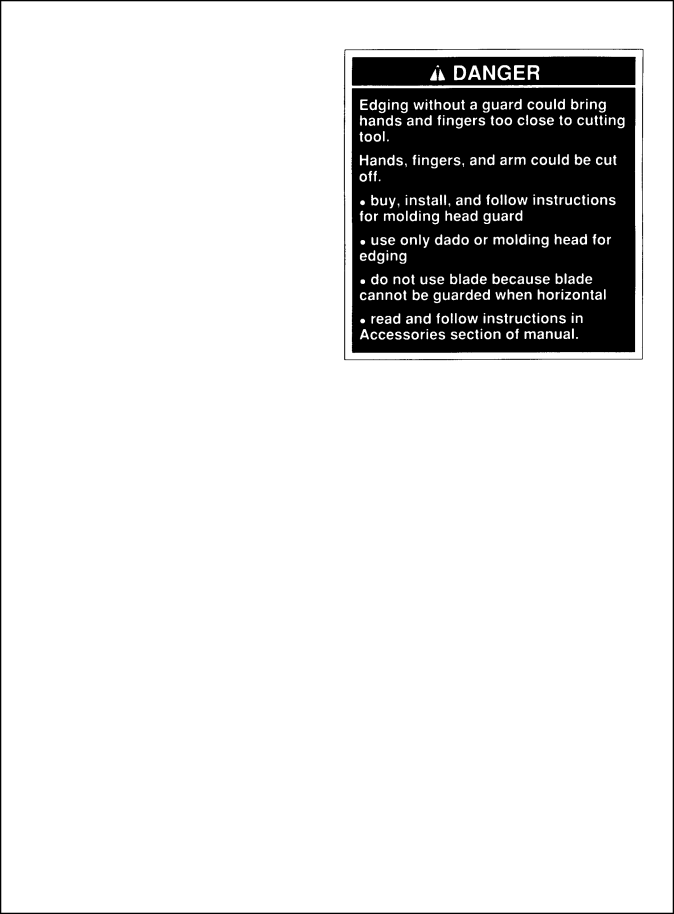
Edging

Edging is the use of a dado blade or molding head in the horizontal position. It is an advanced technique that requires a molding head guard and a special fence. See Acces- sories for information on safety, installation and use of dado blades and molding heads for edging. See Cutting Aides for information on making the special fence.

Ripping Hints

1.To extend life of table top, make auxiliary table cover out of 1/4" plywood or fiberboard. Clamp or nail to original table top, section by section. If you use nails, nail in the four com- ers to make sure blade will not contact nails.

2.Keep table clean of chips and sawdust.

3.Use sharp blades.

4.Use the right blade for each job.

5.For workpiece with one smooth and one rough surface, such as paneling or finished fiberboard, cut with rough surface up so pawls will be more likely to grab in case of kickback.

6.To keep cut line accurate, periodically check blade alignment.

7.If you must cut an irregular workpiece, attach a straight edge (see Cutting Aides).

44

Image 44
Contents Inch Radial SAW Guard KIT Table of Contents Safety Safety Symbol and Signal WordsRead and follow all safety information and instructions Major HazardsKickback Hazard Guard Function and Features Guard Features IncludeHazards Associated with Clear Por- tion of Guard Work Area Safety Instructions Safety InstructionsPersonal Safety Instructions Saw Safety Instructions Workpiece Safety InstructionsBlade Safety Instructions On-Product Safety Labels Safety List of loose parts with model AssemblyIdentify Parts Remove Sawblade and Guard Remove Original Table Boards, and Mounting SupportsPositioning Table Supports Installing Front Table Make Front Table Flat Reposition U-Clip to New Hole Location Leveling Front Table Assembly Making Front Table Flat X 13 Lock Nut Assembly Assembly Installing Guard Adapter Installing Blade/Squaring Crosscut Travel Framing Square Must Be TrueInstall Fence, Rear Tables, and Table Clamps Install GuardGuard Installation Steps/Align Riving Knife to Blade AlignmentControls Requires yellow keyLock before ripping Blade partially protects against Control Function Guard Tab Crosscutting Defined Crosscutting SafetyCrosscutting Crosscut Kerfs Keep one hand on saw handle through stepMaking Crosscuts Repetitive Crosscutting Ripping Workpiece Positioning Push Sticks and Push BlocksKickback To reduce risk of kickback Wrong Way FeedHold Down Function Pawls and Riving Knife FunctionRipping Set-up Procedure Follow these steps before rippingRemove workpiece from table Ready push stick or push block Making Rip CutsIn-Ripping Ripping Hints Dado Blades, Molding HeadsEdging Cutting Aides Auxiliary Fence Making the HandlePutting it together Featherboard This Side Replacing Pawls MaintenanceClean sawdust from the slot and slider Key Description Repair Parts#509398 & #509399 Repair Parts Guard RZQHU·V Inch Radial SAW Guard KIT Pdqxdo