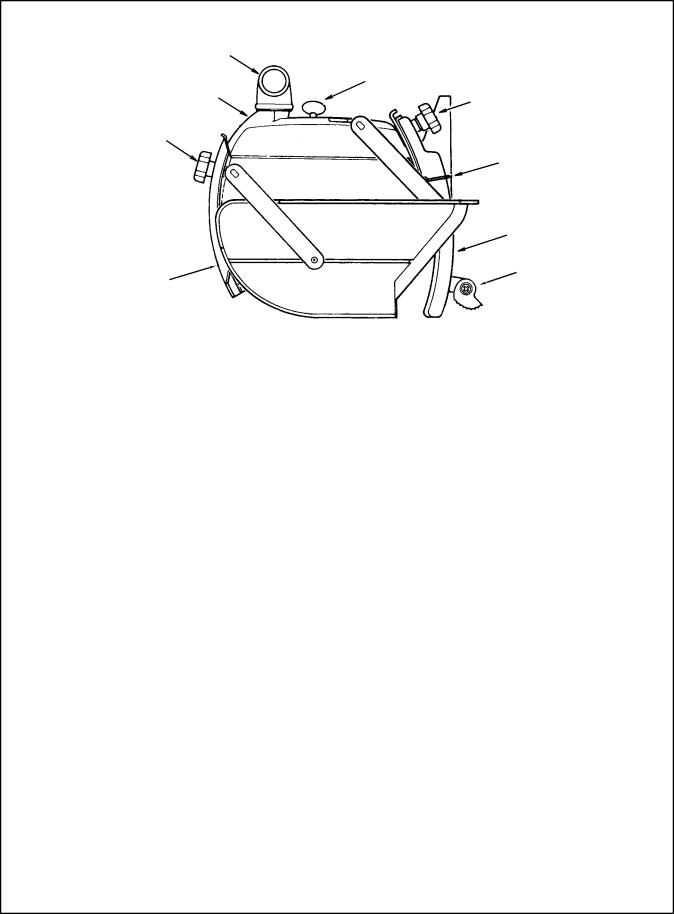
Craftsman 509399, 509398 owner manual Blade partially protects against

Page 30

Controls

Dust Elbow

Guard Clamp

Screw

Guard

Pawls/Riving


Knife Knob

Hold Down

Knob

Riving Knife

Bracket

Riving Knife

Pawls Hold Down

Control

Function

Guard Clamp

Secures guard to motor; frees

Screw

guard for removal

Guard

Protects against contact with upper


blade; partially protects against


contact with lower blade; acts as


sawdust deflector

Operation/Comments

Turn counterclockwise to loosen, clockwise to tighten

Upper part remains fixed in level position. Notch in guard fits securely into matching tab on motor

Clear guard is moveable: raise over fence at start of crosscut; See Saw Handle; most workpieces will auto- matically raise clear guard during rip- ping; See Guard Tab

Hold Down Knob

Hold Down

Riving Knife

Bracket

Frees hold down to move up and down; locks hold down in place

During ripping, acts as partial bar- rier to infeed side of blade; keeps infeed side of workpiece from flut- tering; acts as sawdust deflector

Prevents side to side movement of riving knife and provides means for adjusting alignment

Turn counterclockwise to loosen, clockwise to tighten

For ripping, lower hold down to top of workpiece surface, then raise slightly and lock in place. For crosscutting lock in fully raised position

Loosen to align riving knife, then tighten

30

Image 30
Contents Inch Radial SAW Guard KIT Table of Contents Read and follow all safety information and instructions SafetySafety Symbol and Signal Words Major HazardsKickback Hazard Guard Function and Features Guard Features IncludeHazards Associated with Clear Por- tion of Guard Safety Instructions Personal Safety InstructionsWork Area Safety Instructions Saw Safety Instructions Workpiece Safety InstructionsBlade Safety Instructions On-Product Safety Labels Safety Assembly Identify PartsList of loose parts with model Remove Sawblade and Guard Remove Original Table Boards, and Mounting SupportsPositioning Table Supports Installing Front Table Make Front Table Flat Reposition U-Clip to New Hole Location Leveling Front Table Assembly Making Front Table Flat X 13 Lock Nut Assembly Assembly Installing Guard Adapter Installing Blade/Squaring Crosscut Travel Framing Square Must Be TrueInstall Fence, Rear Tables, and Table Clamps Install GuardGuard Installation Steps/Align Riving Knife to Blade AlignmentControls Requires yellow keyLock before ripping Blade partially protects against Control Function Guard Tab Crosscutting Safety CrosscuttingCrosscutting Defined Crosscut Kerfs Keep one hand on saw handle through stepMaking Crosscuts Repetitive Crosscutting Ripping Workpiece Positioning Push Sticks and Push BlocksKickback To reduce risk of kickback Wrong Way FeedHold Down Function Pawls and Riving Knife FunctionRipping Set-up Procedure Follow these steps before rippingRemove workpiece from table Ready push stick or push block Making Rip CutsIn-Ripping Dado Blades, Molding Heads EdgingRipping Hints Cutting Aides Making the Handle Putting it togetherAuxiliary Fence Featherboard This Side Maintenance Clean sawdust from the slot and sliderReplacing Pawls Repair Parts #509398 & #509399Key Description Repair Parts Guard RZQHU·V Inch Radial SAW Guard KIT Pdqxdo