CDA RC 9000 Electrical installation, Connecting feeder cable, Feeder cable section

Page 41

Electrical installation

The appliance must be connected to the electrical network verifying above all that the voltage corresponds to the value indicated on the specifications plate and that the cables section of the electrical plant can bear the load which is also indicated on the plate.

The cooker can be connected directly to the mains placing an omnipolar switch with minimum opening between the contacts of 3 mm between the appliance and the mains.

The power supply cable must not touch the hot parts and must be positioned so that it does not exceed 75°C at any point.

Once the cooker has been installed, the switch must always be accessible.

Before effecting any intervention on the electrical parts the appliance must be disconnected from the network.

Warning!

Electricity can be extremely dangerous.

This appliance must be earthed.

Connecting feeder cable

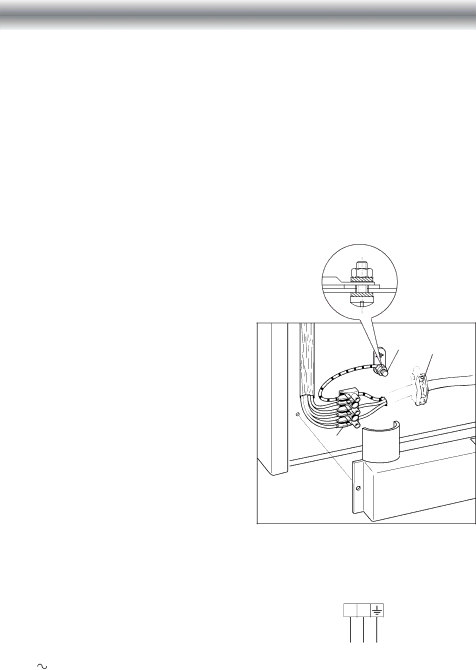
To connect the feeder cable to the cook- er it is necessary to:

Remove the screw that hold shield “A” behind the cooker (fig. 41).

Insert the feeder cable of the suitable section (as described in the next chap- ter) into the cable clamp “D”.

Connect the phase and earth cables to the terminal block “B” according to the diagram in figure 42.

Pull the feeder cable and block it with cable clamp “D”.

Re-mount shield “A”.

D

B

A

Fig. 41

230 V

Feeder cable section

TYPE HO5RR-F


L1

N PE

230 V

3 x 1,5 mm2

(L2)

Fig. 42

41

Image 41
Contents Dual fuel Cookers CDA Contents Assembling the backguard IntroductionGas burners Features and technical dataControl Panel Controls description Control panelElectronic programmer Altering the audible signal Electronic timerElectronic clock fig Normal cooking without the use of the programmerAutomatic oven cooking Semi-automatic cooking Hob burners How to use the hob burnersElectric ignition Lighting of the hob burnersCorrect use of triple-ring burner Choice of burnerOperating principles How to use the Multifunction ovenGeneral features Traditional convection cooking Oven lightHot air cooking GrillingDefrosting frozen foods Convection cooking with ventilation Ventilated grill cookingSimultaneous cooking of different foods SterilizationRegeneration Use of the grill Grilling and au gratinRoasting Important notes Do’s and do not’s For your safetyDo’s and do not’s Flexible tube Care and maintenanceEnamelled parts Triple ring burner BurnersStorage compartment Removal of the inner glass door panelAssembling and dismantling of the side runner frames Inside of ovenOven tray Removing the oven door Door assemblyFor Installer Location Fitting the adjustable feet Levelling the cooker Stability bracket Provison for ventilation Important Note Gas installationGas connection Installation to Natural GasPlug 200 mm 700 mm Conversion to Natural Gas or to LPG Injectors replacement of top burnersAdjusting of the minimum of the top burners Table for the choice of the injectors Lubrication of the gas tapsFeeder cable section Electrical installationConnecting feeder cable Appliance servicing Limit of Cover GuaranteeRC 9000 .. cookers