Zanussi ZKT6050 To replace the door glass, To clean the glass door panels, Top Oven, Main Oven

Page 31

Top Oven:

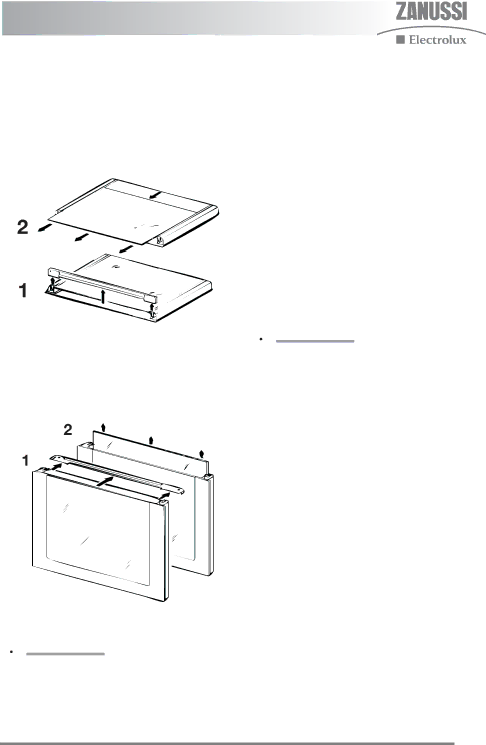
Carefully push the trim towards the oven and lift off.

Hold the door glass securely in place with one hand before sliding the glass out with the other hand.

Main Oven:

Carefully push the trim towards the oven.

Hold the door glass securely in place with one hand before sliding the glass out with the other hand.

Please contact your local service force centre who will be pleased to advise further.

To replace the door glass

To ensure the glass is properly located the text should be facing towards you at the top edge of the door and facing into the cavity.

Holding the glass with both hands, gently slide the glass into the side trims of the oven door. Always ensure that the glass is returned to the same side trim it was removed from.

To replace the trim, line up the clips on the underside of the trim with the connectors at the top of the door.

Carefully slide the trim towards the door. Ensure the trim is securely in place before closing the oven door.

WARNING!

Do not attempt to use the oven without the glass being in place.

To clean the glass door panels

Clean the inner glass door panels using hot soapy water. If the inner panel is heavily soiled, hob cleaner may be used. Do not use abrasive cleaning materials on the door glass. Ensure that all parts are well rinsed and thoroughly dried before attempting to replace the glass. Do not use hob cleaner on the stainless or painted finishes.

WARNING!

If the door glass panel becomes chipped or has deep scratches the glass will be weakened and must be replaced to prevent the possibility of the panel shattering.

31

Image 31
Contents User Manual Cooker Contents During use Important safety instructionsInstallation Child safetyExtreme care must be taken when using a ceramic hob scraper Cleaning and maintenanceControls and their functions Product descriptionTouch control sensors Before using the applianceSwitching the hob on/off Rating plateCondensation and steam Switching the oven on/offCookware Operating timeGrill and oven furniture To set the time of day Electronic timerTo set the countdown To set the oven timer control To cancel the countdownTo set the timer to switch on and off automatically To set the timer to switch off onlyTurn off the oven controls Automatic cookingTo return the appliance to manual Things to noteOperation Ceramic hob Using the hobUsing the stop + go function Using the hob timerSelecting a cooking zone Setting the timeSwitching off the acoustic signal Safety cut-outResidual heat HOB Top oven intelligent grill Using intelligent grillTo fit the top oven shelf Ensure the handle is correctly located Grill pan and handleAlways remove the grill pan handle during grilling Top oven Using the top ovenTo fit the main oven shelves Using main oven fan cookingMain oven grill Main oven fan cookingActivating the child lock Using defrostChild lock DefrostFunction lock Temperature reviewOven Safety cut-out Switching on after a safety cut- outFood Grilling chartTOP Oven Food POS Cooking Approx Temp C Top oven cooking chartFood TOP Oven POS Cooking Approx Temp C Food Cooking Approx Temp C Main oven cooking chartMain oven cooking chart Meattemperature Roasting chartCooking Time Hints and tips Hints and tips when using the hobHints and tips when defrosting Care and cleaning Avoid the use Cleaning the grill/oven furnitureCleaning inside the grill and oven compartments To reduce marking of the hobTo remove the glass Cleaning the doorsCleaning between the outer and inner door glass Aerosol cleaners must not be used on Stay- clean surfacesMain Oven To clean the glass door panelsTo replace the door glass Top OvenType of bulb required is a 300C 25 watt small Edison Screw Replacing an oven light bulbPossible Solution TroubleshootingProblem Timer does not work Oven is not cooking evenlyOven light fails to illuminate Oven fan is noisy Connecting to the electricity supply Installation instructionsThis appliance must be earthed Ensure that the cover is securely fastened SafetyWe recommend you use a new length Mains terminal coverEnvironment Technical detailsStandard guarantee conditions Guarantee / Customer carePage 349151003 04/2007