Manuals
/
Acer
/
Computer Equipment
/
Laptop
Acer
1000
manual
Step Three Machine
Models:
1000
1
73
122
122
Download
122 pages
59.19 Kb
70
71
72
73
74
75
76
77
Troubleshooting
Specs
Install
Error messages
DiagramBlock
Bluetooth
Password
Euro Symbol
Indicators
Connecting the Optical Drive
Page 73
Image 73
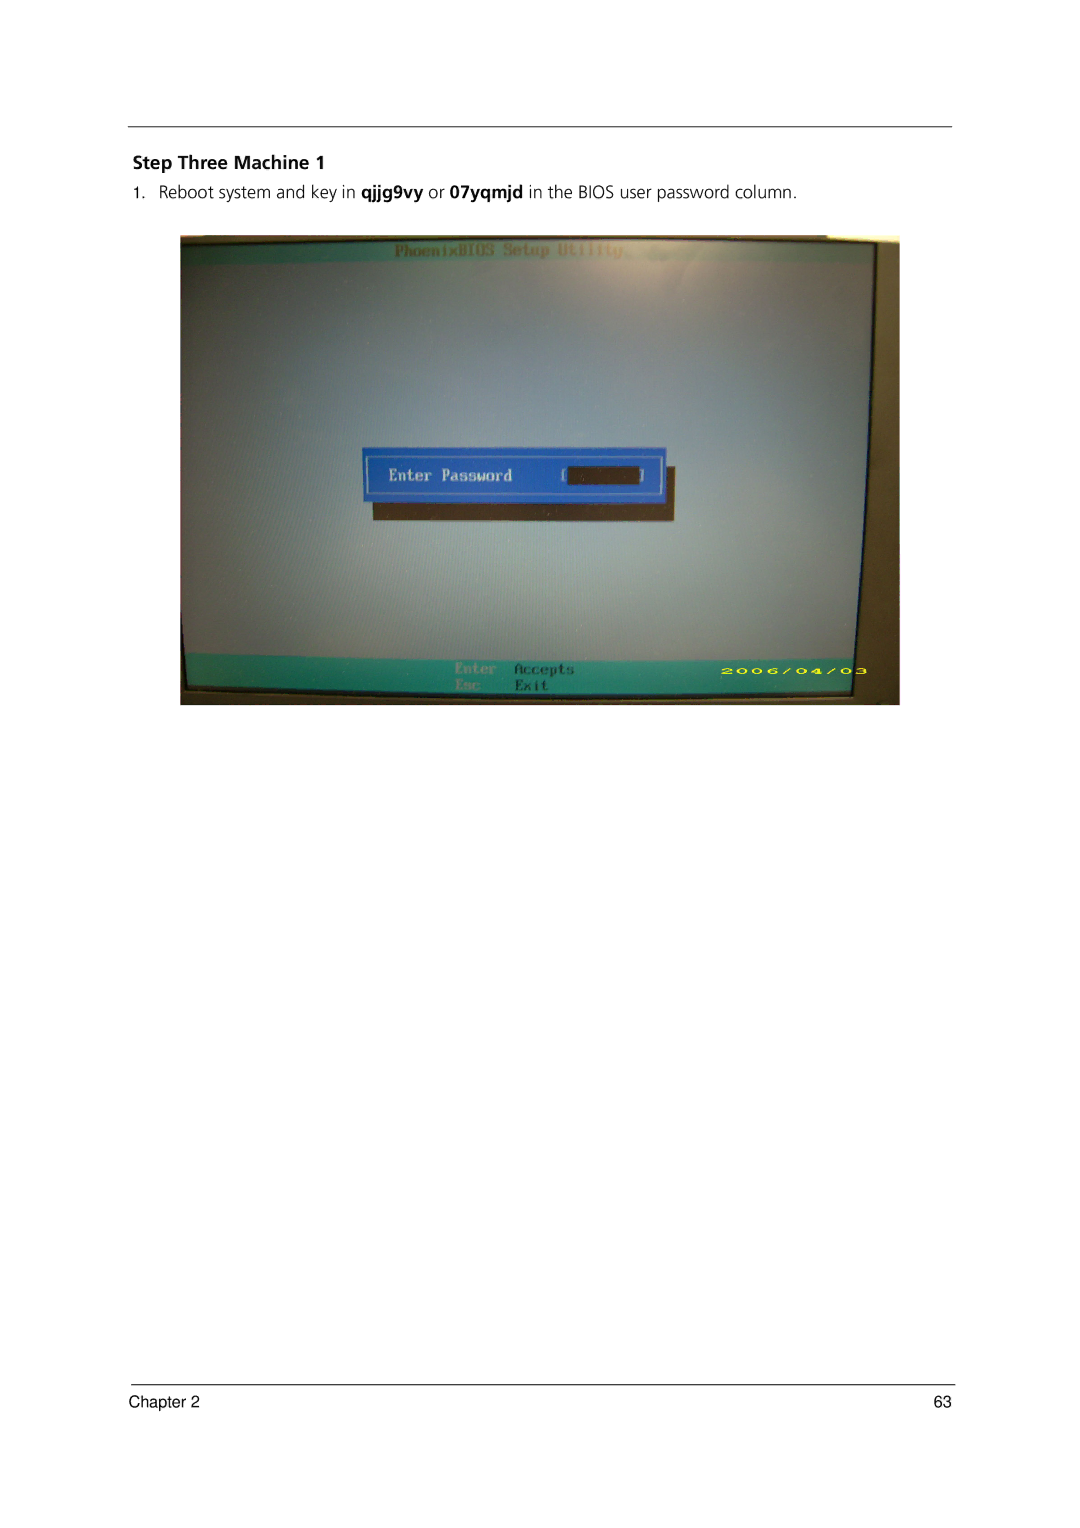
Step Three Machine 1
1.
Reboot system and key in
qjjg9vy
or
07yqmjd
in the BIOS user password column.
Chapter 2
63
Page 72
Page 74
Page 73
Image 73
Page 72
Page 74
Contents
Acer
Ferrari Service Guide
Revision History
Copyright
Disclaimer
Screen Messages
Conventions
Preface
Table of Contents
Chapter Two System Utilities
Chapter Three Machine Disassembly and Replacement
Chapter Five Jumper and Connector Location
Chapter
Specification
Storage Subsystem
Audio
Communication
Input Devices
Interface
Power Subsystem
Security
Software
Environment
Dimensions and Weight
RS485
DiagramBlock
SB460
Front View
Outlook Tour
Description
Icon Description
Closed Front View
Right View
Left View
Base View
Rear View
Upper View
Mouse
Bottom View
External Optical Disk Drive
Connecting the Optical Drive
HDD
Indicators
Easy-launch Buttons
Easy-launch button Default application
Touchpad Basics
Touchpad
Function Left button Right Main touchpad Button
Desired access Num Lock on Num Lock off
Using the Keyboard
Lock keys and Embedded Numeric Keypad
Lock Key Description
Key Icon Description
Windows keys
Shift +
Hot Key Icon Function Description
Hotkeys
Fn +
Fn +
Special keys
Euro Symbol
US Dollar Sign
Installation
Using the Bluetooth Optical Mouse
Usage
Layout
Acer Bluetooth VoIP Phone
Charging the Phone
LED Indicators
Color Status Description
Installing Acer VCM
Using Acer Voice Connection Manager VCM
Info Bar
Acer VCM Menu
Connecting the Phone to Your Notebook
Using the Phone
Rotating the Acer OrbiCam
Acer OrbiCam
Resolution
Changing the Acer OrbiCam Settings
Launching the Acer OrbiCam
Options
Camera Settings
Capturing Photos or Videos
Capture Settings
Enabling the Acer VisageON
Using the Acer OrbiCam as Webcam
Using Video Effects selected models only
Using the Face Tracking Feature
Chapter
Empowering Technology Password
Acer Empowering Technology
AC Mode Adapter Mode
Acer ePower Management
DC Mode Battery Mode
To Create a New Power Profile
Chapter
Acer ePresentation Management
Acer eDataSecurity Management for selected models
Chapter
Acer eRecovery Management
Acer eSettings Management
Acer ePerformance Management
Acer GridVista dual-display compatible
Using the System Utilities
Launch Manager
How do I check for viruses?
Norton AntiVirus
Specification
Hardware Specification and Configuration
Processor
System Main Chipset
System Clock
South Bridge
System Memory
Hard Disk Drive
MK1234GSX MK1032GSX
Toshiba Hgst
Optical Disk Drive
Ieee
Pcmcia Express Card
IR Interface
LAN Interface
Audio Codec & Amplifier
Wireless LAN
MDC Card
Super I/O
Battery
AC Adaptor
LCD
Port Replicator
System Fan True Value Table
System Utilities
Bios Setup Utility
Parameter Description
Information
Uuid
Main
Parameter Description Option
Advanced
ECP
EPP
Security
Symbol Character Symbol Name
Period
Boot
Exit
Step Two Machine 2 Run BIOSPW.EXE
Bios Password Removal SOP
Step One Machine
Step Three Machine
Step Two Machine 2 Run HDDPW.EXE
HDD Password Removal SOP
Step Three Machine
Before You Begin
General Information
Description Acer Part No
Disassembly Procedure Flowchart
Removing the Battery Pack
Disassembly Procedure
Removing the HDD Module
Removing the RAM Module/Mini PCI Card
Removing the Keyboard
Removing the LCD Module from the Main Unit
Separating the Upper Case and the Lower Case
Disassembling the Main Unit
Removing the Bluetooth Module
Removing the Modem Board
Removing the Thermal Module
Removing the LCD Bezel
Disassembling the LCD Module
Detaching the LCD Panel and the CCD Module
Removing the LCD Brackets
Troubleshooting
External Diskette Drive Check
System Check Procedures
External CD-ROM Drive Check
Keyboard or Auxiliary Input Device Check
Check the Power Adaptor
Power System Check
Memory Check
Touchpad Check
Check the Battery Pack
Chapter
Index of Error Messages
Power-On Self-Test Post Error Message
Error Code Error Message
Error Message FRU/Action in Sequence
See External Diskette Drive Check
Dimm
CPU ID
LCD
Power System Check
Beep Code Post Code Description What to Check Recommended
Phoenix Bios Beep Codes
ROM
Cmos
Beep Code Post Code Description What to Check Recommended
Beep Code Post Code Description What to Check Recommended
D0H
C0H
Symptom/Error Action in Sequence
Index of Symptom-to-FRU Error Message
See Check the Battery Pack
Symptom / Error Action in Sequence
PCMCIA-Related Symptoms
Peripheral-Related Symptoms
Intermittent Problems
Dimm
Undetermined Problems
Bottom Side
Main Board
FIR
USB Conn
CRT Conn
DDR2 Sodimm
Pcmcia Conn
Upper Side
Lvds Conn
FRU Field Replaceable Unit
Parts and Exploded Diagram
Mini PCI Wireless ZH3 FOX WL 11N
Mini PCI Wireless ZH3 FOX WL Atheros
Power Board ZH3 DC/B Assy S/P
Cable Power Cord Japan ZB1 Power Cord
Bluetooth S/P Power Board Cable Cable Assy ZH3 DC S/P
Mddem S/P Bluetooth Cable Cable Assy ZH3
Modem Cable Cable Assy ZH3
LCD Cable Assy ZH3 LCD Cable
ZH3 S/P LCD Bracket W/HINGE ZH3 HINGE-BKT-R-SZS
Dummy Pcmcia Card PCMCIA-DUMMY
ZH3 S/P LCD Cover Carbon W ZH3 LCD Cover
MIC, Rubber for CCD CPU / Processor AMD Mobile Turion
Mercury 2 LF FW3.06 100G Toshiba TBD
5400RPM Sata 8M
SATAMK1032GSX ARIES-B FREE-FALL LF
120G Toshiba TBD
FR1000 Keyboard ZH3 K/B Italian S/P
Darfon UK FR1000 Keyboard ZH3 K/B German S/P
FR1000 Keyboard ZH3 K/B French S/P
FR1000 Keyboard ZH3 K/B Swiss S/P
AU N-G S/P Glare LCD 12.1 IN. TFT Wxga ZH3 LCD 12.1 Wxga
Module NON Glare Owwan Assy S/P CCD Assy
AU V3 S/P Glare LCD 12.1 IN. TFT Wxga ZH3 LCD 12.1 Wxga
Toshiba N-G S/P NON-GLARE LCD 12.1 IN. TFT Wxga
Nanya 512MB RAM S/P
Memory 512MB Ddrii ZC1 Nanya DDRII667
SO-DIMM DDRII667 TBD
512MB Samsung
ZH3 S/P BASE-FOOT-R-ZH3 ZH3 BASE-FOOT-R-ZH3
HDD-IN-RUBBER-ZH3 ZH3 HDD-IN-RUBBER
BASE-FOOT-L-ZH3 ZH3 BASE-FOOT-L-ZH3
BASE-FOOT-ZH3 ZH3 BASE-FOOT-ZH3 S/P
Top
Page
Image
Contents