Contrôle de la sélection des chaînes en vue de l’utilisation du système VCR Plus+®
Pour régler le programmateur à l’aide du système VCR Plus+® , vous devez vérifier si le numéro des chaînes sur le magnétoscope correspond aux canaux guides assignés aux stations de télévision.
S’ils ne correspondent pas, le système VCR Plus+® ne fonctionnera pas correctement. Dans ce cas, faites correspondre les numéros.
![]() TV VCR/CATV
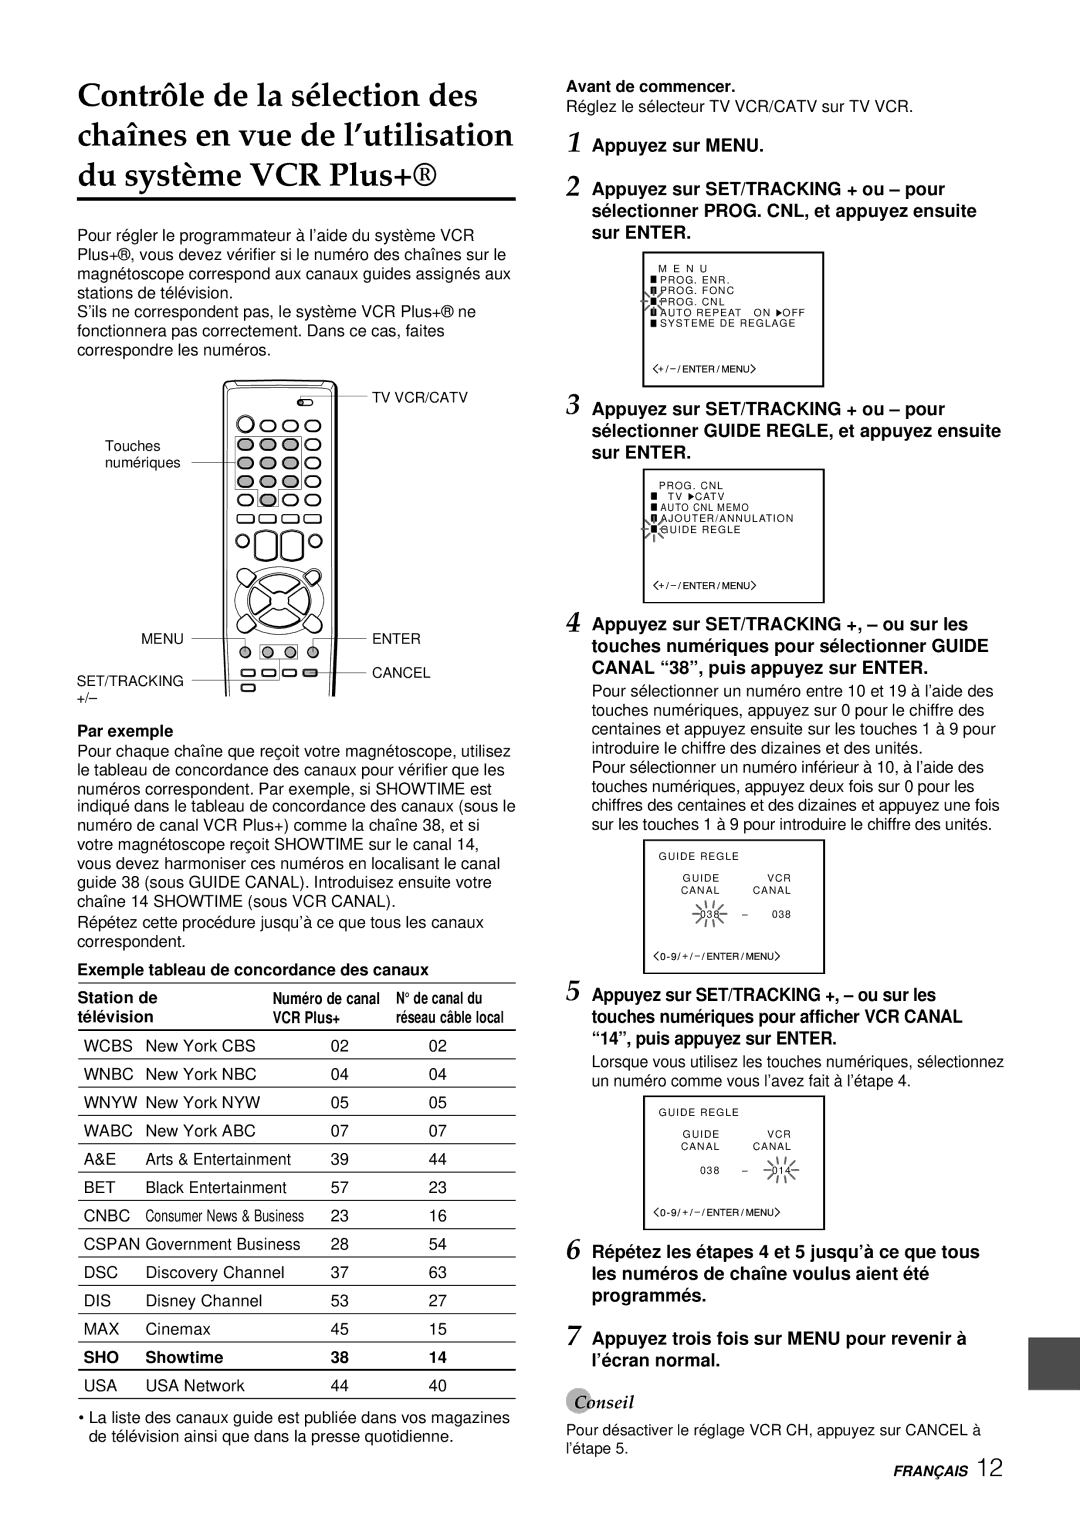
TV VCR/CATV
Touches numériques
MENU | ENTER |
Avant de commencer.
Réglez le sélecteur TV VCR/CATV sur TV VCR.
1 Appuyez sur MENU.
2 Appuyez sur SET/TRACKING + ou – pour sé lectionner PROG. CNL, et appuyez ensuite sur ENTER.
M E N U
![]() PROG . ENR .
PROG . ENR .
![]() PROG . FONC
PROG . FONC
![]() PROG . CNL
PROG . CNL
![]() AUTO REPEAT ON
AUTO REPEAT ON ![]() OFF
OFF
![]() SYSTEME DE REGLAGE
SYSTEME DE REGLAGE
3 Appuyez sur SET/TRACKING + ou – pour
sé lectionner GUIDE REGLE, et appuyez ensuite sur ENTER.
PROG . CNL
TV ![]() CATV
CATV
![]() AUTO CNL MEMO
AUTO CNL MEMO
![]() AJOUTER/ANNULATION
AJOUTER/ANNULATION
![]() GUIDE REGLE
GUIDE REGLE
4 Appuyez sur SET/TRACKING +, – ou sur les touches numé riques pour sé lectionner GUIDE CANAL “38”, puis appuyez sur ENTER.
SET/TRACKING
+/–
Par exemple
CANCEL
Pour sélectionner un numéro entre 10 et 19 à l’aide des touches numériques, appuyez sur 0 pour le chiffre des centaines et appuyez ensuite sur les touches 1 à 9 pour
Pour chaque chaîne que reçoit votre magnétoscope, utilisez le tableau de concordance des canaux pour vérifier que les numéros correspondent. Par exemple, si SHOWTIME est indiqué dans le tableau de concordance des canaux (sous le numéro de canal VCR Plus+) comme la chaîne 38, et si votre magnétoscope reçoit SHOWTIME sur le canal 14, vous devez harmoniser ces numéros en localisant le canal guide 38 (sous GUIDE CANAL). Introduisez ensuite votre chaîne 14 SHOWTIME (sous VCR CANAL).
Répétez cette procédure jusqu’à ce que tous les canaux correspondent.
Exemple tableau de concordance des canaux
Station de | Numéro de canal | N° de canal du | ||
té lé vision | VCR Plus+ | réseau câble local | ||
|
|
|
|
|
WCBS | New York CBS |
| 02 | 02 |
|
|
|
|
|
WNBC | New York NBC |
| 04 | 04 |
|
|
|
| |
WNYW New York NYW |
| 05 | 05 | |
|
|
|
|
|
WABC | New York ABC |
| 07 | 07 |
|
|
|
| |
A&E | Arts & Entertainment | 39 | 44 | |
|
|
|
| |
BET | Black Entertainment | 57 | 23 | |
|
|
|
| |
CNBC | Consumer News & Business | 23 | 16 | |
|
|
| ||
CSPAN Government Business | 28 | 54 | ||
|
|
|
| |
DSC | Discovery Channel | 37 | 63 | |
|
|
|
|
|
DIS | Disney Channel |
| 53 | 27 |
|
|
|
|
|
MAX | Cinemax |
| 45 | 15 |
|
|
|
|
|
SHO | Showtime |
| 38 | 14 |
|
|
|
|
|
USA | USA Network |
| 44 | 40 |
|
|
|
|
|
•La liste des canaux guide est publiée dans vos magazines de télévision ainsi que dans la presse quotidienne.
introduire le chiffre des dizaines et des unités.
Pour sélectionner un numéro inférieur à 10, à l’aide des touches numériques, appuyez deux fois sur 0 pour les chiffres des centaines et des dizaines et appuyez une fois sur les touches 1 à 9 pour introduire le chiffre des unités.
GUIDE REGLE
GUIDE VCR
CANAL CANAL
038 – 038
5 Appuyez sur SET/TRACKING +, – ou sur les touches numériques pour afficher VCR CANAL “14”, puis appuyez sur ENTER.
Lorsque vous utilisez les touches numériques, sélectionnez un numéro comme vous l’avez fait à l’étape 4.
GUIDE REGLE
GUIDE VCR
CANAL CANAL
038 – 014
6 Ré pé tez les é tapes 4 et 5 jusqu’à ce que tous les numé ros de chaîne voulus aient é té programmé s.
7 Appuyez trois fois sur MENU pour revenir à l’é cran normal.
Conseil
Pour désactiver le réglage VCR CH, appuyez sur CANCEL à l’étape 5.
FRANÇ AIS 12