Upgrading or Replacing Memory
Your laptop is equipped with a configurable memory unit. The industry standard JEDEC
NOTE: If you purchased a
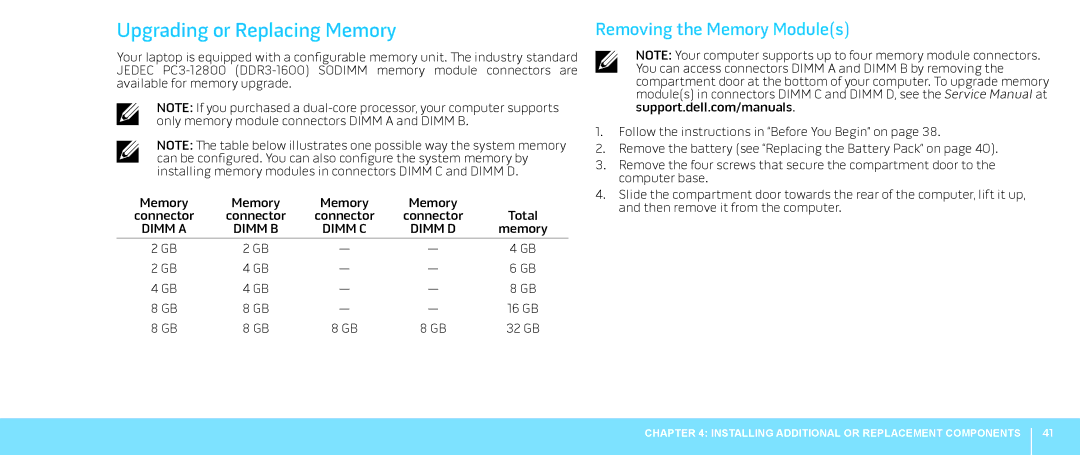
NOTE: The table below illustrates one possible way the system memory can be configured. You can also configure the system memory by installing memory modules in connectors DIMM C and DIMM D.
Memory | Memory | Memory | Memory |
|
connector | connector | connector | connector | Total |
DIMM A | DIMM B | DIMM C | DIMM D | memory |
2 GB | 2 GB | — | — | 4 GB |
2 GB | 4 GB | — | — | 6 GB |
4 GB | 4 GB | — | — | 8 GB |
8 GB | 8 GB | — | — | 16 GB |
8 GB | 8 GB | 8 GB | 8 GB | 32 GB |
Removing the Memory Module(s)
NOTE: Your computer supports up to four memory module connectors. You can access connectors DIMM A and DIMM B by removing the compartment door at the bottom of your computer. To upgrade memory module(s) in connectors DIMM C and DIMM D, see the Service Manual at support.dell.com/manuals.
1.Follow the instructions in “Before You Begin” on page 38.
2.Remove the battery (see “Replacing the Battery Pack” on page 40).
3.Remove the four screws that secure the compartment door to the computer base.
4.Slide the compartment door towards the rear of the computer, lift it up, and then remove it from the computer.
CHAPTER 4: INSTALLING ADDITIONAL OR REPLACEMENT COMPONENTS
41
