Care & Cleaning 19-22
Important Safety Instructions
Maintenance 23-24 Troubleshooting 25-26
Gas Range
Recognize Safety Symbols, Words, Labels
Instructions
General Instructions
Child Safety
Important Safety Instructions
To Prevent Fire or Smoke Damage
Case of Fire
Utensil Safety
Cooking Safety
Self-Clean Oven select models
Cleaning Safety
Important Safety Notice and Warning
Save These Instructions for Future Reference
Surface Cooking
Operating During a Power Failure
Surface Controls
Pilotless Ignition
Burner Grates
Cooktop
Sealed Burners
High Performance Burner
Using the Touchpads
Manual Clean Oven Control
Setting the Timer
Setting the Clock
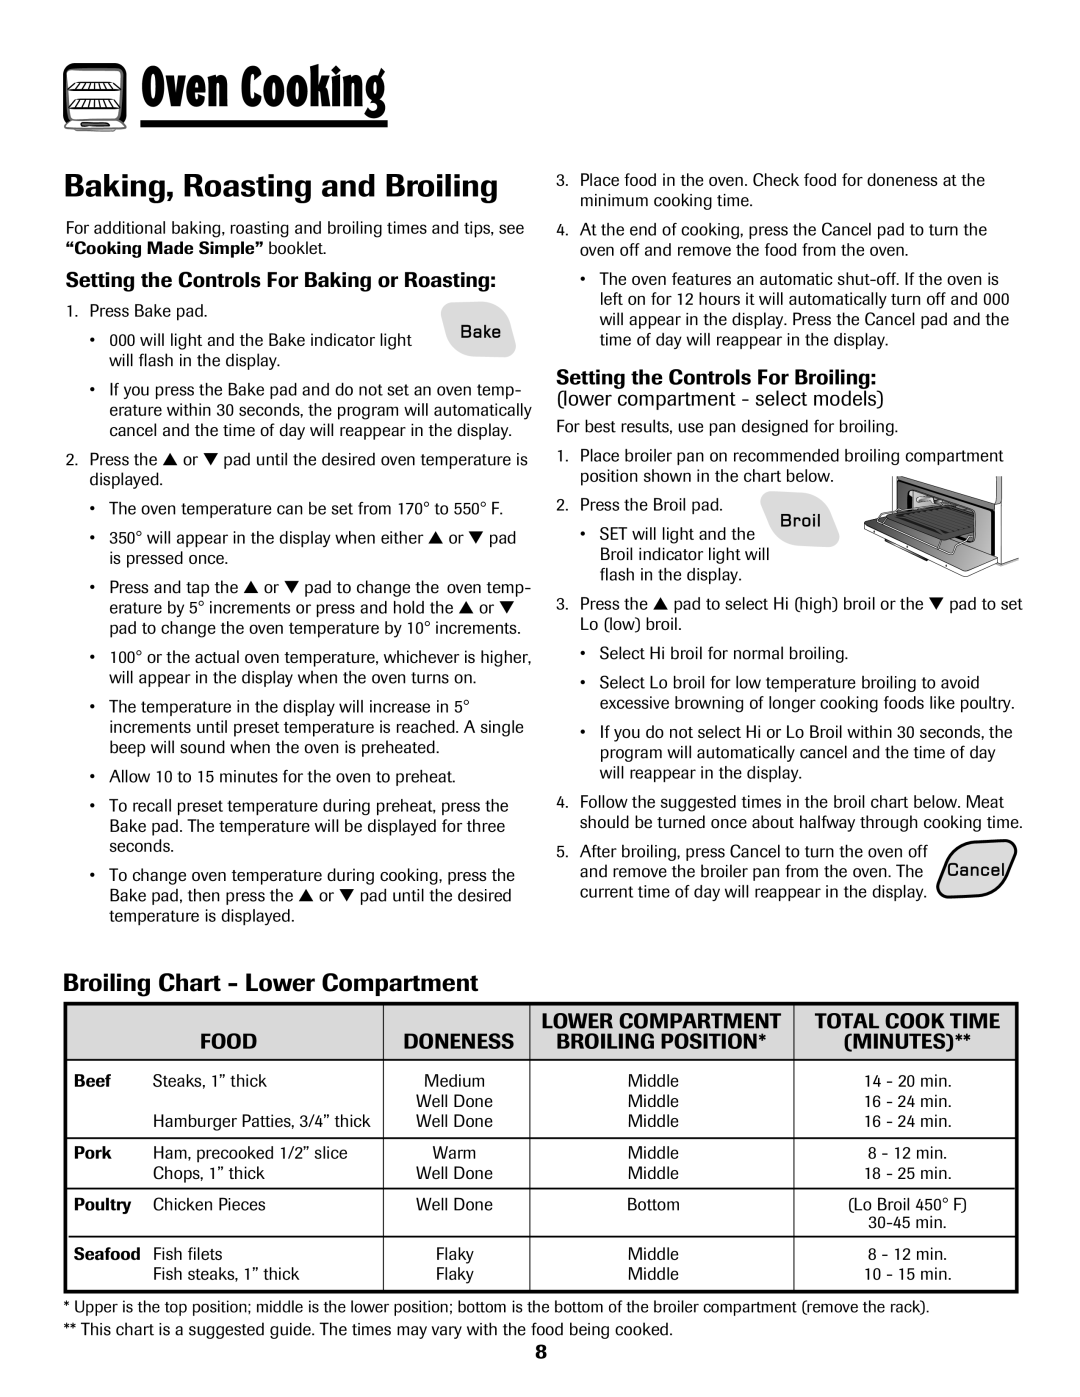
Broiling Chart Lower Compartment
Setting the Controls For Baking or Roasting
Baking, Roasting and Broiling
Setting the Control for Baking and Roasting
Manual Clean Oven Knob
Setting the Control for Broiling
Control select models Oven Temp Knob
Clock
Self-Clean Oven Control select models
BC D G H I J
To change the clock to Hour format
Timer
Fault Codes
Locking the Controls
Cook & Hold
Baking
Baking Notes
Baking Differences Between Your Old and New Oven
Delay Bake
Press the Cancel pad Remove food from the oven
To cancel Keep Warm
Keep Warm
Keep Warm Notes
Automatic Shut-Off/Sabbath Mode
Adjusting the Oven Temperature
Sabbath Mode Notes
Broiling
Oven Broiling Chart
Broil Notes
Rack Total Foods Position
Oven Light
Oven Vent
Oven Racks
Oven Bottom
Two rack Use rack positions 2 and 4, or 1
Half Rack Accessory
Before Self-Cleaning
To set Self-Clean
To Delay a Self-Clean Cycle
After Self-Cleaning
During the Self-Clean Cycle
Care & Cleaning
Cleaning Procedures
Part Procedure
Select models First
To restore ease of movement, then wipe off excess oil
Glass
Is not wiped up, it may discolor the porcelain
Oven Door
Maintenance
Leveling Legs
Oven Window select models
Electrical Connection
Removal of Gas Appliance
Storage Drawer select models
Troubleshooting
Problem Solution
Inches between pans and oven wall
Off. This is normal
Gas Range Warranty
Warranty & Service
What is Not Covered By These Warranties
If you Need Service
Cuisinière à gaz
Les instructions de sécurité importantes et les paragraphes
Instructions de sécurité importantes
Pour éviter un incendie ou des dommages par la fumée
Instructions générales
En cas d’incendie
Sécurité pour les enfants
Cuisson et sécurité
Familiarisation avec l’appareil
Ustensiles et sécurité
Nettoyage et sécurité
Four autonettoyant
Conserver ces instructions pour consultation ultérieure
Avertissement et avis important pour la sécurité
Boutons de commande de la surface de cuisson
Commandes de la surface de cuisson
Cuisson sur la surface
Allumage sans flamme de veille
Brûleurs scellés
Surface de cuisson
Brûleur de haute performance 12,000 BTU
Brûleur de mijotage
Cuisson dans le four
Commandes du four à nettoyage manuel certains modèles
Utilisation des touches
Programmation de la minuterie
Tableau de cuisson au gril Compartiment inférieur
Cuisson courante, rôtissage et cuisson au gril
Certains modèles Réglage du bouton
Régulateur de four à nettoyage manuel
Réglage du four pour une cuisson courante ou un rôtissage
Réglage du four pour cuisson au gril certains modèles
Horloge
Tableau de commande au four autonettoyant certains modèles
Changement de l’horloge à un format de 24 heures
Réglage de l’horloge
Verrouillage des commandes
Minuterie
Codes d’anomalie
Cuisson et maintien
Cuisson courante
Remarques sur la cuisson courante au four
Différences de cuisson entre l’ancien four et le nouveau
Cuisson différée
Remarques sur la fonction maintien au chaud
Maintien au chaud
Programmation du maintien au chaud
Annulation du maintien au chaud
Annulation du mode sabbat
Remarques sur le mode sabbat
Arrêt automatique/Mode sabbat
Ajustement de la température du four
Tableau de cuisson au gril du four
Cuisson au gril
Remarques sur la cuisson au gril
Position Degré DE Temps DE Cuisson Aliments
Éclairage du four
Évent du four
Fond du four
Grilles du four
Deux grilles Placer les grilles aux positions 2 et 4 ou 1 et
Demi-grille
Avant l’autonettoyage
Nettoyage
Programmation de l’autonettoyage
Démarrage différé d’un cycle d’autonettoyage
Pendant le cycle d’autonettoyage
Après le cycle d’autonettoyage
Pièce Nettoyage
Méthodes de nettoyage
Latéraux, tiroir
Panneaux
De remisage
Porte du four
Porte du four Pieds de réglage de l’aplomb
Entretien
Lampe du four
Hublot du four certains modèles
Tiroir de remisage
Déplacement d’un appareil à gaz
Raccordement électrique
Sole du four
Recherche des pannes
Problème Solution
Cuisson au four, voir la brochure La cuisson simplifiée
Parois du four
Particulièrement les résidus d’aliments acides ou sucrés
Impossibilité d’autonettoyage
La porte du four ne se déverrouille
Pas après l’autonettoyage
Remarques
Si un service après-vente est nécessaire
Garantie et service après-vente
Garantie de la cuisinière à gaz
Ne sont pas couverts par ces garanties
Estufa a Gas
Instrucciones
Seguridad
Canadá
Para Evitar un Incendio o Daño Causado por el Humo
Instrucciones Generales
En Caso de Incendio
Seguridad para los Niños
Seguridad Para Cocinar
Generalidades
Utensilios Apropiados
Seguridad de la Limpieza
Horno Autolimpiante
Conserve estas Instrucciones para Referencia Futura
Aviso y Advertencia Importante Sobre Seguridad
Controles Superiores
Cocinando en la Estufa
Encendido Sin Piloto
Perillas de Control de los Elementos Superiores
Rejillas de los Quemadores
Cubierta
Quemadores Sellados
Quemador de Alto
Controles del Horno de Limpieza Manual
Cocinando en el Horno
Uso de las Teclas
Programación del Temporizador
Tabla para Asar a la Parrilla Compartimento inferior
Horneado, Asado y Asado a la Parrilla
Manual modelos selectos Perilla de la Temperatura del Horno
Perilla del Horno de Limpieza
Ajuste del Horno para Horneado y asado
Ajuste de los Controles para Asado a la Parrilla
‘Clock’ Reloj
Panel de Control del Horno Autolimpiante modelos selectos
Para cambiar el reloj a formato de 24 horas
Programación del Reloj
‘Timer’ Temporizador
Códigos de Errores
Bloqueo de los Controles
‘Bake’ Horneado
‘Cook & Hold’ Cocción y Mantener Caliente
Notas sobre Horneado
‘Delay Bake’ Horneado Diferido
Oprima la tecla ‘Cancel’ Retire el alimento del horno
Para cancelar ‘Keep Warm’
‘Keep Warm’ Mantener Caliente
Notas sobre ‘Keep Warm’
Cierre Automático/Modo Sabático
Ajuste de la temperatura del horno
Notas Sobre el Modo Sabático
‘Broiling’ Asar a la Parrilla
Notas Sobre Asado a la Parrilla
Tabla de Asar a la Parrilla del Horno
Fondo del Horno
Respiradero del Horno
Parrillas del Horno
Posiciones de la Parrilla
Posicion Para Hornear
Accesorio de la Media Parrilla
Antes de la Autolimpieza
Para programar ‘Self-Clean’ Autolimpieza
Para diferir un ciclo de autolimpieza
Nota Para la limpieza manual, ver página
Durante el ciclo de autolimpieza
Después del ciclo de autolimpieza
Pieza Procedimiento DE Limpieza
Procedimientos de Limpieza
Cuidado y Limpieza
Puerta del Horno
Mantenimiento
Ventana del Horno
Tornillos Niveladores
Gaveta de Almacenamiento
Retiro de la Estufa a Gas
Conexión Eléctrica
Panel Inferior del Horno
Localización y Solución de Averías
Problema Solución
El horno no se autolimpia
Códigos de Errores
205 C 400 F para programar un ciclo de limpieza
Limpiados antes del ciclo de autolimpieza
Notas
Garantía de la Estufa a Gas
Garantía y Servicio
Lo que No Cubren Estas Garantías
Si Necesita Servicio

 Oven Cooking