Manuals
/
Amana
/
Kitchen Appliance
/
Range
Amana
ARG7302 Testing for Gas Leaks, Seal Openings, Anti-tip Bracket Installation, Place Range
Models:
ARG7302
1
12
60
60
Download
60 pages
53.71 Kb
9
10
11
12
13
14
15
16
Install
Timer
Warranty
Problem
Pièces et accessoires
Commandes du four
Adjusting Air Shutter
Setting Electronic Clock
Self-Cleaning Oven
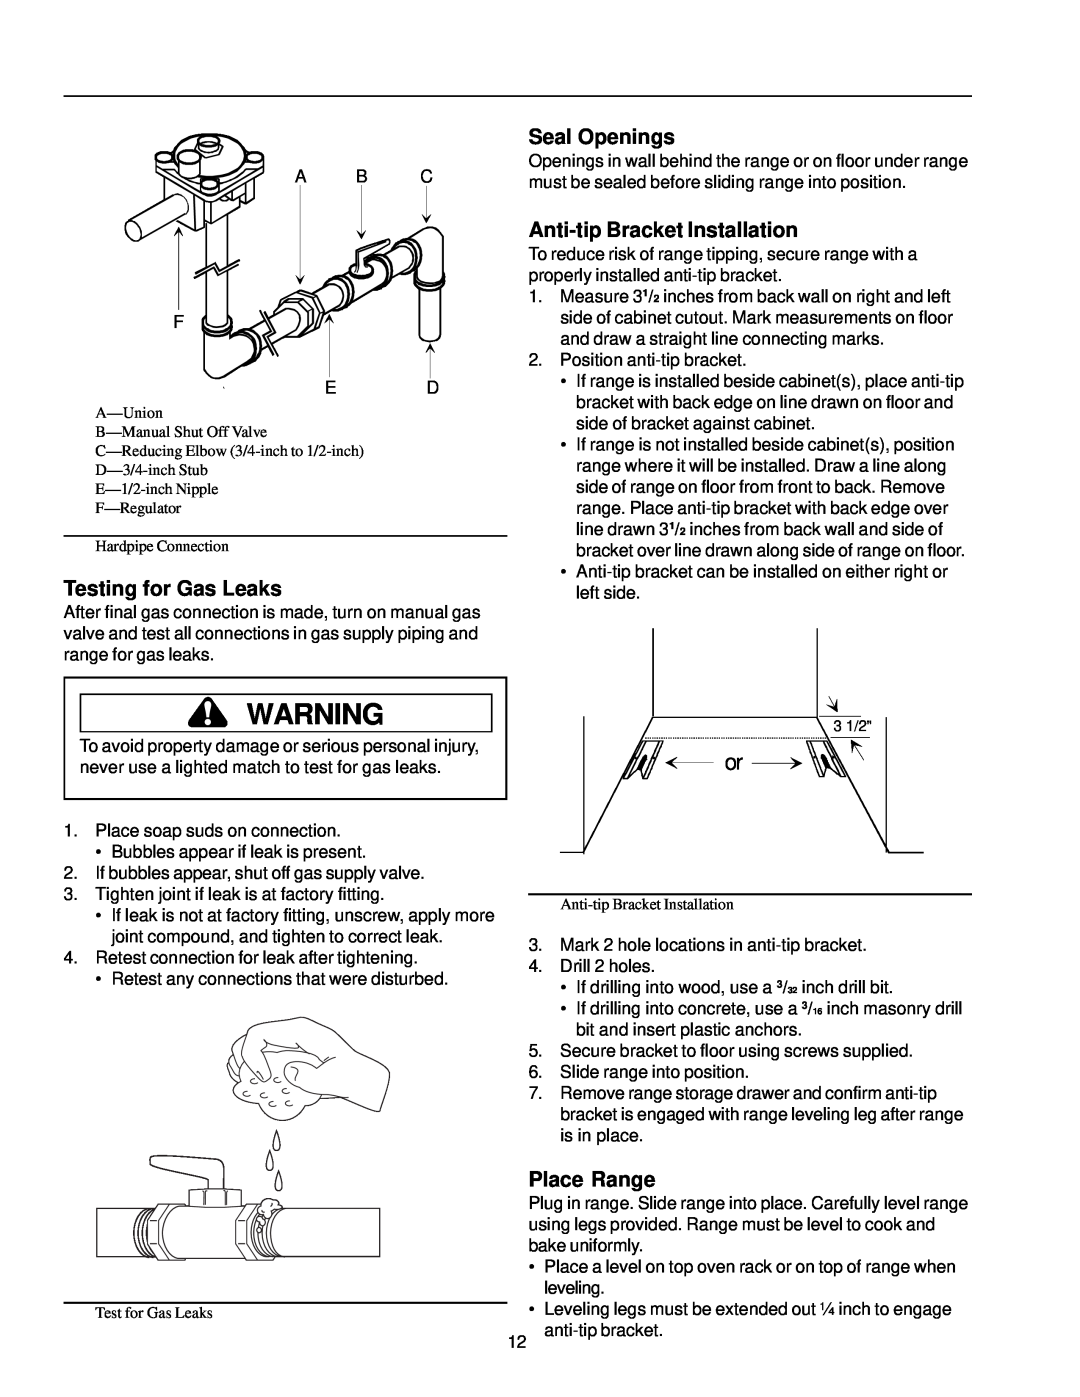
Testing for Gas Leaks
Page 12
Image 12
Page 11
Page 13
Page 12
Image 12
Page 11
Page 13
Contents
Please Read Manual Before Operating Range Installer
Customer
Contents
Parts and Accessories
Service
Asure Extended Service Plan
Important Safety Information
INSTALL ANTI-TIP BRACKETS PACKED WITH RANGE
SEE INSTALLATION INSTRUCTIONS
ALL RANGES CAN TIP INJURY TO PERSONS COULD RESULT
SELF-CLEANING OVEN
ALL APPLIANCES
OVEN
SURFACE COOKING UNITS
Installation
Precautions
VENTILATION HOOD
In Case of Fire
Minimum Clearances to Combustible Surfaces
Special Countertop Conditions
Electrical Connection Requirements
Electrical Connection Clearance
Gas Supply Location
Gas Connection Requirements
Gas Supply Pressure
Pressure Regulator Location
Oven Shutoff Valve
Converting for Use with Natural Gas or Propane Gas
Converting Type 1 Pressure Regulator for Use with LP/ Propane
See Adjusting Surface Burner Flame section
Converting Type 2 Pressure Regulator for Use with LP/Propane
Converting Surface Burners for Use with LP\Propane
B A C
Converting Oven Burner for Use with LP\Propane
See Removing Storage Drawer section
Converting Broiler Burner for Use with LP\Propane
Gas Connection
Converting Surface Burners for Use with Natural Gas
Converting Oven Burner for Use with Natural Gas
Removing Storage Drawer section
Testing for Gas Leaks
Anti-tip Bracket Installation
Seal Openings
Place Range
Removal and Reinstallation of Range
Test and Adjust Surface Burner Flame
Place Grates and Burner Caps
Correct
Test and Adjust Oven Burner Flame
Adjusting Air Shutter
Removing Oven Bottom
Adjust Oven Burner Flame
Broiler Flame
Radiant Screen Style
TIMER
Operation
MINS
CLOCK
Setting Electronic Clock
Setting Electronic Timer
Service Tones and Codes
Resetting and Canceling Timer
Operating Surface Burner during a Power Failure
Adjusting Burner Flame Size
Operating Surface Burners
Cooking Utensils
Utensil Material Characteristic
Prepare to Bake
Type
Temperature
Oven Rack Placement
Baking
Check for Bake Burner Flame
Adjusting Factory Set Baking Temperature
Broiling
Broiling Tips
Broiling
Self-Cleaning
Prepare for Self-clean Cycle
Self-cleaning
Interrupt Self-Clean Cycle
Cooking Guide
Baking Guide
Broiling Guide
Food
Poultry Roasting Guide
Beef and Pork Roasting Guide
Oven temperature
Care and Cleaning
Removing Oven Door
Replacing Oven Light
Removing Storage Drawer
Cleaning
Part
Materials to Use
General Directions
Before Calling for Service
Problem
Check
OVEN and LOCKED
Warranty
COOKING PRODUCTS excluding wall ovens FULL ONE YEAR WARRANTY
LIMITED SECOND YEAR WARRANTY ON ALL PARTS
LIMITED THIRD THRU FIFTH YEAR WARRANTY ON GLASS/CERAMIC TOP
Setting Electronic Clock
Setting Electronic Timer
Adjusting Factory Set Baking Temperature
Self-Cleaning
Pièces et accessoires
Service après-vente
Table des matières
Identification du modèle
VOIR LA NOTICE D’INSTALLATION
Renseignements de sécurité importants
MISE EN GARDE
CELA PEUT PROVOQUER DES BLESSURES
TOUS APPAREILS
FOUR AUTONETTOYANT
FOUR
BRÛLEURS
HOTTE
En cas d’incendie
Précautions
Flamme du brûleur de cuisson
Mise en service
Emplacement de la cuisinière
MISE EN GARDE
Matériaux d’emballage
Conditions spéciales concernant le dessus du comptoir
Alimentation en électricité
Dégagement pour la prise
Emplacement du détendeur
Emplacement du raccordement au gaz
Alimentation en gaz
Pression de l’alimentation en gaz
Soupape d’arrêt du four
Conversion au gaz naturel ou au gaz propane
Conversion d’un détendeur de type 1 au gaz propane/GPL
Conversion d’un détendeur de type 2 au gaz propane/GPL
Ouvrir à fond
Conversion des brûleurs au gaz propane/GPL
Voir la rubrique Réglage de la flamme des brûleurs
Conversion du brûleur du four au gaz propane/GPL
Conversion du brûleur du gril au gaz propane/GPL
Conversion d’un détendeur de type 1 au gaz naturel
Conversion d’un détendeur de type 2 au gaz naturel
Conversion des brûleurs au gaz naturel
Raccordement au gaz
A-Détendeur B-Raccord C-Flexible de raccordement D-Robinet d’arrêt
Flexible de raccordement
A-Raccord B-Robinet d’arrêt C-Coude de réduction de 3/4 x 1/2 po
Vérification des fuites de gaz
Pose de la patte de stabilisation
Obstruction des ouvertures
Placement des grilles et des couvre-brûleurs
Mise en place de la cuisinière
Retrait et remise en place de la cuisinière
Réglage de la flamme des brûleurs
Réglage de la flamme du four
Réglage de l’obturateur d’air
Flamme du gril
Retrait de la partie inférieure du four
Surface avoisinante au brûleur
Type de l’écran de rayonnement
Commandes du four
Fonctionnement
OFF WM 200 250
Touche
Réglage de l’horloge
Réglage de la minuterie
Lumière du four
Arrêt automatique du four
Utilisation des brûleurs de la surface de cuisson
Plats de cuisson
Réglage de taille de la flamme du brûleur
Préparation à la cuisson
Caractéristiques des matériaux des plats
Réponse de la
Utilisation
CLEAN
BROIL
Cuisson ordinaire
Mise en place des grilles du four
Modification de la température de cuisson préréglée en usine
Cuisson sur le gril
Conseils pour la cuisson sur le gril
Cuisson sur le gril
Autonettoyage
Préparation à l’autonettoyage
Autonettoyage
Déverrouillé Verrouillé
Guide de cuisson
Guide de cuisson ordinaire
Guide de cuisson sur le gril
Aliment
Guide de cuisson de la volaille
Guide de cuisson du boeuf et du porc
Remplacement de l’ampoule du four
Nettoyage et entretien
Retrait de la porte du four
Retrait du tiroir de rangement
Nettoyage
Pièce
Produits
Indications
Avant d’appeler le service de dépannage
Problème
Vérifier ces points
Le dessus de la cuisinière
Ceci est normal
devient chaud pendant son
fonctionnement
Garantie
APPAREILS DE CUISSON AMANA sauf les fours encastrés
GARANTIE COMPLÈTE D’UN AN
GARANTIE LIMITÉE PENDANT LA DEUXIÈME ANNÉE SUR TOUTES LES PIÈCES
Page
Instructions de référence rapide
Réglage de l’heure
Réglage de la minuterie
Arrêt automatique du four
Top
Page
Image
Contents