Users Guide
One Sprint. Many Solutions.SM
Welcome to Sprint
Table of Contents
Personalizing Your PPC6600
Index 188
Section
Getting Started
Setting Up Service
Setting Up Your Voicemail
To set up your voicemail
Sprint PCS Vision Password
Sprint PCS Account Passwords
Account Password Voicemail Password
Visit Our Website
Reaching Sprint Customer Service
To access automated invoicing information
Getting Help
To call Sprint PCS Directory Assistance
Sprint PCS Operator Services
To access Sprint PCS Operator Services
Sprint PCS Directory Assistance
Earphone Plug
Qwerty Keyboard Microphone Sync Connector Soft Reset
Your Sprint PCS Vision Smart Device
Top, Front, and Bottom Components
Back, Left and Right Side Components
Battery Fixing Lock
Navigation Pad
PPC6600 Features
Battery life estimates when fully charged
Battery
To recharge your PPC6600
Data Retention
Recharging Your Device
To the sync To AC Adapter Connector of your PPC6600
USB Cradle
Accessories
When Your Battery is Low
To view the battery status
Stereo Headset
AC Adapter Converter
USB Sync Cable
Section
To turn your device off
Initiating Your Sprint PCS Vision Smart Device
Getting to know Your PPC6600
Turning Your PPC6600 On and Off To turn your device on
Screen Orientation
Today
Tap Settings Personal tab Today
Today Screen
Meaning
Indicators
Notifications
Title Bar
Command Bar
Icon Program Description
Pop-Up Menus
Programs
Icon Program Description
Entering Information
Using the Input Panel
Typing With the Soft Keyboard
Typing on the Qwerty Keyboard
Word Completion tab
Block Recognizer
Using Letter Recognizer
Using Block Recognizer
Letter Recognizer
To learn writing in Transcriber
Using Transcriber
To punctuate in Transcriber
Transcriber
Editing/Selecting Text
Using Profiles
Selecting Writing
Writing on the Screen
Tips to Ensure Successful Recognition
Converting Writing to Text
To select a drawing
Drawing on the Screen
To create a drawing
To create a recording
Recording a Message
Tap Programs Find
Finding Information
To change recording formats
Sprint PCS Service Features
About The Dialer Screen
Sprint PCS Service Features
Indicator Meaning
Checking Your Connection
Navigation Pad and Dialing
Turning Phone On and Off
Adjusting Phone Volume
To make a call from Contacts
To make a call from the Dialer
Backspacing and Deleting
For example
Using Speed Dial
To store a Speed Dial entry
To make a call from Speed Dial
To make a call from the Call History
Tips for Speed Dial Setting
To swap between calls
To answer an incoming call
To end a call
To answer a call waiting call
To view a note
Taking Notes During a Call
To take a note
To retrieve your voicemail
Enabling Speakerphone Mode
Checking Your Voicemail
To delete individual calls from Call History
Managing Your Call History
To view Call History details
To view duration of calls
To add an entry to Contacts from Call History
Tap Tools Call Timers
To manage how long your Call History details are saved
Saving Contacts From Call History
To make an emergency call
Tap Settings System tab Button Lock
Locking the keypad
Locking Your Phone
Tap Settings Personal tab Password
Simple 4 digit password or Strong alphanumeric password
Sprint PCS VisionSM
Sprint PCS VisionSM
Personal Edition
Message Types
Messaging
Web
Sprint PCS Picture MailSM
Creating Your Sprint PCS Picture Mail Password
When is my data connection dormant?
Sprint PCS Vision FAQs
When is my data connection active?
ActiveSync Errors
Using ActiveSync Synchronizing Information
Synchronizing Information
Using ActiveSync
Installing ActiveSync
Creating a Partnership
Connecting Your Device to Your PC
Synchronizing Inbox
Synchronizing Information
Synchronizing Tasks
Synchronizing Calendar
Synchronizing Contacts
To receive information
Synchronizing Using an Infrared Connection
Transferring Items Using Infrared
To send information
To view ActiveSync Error information
ActiveSync Errors
Personalizing Your PPC6600
Device Settings Phone Settings
Personalizing Your PPC6600
Personal Tab
System Tab
Icon Program Backlight
Clock & Alarms
Power
Regional Settings
Input
Default settings
Buttons
Owner Information
Tap Settings Personal tab Menus
Tap Settings Personal tab Owner Information
Menus
Simple 4 digit or Strong alphanumeric
Password
Tap Settings Personal tab Sounds & Notifications
Sounds and Notifications
To change the background
Tap Settings Personal tab Today Items tab
Today
About
Memory
Clock & Alarms
Tap Settings System tab Backlight
Backlight
To back up to FlashROM
Power
To restore to FlashROM
Permanent Save
Ring Tone
Tap Settings Personal tab Phone
Keyboard
Ring Type
Add Ring Tone
Keypad Tone
Automatic Answer
Services
Feature Function
Calendar Contacts Tasks
Using Microsoft Pocket Outlook
To view the Calendar display
Using Microsoft Pocket Outlook
Calendar Scheduling Appointments and Meetings
Creating or Changing an Appointment
Sending a Meeting Request
Using the Summary Screen
Tap Reminder and select Remind me
Setting a Reminder for an Appointment
Beaming an Appointment
Viewing Contacts
Contacts Tracking Friends and Colleagues
To edit an existing contact
Creating or Changing a Contact
Finding a Contact
To add a new contact
Changing Options
Beaming a Contact
Creating or Changing a Task
Tasks Keeping a To Do List
Tap Tools Entry Bar
Setting a Reminder for a Task
Beaming a Task
Tap Programs Notes New
Creating a Note
Sending a Note via E-mail
Beaming a Note
Getting Connected
About Connections
Connecting to the Internet
Connecting to the Internet via Sprint
Tap Settings Connections tab Connections
Tap Advanced
Setting up a WAP Gateway
Cellular Line
Browsing the Internet
Pocket Internet Explorer
Tap Connect
Terminal Services Client
Connecting to a Terminal Server
Tap Programs Terminal Services Client
Shut down Tap Disconnect
Navigating Within Terminal Services Client
Disconnecting Without Ending a Session
Disconnecting and Ending a Session
Improving browser performance
Bluetooth
Tips and Tricks
Improving display performance
Turning Bluetooth On and Off
Using Bluetooth
Using Bluetooth Settings
Office
To access Bluetooth Settings
Using Profiles
Tap Bluetooth Settings
To rename or delete a profile
To access Accessibility properties
Setting Accessibility Properties
Enabling Bluetooth Services
Authentication Passkey required
To access Bluetooth Services for configuration
Tap Bluetooth Settings Services tab
Authorization required
To set up a paired device
Using Bluetooth Manager
To access Bluetooth Manager
Pairing Devices
To use Business Card Exchange
Exchanging Business Cards
To run the Bluetooth Connection Wizard
Using the Bluetooth Connection Wizard
Tap Bluetooth Settings Services tab
Using a Serial Port Connection
To establish a serial connection
Setting up a Bluetooth Hands-free/Headset Connection
Tap Bluetooth Manager Tap New Hands-free/Headset setup Next
Tap Bluetooth Manager Tap New ActiveSync via Bluetooth Next
To use Dial-up Networking
Dial-Up Networking Connecting to a Remote PC
Tap Bluetooth Manager Tap New Connect to a network Next
Browsing and Sharing Data on a Remote Device
To send data via Bluetooth transfer
Using a Bluetooth Personal Area Network
Use server-assigned IP address, then tap OK
To host a Personal Area Network
To join a Personal Area Network
My Shortcuts
Double-tap is context sensitive
Active Connections
Exploring Messaging
Exploring Messaging
To set up an e-mail service
During synchronization
Connecting Directly to an E-mail Server
Sending and Receiving E-mail
Synchronizing E-mail Messages
Creating an E-mail Message
Using the Message List
To send Text Messages from the Phone Dialer screen
SMS Text Messaging
Send Pictures or Send Videos, then tap OK
To send Sprint PCS Picture Mail
Tap Messaging Tap Accounts Picture Mail
Tap Messaging
Receiving a Sprint PCS Picture Mail
Options
Accessing Sprint PCS Picture Mail From Your PC
Managing Your Sprint PCS Picture/Video Mail
Tap Programs MSN Messenger
To switch to MSN Messenger
Chatting with Contacts
Setting Up and Signing
Working with Contacts
Managing Messages and Folders
Exploring Messaging
Pocket Word Pocket Excel Windows Media Player Pictures
Using Companion Programs
Pocket Word
To create a new document using Pocket Word
Using Companion Programs
Entering Information in a New File
Writing Mode
Typing Mode
Drawing Mode
Recording Mode
To create a new Pocket Excel file
Pocket Excel
Tips for Working in Pocket Excel
Restore
Finding and Listing Pictures
Windows Media Player
Pictures
Transferring Pictures
Deleting an Image
Viewing Pictures
Sorting Pictures
Tap Tools, then select Set as Today Wallpaper
Setting Pictures as Background
Editing Pictures
Customizing Pictures
To select the Time Delay between slides
Camera Album Managing Sprint PCS Picture MailSM
Using Camera and Album
Tap Programs Camera
Using Camera and Album
There are two ways to enter the Camera mode
Camera
Up and Down Buttons
Usage of Buttons in Camera Mode
Left and Right Buttons
Capture/Selects
133
Photo Capture Mode
Section
Upload to Online Album
Send Picture Mail
Send via E-mail
Zooming In/Out
Camera and Album
Video Capture Mode
Picture Frame Capture Mode
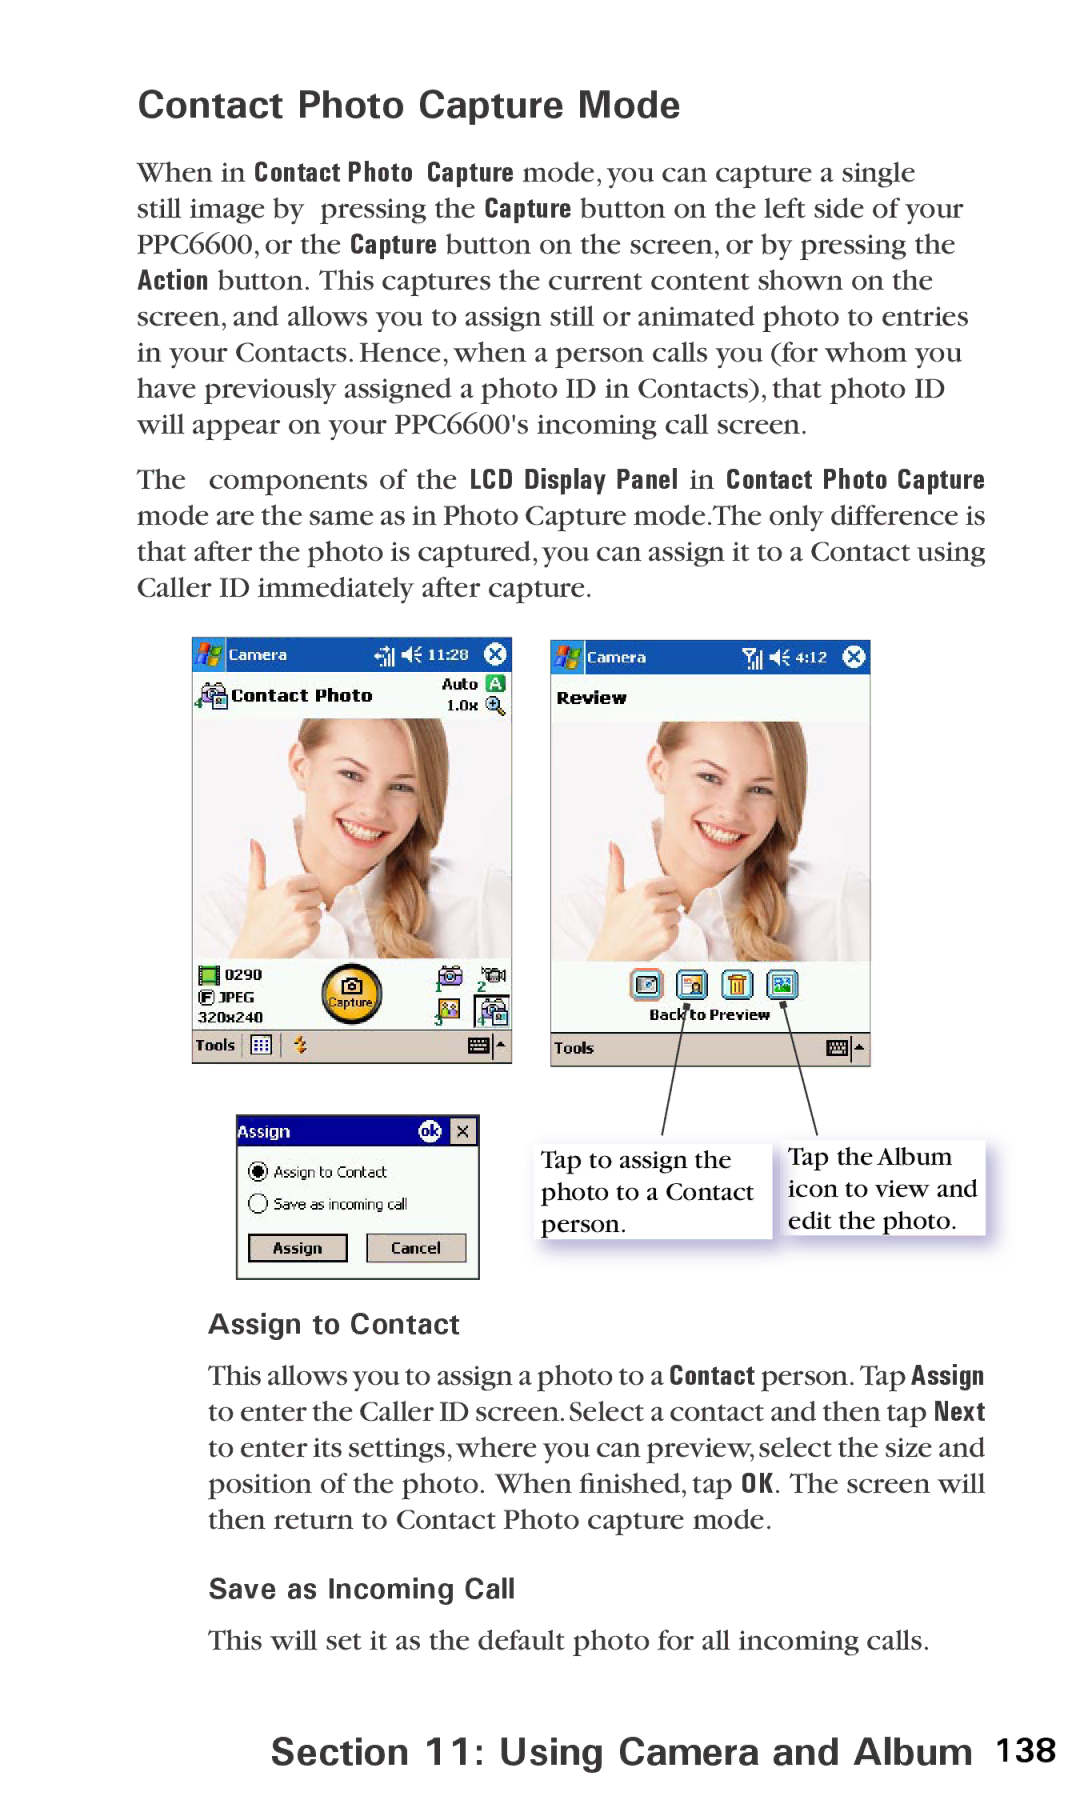
Save as Incoming Call
Contact Photo Capture Mode
Assign to Contact
Image Control
Tools Menu
Ambience
Image tab
Options
General tab
Video tab
Select Tools Options Modes tab Or, select Tools Manage
Modes tab
Options Function
Tap Programs Album
Thumbnail View Mode
To enter Album mode
Album
Pop up menu when you tap
To start editing the picture
Making an Annotation on Your File
Editing Your Pictures
Tap File Save or Save as
To adjust picture size
To save an edited picture
Send Picture Mail To send one or more files from Album
To adjust view properties of the picture
Sending Pictures
Will appear. Tap to
Browse Online Album
Upload All
General, Association, and Slide Show
Setting Audio Files as Ring Tones
Rotate Counterclockwise icons on the Toolbar
General tab
Function Explanation
Icons on the Toolbar
Detailed View Mode
Association tab
Slide Show tab
To Set as Today Wallpaper
To Reset the Today Screen Back to the Default Wallpaper
Images Too Big for Screen
Slide Show View
Full Screen View Mode
Managing Sprint PCS Picture Mail
Using the Sprint PCS Picture Mail Website
To access the Sprint PCS Picture Mail Website
To access your online Album options from your PPC6600
Section
Adding or Removing Programs
To add programs using ActiveSync
Maintenance, Safety, and Troubleshooting
To remove a program
Tap Settings System Remove Programs
To add a program directly from the Internet
To view memory allocation and availability
Tap Settings System tab Memory
Managing Memory
Finding Space in Storage Memory
Deleting Unnecessary Files
Moving E-mail Attachments
Saving New Items on the Storage Card
To insert or remove a memory card
Backing Up Files
SD and MMC Cards
Saving Word or Excel files to a Memory Card
Backing up or Restoring Your System via ActiveSync
Backing up or Restoring Your System Using xBackup
Performing a Soft Reset
Resetting the PPC6600 and Clearing Memory
Performing a Full Reset
Regulatory Agency Identification Numbers
Maintenance, Safety, Troubleshooting
Accessories Model Number
General Precautions
Important Health and Safety Information
Safety Precautions for Power Supply Unit
SAR Information
Hearing Aids
TIA Safety Information
Pacemakers
Persons with pacemakers
Driver Safety Tips
Do wireless phones pose a health hazard?
Consumer Information on Wireless Phones
Maintenance, Safety, Troubleshooting
What are the results of the research done already?
What kinds of phones are the subject of this update?
Maintenance, Safety, Troubleshooting
What about children using wireless phones?
Maintenance, Safety, Troubleshooting
Maintenance, Safety, and Troubleshooting
How does the FCC Audit Cell Phone RF?
Maintenance, Safety, and Troubleshooting
Audio
System Information
Display
Cdma Module Dual Band
Connection
Power Supply
Controls and Lights
Troubleshooting
Problem
Tapping and Writing Problems
Connection Problems
Maintenance, Safety, Troubleshooting
188
Index
189
190