Viewing Digital Photographs, Creating Slide Shows and Calendars
Photo Explorer can help you manage your digital photographs and other images, letting you easily view, print, and edit them, as well as create customized slide shows.
Click the ![]() button on the QMedia Bar to open Photo Explorer.
button on the QMedia Bar to open Photo Explorer.
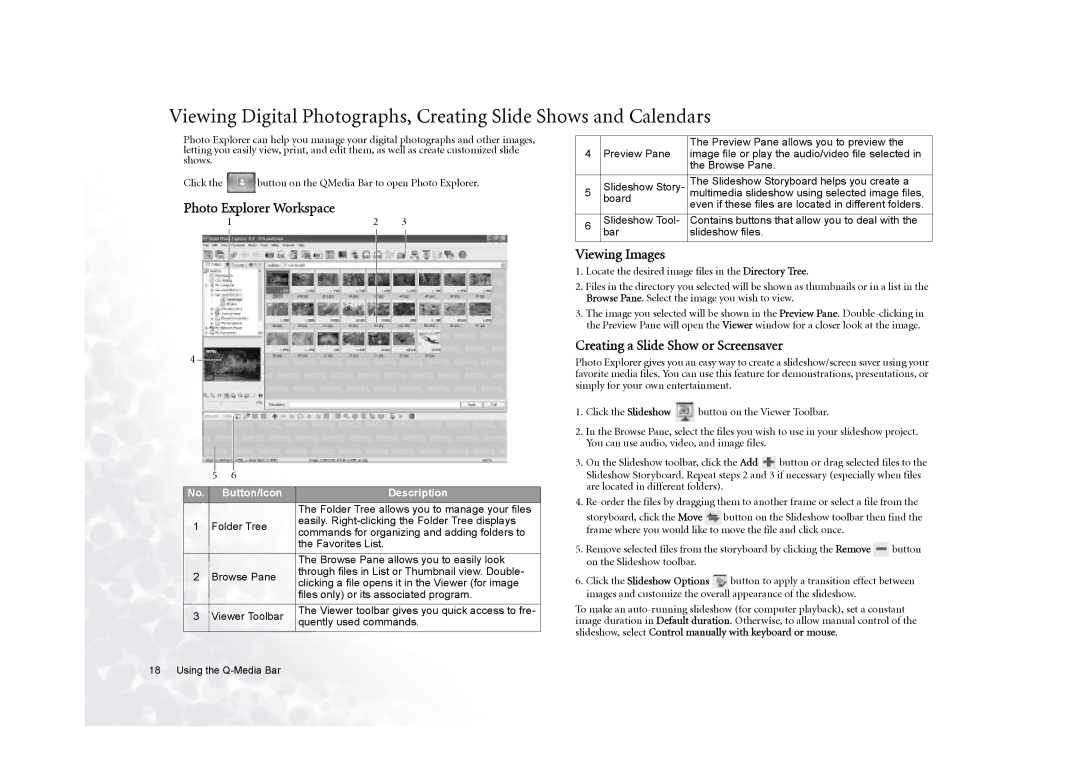
Photo Explorer Workspace
1 | 2 | 3 |
4
|
|
|
|
|
| |
|
|
|
|
|
| |
| 5 | 6 |
| |||
|
|
|
|
|
| |
No. |
|
| Button/Icon | Description | ||
|
|
|
|
| The Folder Tree allows you to manage your files | |
1 | Folder Tree | easily. | ||||
commands for organizing and adding folders to | ||||||
|
|
|
|
| ||
|
|
|
|
| the Favorites List. | |
|
|
|
|
|
| |
|
|
|
|
| The Browse Pane allows you to easily look | |
2 | Browse Pane | through files in List or Thumbnail view. Double- | ||||
clicking a file opens it in the Viewer (for image | ||||||
|
|
|
|
| ||
|
|
|
|
| files only) or its associated program. | |
|
|
|
|
|
| |
3 | Viewer Toolbar | The Viewer toolbar gives you quick access to fre- | ||||
quently used commands. | ||||||
|
|
|
|
| ||
|
| The Preview Pane allows you to preview the | |
4 | Preview Pane | image file or play the audio/video file selected in | |
|
| the Browse Pane. | |
| Slideshow Story- | The Slideshow Storyboard helps you create a | |
5 | multimedia slideshow using selected image files, | ||
| board | even if these files are located in different folders. | |
|
| ||
|
|
| |
6 | Slideshow Tool- | Contains buttons that allow you to deal with the | |
bar | slideshow files. | ||
|
Viewing Images
1.Locate the desired image files in the Directory Tree.
2.Files in the directory you selected will be shown as thumbnails or in a list in the Browse Pane. Select the image you wish to view.
3.The image you selected will be shown in the Preview Pane.
Creating a Slide Show or Screensaver
Photo Explorer gives you an easy way to create a slideshow/screen saver using your favorite media files. You can use this feature for demonstrations, presentations, or simply for your own entertainment.
1.Click the Slideshow ![]() button on the Viewer Toolbar.
button on the Viewer Toolbar.
2.In the Browse Pane, select the files you wish to use in your slideshow project. You can use audio, video, and image files.
3.On the Slideshow toolbar, click the Add ![]() button or drag selected files to the Slideshow Storyboard. Repeat steps 2 and 3 if necessary (especially when files are located in different folders).
button or drag selected files to the Slideshow Storyboard. Repeat steps 2 and 3 if necessary (especially when files are located in different folders).
4.
storyboard, click the Move ![]() button on the Slideshow toolbar then find the frame where you would like to move the file and click once.
button on the Slideshow toolbar then find the frame where you would like to move the file and click once.
5.Remove selected files from the storyboard by clicking the Remove ![]() button on the Slideshow toolbar.
button on the Slideshow toolbar.
6.Click the Slideshow Options ![]() button to apply a transition effect between images and customize the overall appearance of the slideshow.
button to apply a transition effect between images and customize the overall appearance of the slideshow.
To make an
18 Using the
