Page
Part code XA4813-051
Enclosed Accessories
Accessories
Following items should also be enclosed in the box
Front view
Names of Machine Parts and Their Functions
Right-side/rear view
Needle and presser foot section
Operation buttons
Contents Getting Ready
Automatic reverse/reinforcement stitch key
Operation panel
Following are available as optional accessories
Optional Accessories
Introduction
Sewing Machine Features
Contents
Utility Stitches
Index
Stitch Settings
Maintenance
Troubleshooting
Important Safety Instructions
For Users in the UK, EIRE, Malta and Cyprus only
Congratulations on Choosing OUR Machine
Getting Ready
Turning the Machine On/Off
Power supply precautions
Turning off the machine
3Unplug the power supply cord from the electrical outlet
4Unplug the power supply cord from the power supply jack
Turning on the machine
Winding/Installing the Bobbin
Bobbin precautions
Winding the bobbin
Place the spool of thread for the bobbin onto the spool pin
4Slide the bobbin winder shaft to the right
Thread is cut to a suitable length
Pass the thread under the thread guide plate from the right
DPress start/stop button once
EPress start/stop button once
Sewing machine stops
Slide the bobbin cover latch to the right
Installing the bobbin
7Reattach the bobbin cover
Presser foot is raised
Upper Threading
Threading the upper thread
1Turn on the sewing machine 2Raise the presser foot lever
Place the spool for the upper thread onto the spool pin
4Lift open the upper cover
Shutter
4Lower the needle threader lever until it clicks
Threading the needle
3Lower the presser foot lever
Presser foot is lowered
Using the twin needle
Threadeye. the upper thread for the left needle
Manually thread the left needle with the upper thread
0Turn on the sewing machine
4Insert the extra spool pin onto the bobbin winder shaft
Thread should unroll from the top front of the spool
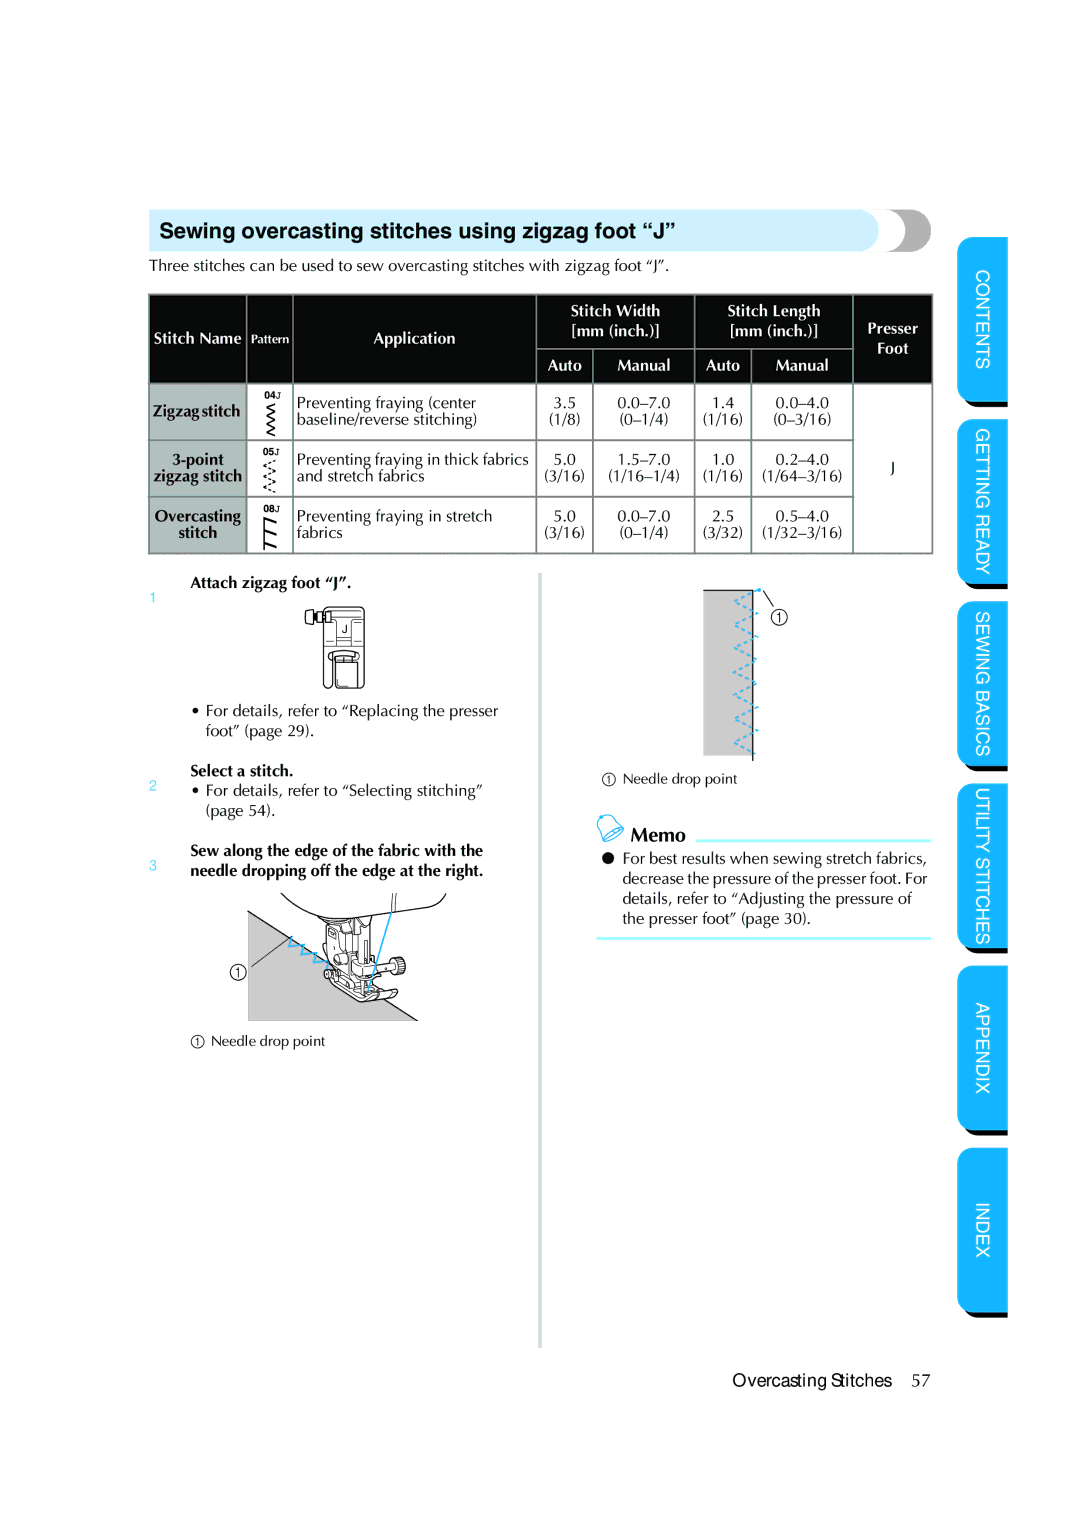
Attach zigzag foot J
Using thread that winds off quickly
ASelect a stitch
Two lines of stitching are sewn parallel to each other
Refer to steps 1 through 5 of Installing the bobbin
Pulling up the bobbin thread
1Insert the bobbin into the shuttle
Fabrics
Needle precautions
Replacing the Needle
Needle types and their uses
Checking the needle
Correct needle
Incorrect needle
Replacing the needle
Presser foot precautions
Replacing the Presser Foot
Replacing the presser foot
Lower the presser foot lever
Adjusting the pressure of the presser foot
3When you are finished sewing, reset the dial to 3 standard
Presser foot is attached
For details, refer to Replacing the presser foot
Using the optional walking foot
Removing the presser foot holder
Removing the presser foot holder 1Remove the presser foot
For details, refer to Removing the presser foot holder
2Turn off the sewing machine 3Raise the presser foot lever
Sewing Cylindrical or Large Pieces
Stitching cylindrical pieces
Sewing large pieces of fabric
Memo
Sewing Basics
Sewing
General sewing procedure
Fabric is now positioned to be sewn
Positioning the fabric
Turn on the sewing machine
3Place the fabric under the presser foot
Starting to sew
Machine stops sewing with the needle lowered in the fabric
Machine starts sewing in the normal sewing direction
Securing the stitching
For details, refer to Starting to sew Machine starts sewing
Machine stops sewing
Sewing reinforcement stitches
Release the start/stop button or foot controller
Cutting the thread
When you have finished sewing, cut the threads
Upper thread is too tight
Adjusting the Thread Tension
Changing the tension of the upper thread
Correct thread tension
Stitch width adjustment button lights up
Adjusting the Stitch Width and Length
Adjusting the stitch width
Stitch width can be adjusted with the arrow keys
Slideand down.the stitch length adjustment slider up
Adjusting the stitch length
Stitch length can be adjusted with the arrow keys
Stitch length adjustment button lights up
For the raised needle stop position
Useful Functions
Changing the needle stop position
For the lowered needle stop position
Start/stop button
Sewing curves
Useful Sewing Tips
Trial sewing
Changing the sewing direction
Sewing thick fabrics
Aligning the fabric with the presser foot
Sewing thin fabrics
Sewing stretch fabrics
Sewing an even seam allowance
Sewing Basics
Utility Stitches
Selecting Stitching
Selecting stitching
Attach the presser foot
Selecting Stitching
Attach overcasting foot G
Sewing overcasting stitches using overcasting foot G
Overcasting Stitches
Stitch
Sewing overcasting stitches using zigzag foot J
Contents Getting Ready Sewing
Sewing overcasting stitches using the optional side cutter
Position the fabric in the side cutter
Asewing
Lower the presser foot lever, and then start
Position
When sewing is finished, cut the thread
Basic Stitching
Basic stitching
Then lower the presser foot lever
Blind Hem Stitching
Foot
5hem against the guide of the presser foot,
If the needle catches too much of the hem fold
Buttonhole Stitching
Buttonhole sewing
4Select a stitch
If the button does not fit in the button guide plate
Size of the buttonhole is set
3Attach buttonhole foot a
Changing the stitch width
For details, refer to Adjusting the stitch width
Feed dogs are lowered
Button sewing
Sewing buttonholes on stretch fabrics
Trim off any excess of the gimp thread
4Place the button into button-sewing foot M
Select stitch
9Start Aftersewing.sewing for about 10 seconds at low
3Cut off any excess thread
Attaching a shank to a button
Are described below
Zipper Insertion
Inserting a centered zipper
Zipper can be sewn in place
Inserting a side zipper
6Select stitch
7Topstitch around the zipper
Wrong side of fabric Mm 1/8 inch
7Select stitch
BTopstitch around the zipper
Stretch stitching Elastic attaching
Sewing Stretch Fabrics and Elastic Tape
3Select stitch
Quilting
Appliqué, Patchwork and Quilt Stitching
Piecing
Straight
Appliqué stitching
Remove the thick paper after pressing the seam allowance
4Attach zigzag foot J
3Select stitch or
Edge of the fabric, and sew using stitch
Patchwork crazy quilt stitching
Piecing
For details, refer to Using the optional walking foot
Quilting
Baste the fabric to be quilted Attach the walking foot
1Removeholder. the presser foot and the presser foot
Using the optional quilting guide
Free-motion quilting
Walking foot Presser foot holder
Normally, the drop feed lever is positioned at the left
4Slide the drop feed lever, located at the rear
2Select stitch
Reinforcement Stitching
Triple stretch stitching
Bar tack stitching
5Pullpossible.down the buttonhole lever as far as
3Adjust the stitch width to select the desired eyelet size
Eyelet Stitching
Attach monogramming foot N
Decorative
Decorative Stitching
Set the stitch width to 7.0 mm 1/4 inch
Fagoting
3Attach zigzag foot J
4Select stitch or
3Sew parallel stitching at intervals of 1 cm 3/8 inch
Scallop stitching
Smocking
4Trim along the stitches
Joining
5Select stitch or
3Select stitch , or
4Start sewing
1Install the wing needle
Heirloom stitching
2Attach monogramming foot N
4Sew along the center of the unfrayed section
Appendix
Stitch Settings Maintenance Troubleshooting Index
Utility stitches
Stitch Settings
Stitch Settings
Stitch Width Stitch Length Mm inch
Sewing
Needle plate cover is removed
Maintenance
Cleaning the machine surface
Cleaning the shuttle
Remove the shuttle
Grasp the shuttle, and then pull it out
Do not apply oil to the shuttle
Loosen the upper thread tension
Troubleshooting
Presser foot lever is raised Lower the presser foot lever
Not operate
Replace the bobbin
Clean the shuttle
Correctly install the presser foot
Shuttle
This machine is not used Cifically for this machine
Thread tension is incorrect Adjust the tension of the upper
Contact your retailer or the nearest Burr on it
High-pitched
Sewing lamp is damaged Contact your retailer or the nearest
Error messages
You wish to sew Wish to sew
Pressure of the presser foot is
Operation beep
Removing the upper cover
Hold the upper cover level
Numerics
Index
104
English 882-S60 XC4665-0511

 Memo
Memo