USER’S Guide
Contents
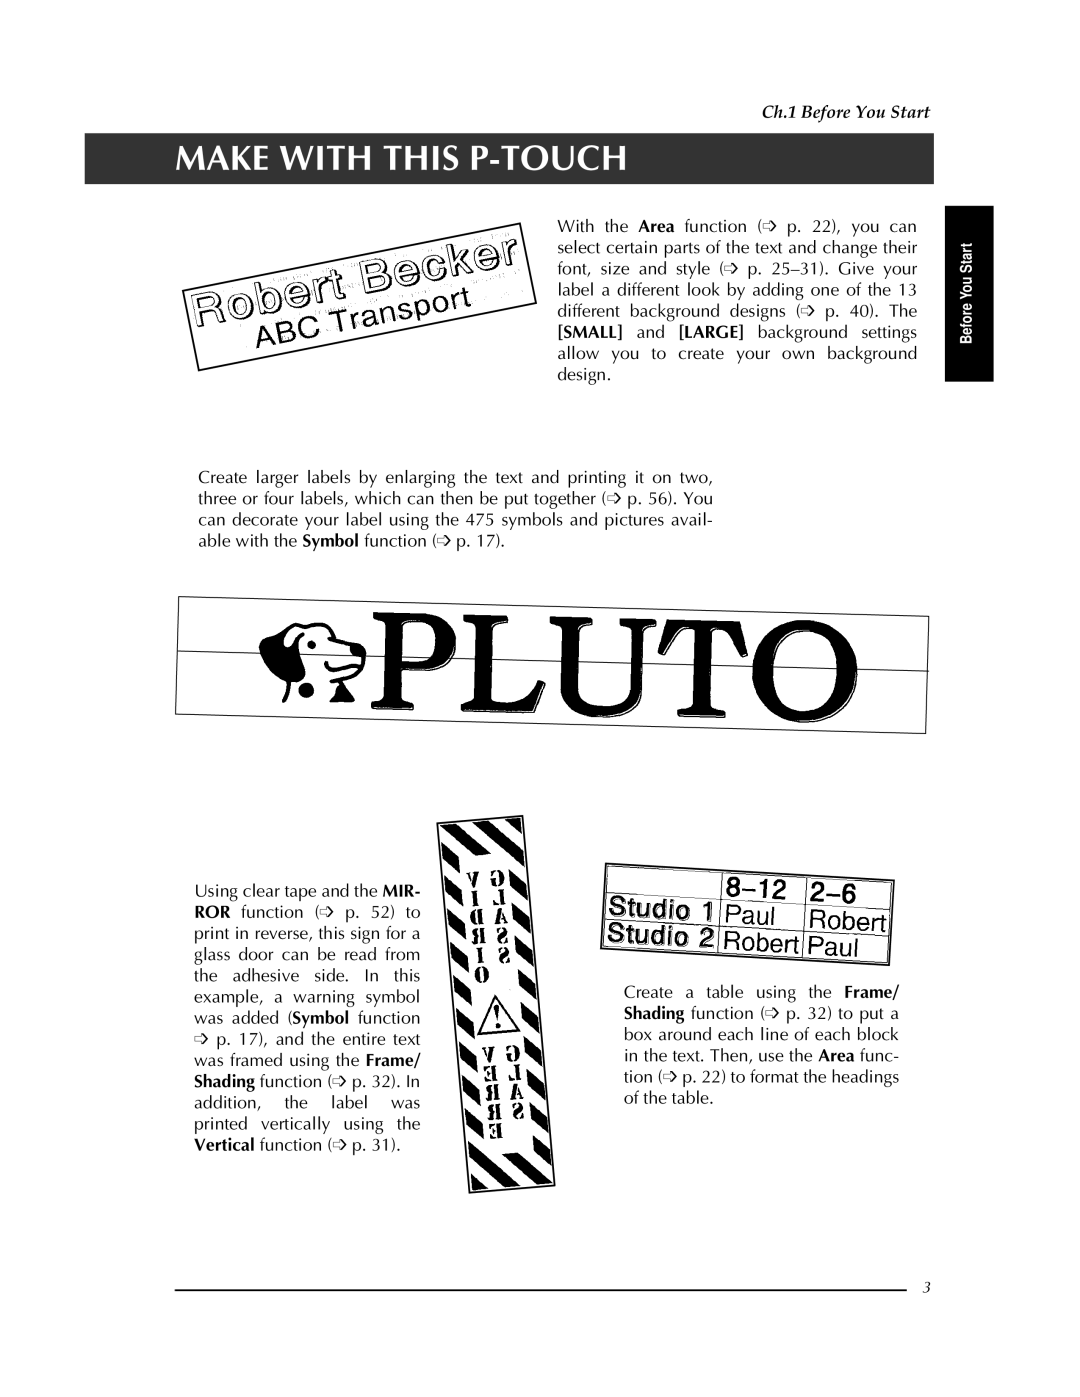
Using Labels and Stamps
Quick Reference
Using a template
To select Print Label →
Printing many cop To select Number →
Before You Start
Examples of What YOU can
Make with this P-TOUCH
Features
General Description
LCD display
Menus
Keyboard
56 7 B CD E
Getting Started
Precautions
Connecting the power supply cord
Once to remove any slack
Installing a TZ tape cassette
Helsi Marginwide Auto
Press & Cut
Turning on & off the P-touch
Ch Getting Started
Functions
Code Code
Cancel Cancel
Performing basic operations
Cursor keys
Space bar
Entering text
Alt Alt
Shift Shift
New Block Code +
Symbol Symbol
PROTOCOLCODE39
Symbolspecial
Barcode Barcode
Formatparameter
Proto CODE39
Change Settings
Parameter
Width Wide UNDER#SON
To enter the barcode data
Formatparameter Symbolspecial Character
Confirm Special Chara Symbol 1 +
To add the barcode to the text
Back Space ClearBack Space
Editing text
Zoom ImageZoom
Clear
OK to Clear
Cancel
Area All
Text BUFFER?
To select all of the text
All
To select an area of the text
All
Font Font
Formatting
Copy & Paste &Paste
OK to PASTE?
Brussels
Size Size
Font
To change the font before entering the text
To change the size of the text in a selected area
Size
To change the text size before entering the text
Width
Width Width
Width Wide
To change the width of the text in a selected area
Outline
Style Style
Style
To change the style of the text in a selected area
Italic
To change the Italic setting before entering the text
Italic Italic
Hold down Press All to select all
Line Effects
With the desired Line effects setting
Line effects
Underline
Vertical Vert
To change the Vertical setting before entering the text
Vertical
Frame/shading
Select END Point
Select Start
Point
Block
Line
Press Until 9 moves beside
To apply a frame or shading to selected lines of text
Select Start Point
Character
Format Format
Helsi
Length
ABC None
ABC None
Margin
ABC Wide
ABC Narrow
ABC Center Right
Horizontal Align ABC Left
ABC Justify
Fixed
To change the Back background setting
Pitch
Back
Template Templt
1ADDRESS
Select the desired template
Menu Print
Change Settings Style CHAR.ORIGINAL
Confirm Char Original Italic Dynamic Cute Formal Elegant
Done Continue
NEW
OK to PRINT?
Print Stamp Print Label
Save AS
TEMPLATE?
Input File Name
Edited
Clear
Delete
Storing and recalling files
Open
To save a file that has not been saved before 1 Press File
Open
File NEW
Search for
To recall a file that has been saved
To delete a file that has been saved
OK to Clear FILE?
Delete
Image
OK to PRINT? Option Cancel
Printing
Feed & Cut Feed
Since Î is already beside COPIES, press
To change the Number setting
Copies
Return to the Option menu
Number
Press or to move Î beside NUM- BER
ABC OFF
Option COPIES1 Numberoff Mirroroff Invertoff Trans ABC Form
Mirror
OFF
To print an inverted image of the text
Trans ABC
Confirm Invert ABC OFF
ABC OFF
To change the shape of the text
Confirm Transformation ABC OFF
Transform
CUT ABC Both Full
To change the CUT setting
Following CUT settings are available
ABC
To use Split printing
Split
Press or to move Î beside Split
Setting display features
Setup Setup
Contrast
To change the Contrast setting
To change the Units setting
Trast
Press or to move Î bEside Units
To change the Language setting
Fraçais
Press or to move Î beside LAN
Ch Functions
Using Labels and Stamps
Laminated tape
Stamp film
Glossy side Tape end Slit
Insert a TZ tape cassette into the tape com- partment
Printing an identification label for the stamp holder
Stamping
Error Message Cause Solution
To delete text, causing Reduce the character size
Install a tape cassette
Sette is installed when you try to Try again Print text
Enter barcode data that
Length Length function on Is within the specified
To add a new line, causing Mum possible
Type in a label length that
Format menu is not within Range Range 4.0 to 30.0 cm
Memory Full
Ing tape Or lettering tape
Tape in the cassette has been Reached
Located in a barcode mark when Barcode before trying
This message appears if the end Replace the tape cassette
Move the cursor or delete
Problem Solution
Turn
Rollers
All text and formats in the display and all
Indicators with back light
118 × 64 dots
Machine Specifications
Appendix
Symbols p
Following symbols are available
Guidance
Traffic Sign
Medical
Fonts p
Special barcode characters p
Following fonts are available
Sizes and widths pp
Type styles p
Framing and shading patterns p
Following frame and shading patterns are available
Small
Background designs p
OFF Arabic
Tartan
Pre-set templates p
Samples of the available templates are shown below
Shop Sale
Video VHS
Stamp Normal L
Template text styles p
Text transformation styles p
Samples of the text transformation shapes are shown below
Index
Page
Accessories
Special tapes
Stamp kit
Total
Stock No Description Price Quantity Total
Shipping/Handling
Page
Accessory Order Form
Page
Guía DEL Usuario
¡Muchas gracias por la adquisición de este P-touch
Introducción
Aviso DE FCC
Contents
Page
Precauciones
Conexión del cable de alimentación
Conexión y desconexión de la ali- mentación del P-touch
Instalación de un casete de cinta TZ
Derecha
Realización de las operaciones básicas
Teclas del cursor
Izquierda
Barra espaciadora
Introducción de texto
Abajo
Ducción de una línea de texto
New Block Code
Teniendo pulsada Presionando New Block
Seleccione el símbolo deseado
Si seleccionó Symbol no
Para añadir un símbolo o imagen al texto
Escriba un número de símbolo o pre
Presione Barcode
Para crear un código de barras
Para cambiar los parámetros del código de barras
Para introducir los datos del código de barras
Edición de texto
Para añadir el código de barras al texto
Mantenga pulsada Presione Clear
Para borrar todo el texto y los formatos
Para borrar solamente el texto
Mantenga pulsada
Para seleccionar un área de texto
Para seleccionar todo el texto
Para copiar y pegar texto
Para cambiar la fuente antes de introducir el texto
Formateo
Para cambiar la fuente del texto de un área seleccionada
Para cambiar el tamaño del texto antes de introducirlo
Para cambiar la anchura del texto antes de introducirlo
Para seleccionar todo el texto, o presione
Utilice Para
Para cambiar la anchura del texto de un área seleccionada
Para cambiar el estilo del texto antes de intro- ducirlo
Para cambiar el estilo del texto de un área seleccionada
Se mostrará debajo de Italic de la parte
Seleccionar solamente parte del mismo
Presione Italic hasta que el texto se visualice
Superior del visualizador Presione
Tenga pulsada y presione barra espaciadora
Cambio, presione
Seleccione o para mover 9 hasta el lado del ajuste deseado
Para aplicar un cuadro o sombra a todo el texto
Como 9 ya está la lado de ALL, presione
Or hasta seleccionar bloques que desee encuadrar o Presione
Seleccionados
Narrow
Para cambiar el ajuste Length
Para cambiar los ajustes de Margin
Medium
Para cambiar el ajuste de H.ALI alineación horizontal
ABC Right ABC Justify
ABC Left
Para cambiar el ajuste de Pitch
Para cambiar el ajuste de Back fondo
Para crear una etiqueta o un sello a partir de
Para confirmar el ajuste, presione una vez
Una plantilla
Página 89 de inglés
Presione Para mover 9 hasta el
Muestras de estos ajustes, consulte la
La plantilla y de haber presionado aparecerá Menu
Para continuar la edición de la etiqueta o el sello
Para almacenar un archivo que no haya sido almacenado antes
Almacenamiento e invocación de archivos
Presione File Como 9 ya está al lado de Save AS, pre
Para invocar un archivo almacenado
Para almacenar un archivo que se haya almace- nado antes
Para borrar un archivo que haya almacenado
Se borrará
Impresión
Para alimentar la cinta 1 25 mm y cortarla
Para cambiar el ajuste Number
Para imprimir una imagen de espejo del texto
ABC OFF ABC on
Para imprimir una imagen invertida del texto
Para cambiar la forma del texto
Para cambiar el ajuste de CUT
Presione o para mover Î hasta el lado de CUT
Para utilizar la impresión Split
Para cambiar el ajuste de Contrast
Ajuste de las funciones de visuali- zación
Para cambiar el ajuste de Line no
Para cambiar el ajuste de Units
Para cambiar el ajuste de Language
Volviendo a conectar su
Problema Solución
Solución de prodlemas
Alimentación
Cabeza
Del compartimiento del
Se encuentran dentro del compartimiento
Utilice un palillo de
Máquina, abra la cubierta del comparti
Veedor más cercano
CLEARED, y se perderán todos los Archivos de la memoria
Tecla antes de 30 minutos
Especificaciones de la máquina
Alimentación CA, 60 Hz
Fuentes de carac