Guía de configuración y uso
Introduction
Before using the printer
What is covered
What is the length of the Warranty Periods
What is not covered
Who is covered
What Brother will do
Limitations
Important Information
Save Time Register On-Line
Symbols Used in this Manual
„Setup & Operation Guide This manual
Manuals
Safety Precautions
Symbols used in this manual are as follows
„The Printer
Do not disassemble the printer
„Power Cord
„Battery
„Installation/Storage
„Cutter
„DK Roll DK Label, DK Tape
Follow the followings to avoid damage of the printer
General Precautions
Do not use included power cord to other products
„DK Roll DK Label and DK Tape
„CD/DVD Film Labels
„CD-ROM and Software
Contents
Maintenance
Troubleshooting
For Windows
For Macintosh
Introduction
Before using the printer
Accessory Checklist
DK Label & Tape Guide
Parts Description
Main Printing Unit
„Front face
„Rear view
„Time Display mode
1234 P01 2005/7/20
For details, refer to ÎCreating a label
„Menu Selection mode
Label Settings
LCD displays in this mode when editing the template
Setting or changing the function
Manual operation button
Name Function
Functions of each manual operation button are shown below
Setting the DK Roll
Setting the DK Roll
Applicable DK Rolls
Usable types of DK Roll for the printer are shown below
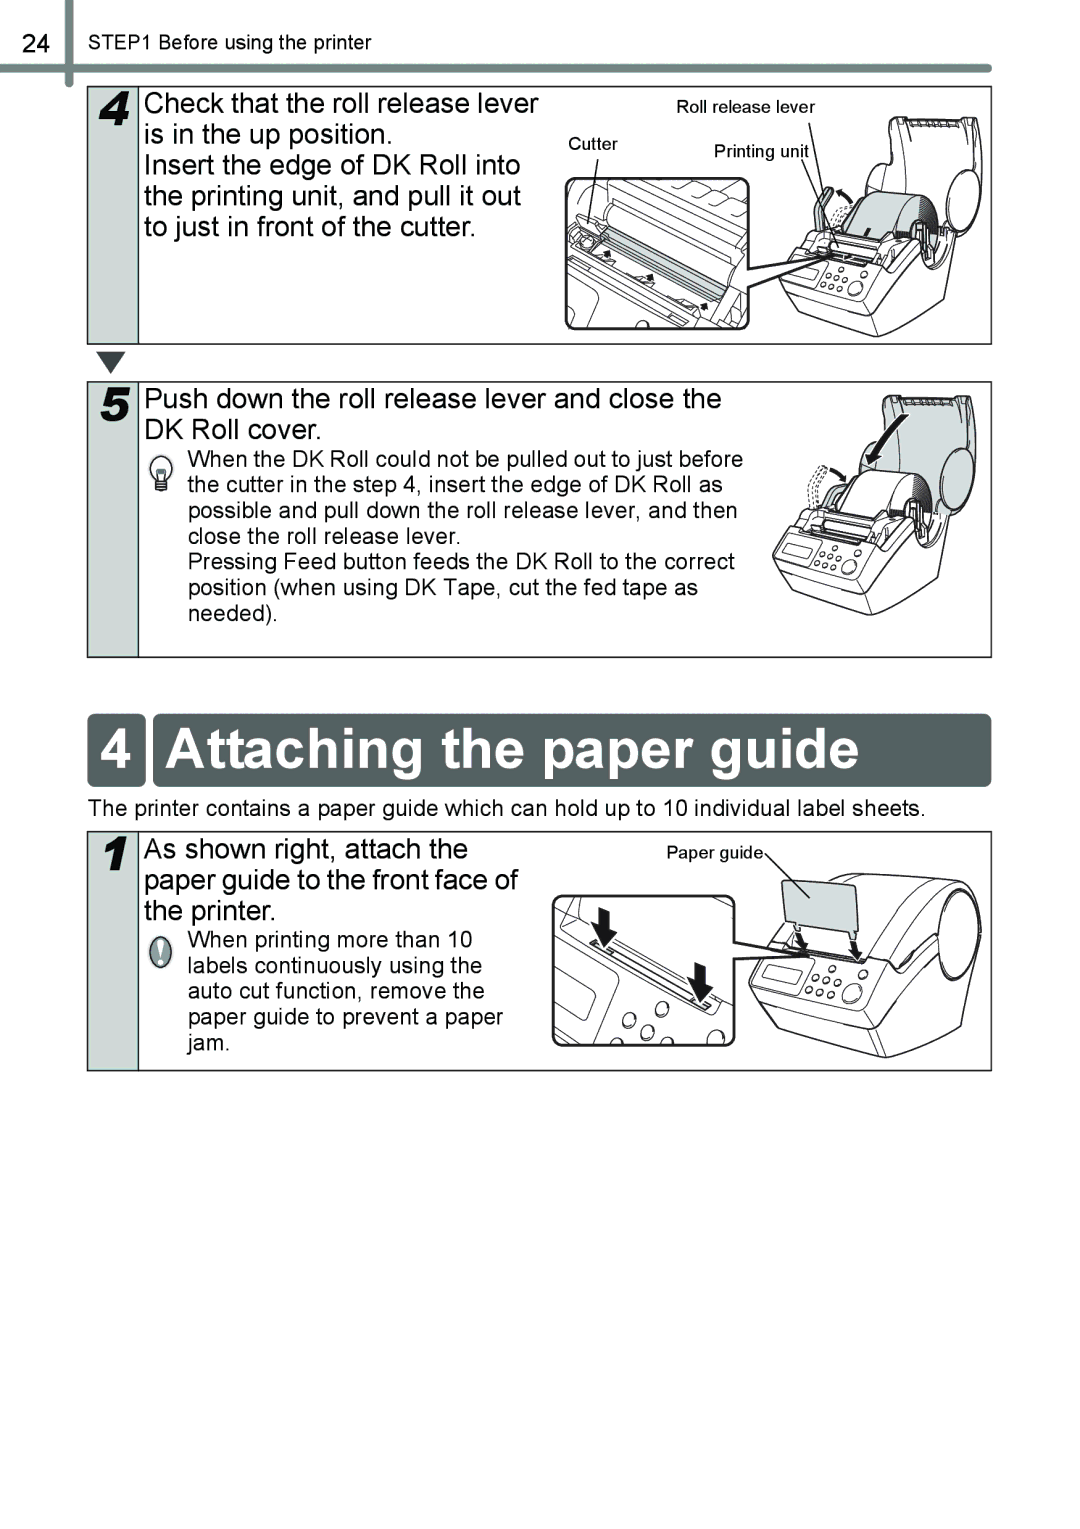
Attaching the paper guide
Check that the roll release lever
Is in the up position
Connecting the power supply
Insert the power plug into the outlet
Printer
Before inserting the plug, check the outlet is for
Setting clock/language/unit
Press ON/OFF button to turn on the power of the printer
2005/07/20 12mm
Language is determined and then unit setting
Screen is displayed
Is displayed
Procedure for creating a label
Decide the type of label you want to create
Prepare the appropriate DK Roll to the label image
Create a label and print it
Creating and printing a label Using only this printer
Selecting a template
Press ON/OFF button to turn on 1234 P01 Power 2005/7/20
Name of template Content Sample of printing
Time Display mode is displayed
Creating a label
Press the Print button while in Time Display mode
Printing a label
„Printing only one label
1234 P07 2005/7/20 Printing
Press the Menu button in Time Display 1234 P07 Mode
Other convenient functions
Editing a template Menu
Date Fmt P07 2005/7/20
Setting is saved and the screen returns to
Time Display mode
Date addition selection mode is displayed
Confirming print content prior to printing Menu
Press the Menu button in Time Display mode
Date P01 +Months 1234 2005/7/20
1234 P01
Specifying the number quantity of prints Menu
Printing labels with label numbers Menu
Setting the clock Menu
Returns to Time Display mode
Printing a list of templates Menu
All Templates?
Setting Daylight Saving Time Menu
Cutting the roll automatically when printing Menu
Setting the language Menu
Setting the unit of measure inch or mm Menu
Language English US
Unit inch
Adjusting the contrast of LCD Menu
Display mode
Locking the Menu button
Concerning the downloaded template
Creating and printing a label using only this printer
Software description Installing the software
Software description Software installation
For Windows
Software description
„P-touch Editor
„P-touch Address Book
Installing the software
Click Standard Installation
Standard Installation
Custom Installation
Input User Name and Company Name, and click Next
Click Next
Customer Information screen is displayed
Choose Destination Location screen is displayed
Check the setting, and if it is set correctly, click Next
Start up each installed software
Click Finish
For Macintosh
„Fonts
„Auto Format Templates
„Clip Art
Software installation
Check the content and click Next
Start up Macintosh, and insert the CD-ROM into CD-ROM drive
Important Information screen is displayed
Click Install
Not installed
Installation starts
Double click QL-500 550 650TD Driver.pkg in Mac OS X folder
When continuing the installation, click Agree
Select the drive you want to install, and click Continue
Click Continue
Input Name and Password Administrator and click OK
Screen to check the installation is displayed
Check the QL-650TD is added, and close Printer List screen
Screen returns to Printer List screen
Now you can use the printer
Potential types of problems
Error messages what they mean
Main specifications Accessories For USA Only
Maintenance
Print head maintenance
Roller maintenance
Label outlet maintenance
Replacing the cutter unit
Hold the knob and carefully remove the cutter unit
Set the new cutter unit at the prescribed position
Take care not to touch the blade of cutter
Replacing the lithium clock battery
When turning the cover of battery, do not exceed position
For details, refer to ÎSetting the DK Roll
Set the DK Roll and close the DK Roll cover
Printer, it may cause a malfunction
Troubleshooting
Potential types of problems
Problem Solution
Error messages what they mean
Error message Cause Solution
Possible to change their settings
Which does not include Includes the numbering object
Main unit and do the operation
Over again
Main specifications
„Product specifications
Specifications
„Operating environment
Accessories For USA Only
„Replacement Cutter
„Cleaning Sheet
„DK Rolls
Guía de configuración y uso
Introducción
Su PC
Cobertura
Alcance de la cobertura
Duración del periodo de garantía
Aspectos no Cubiertos
Brother, por su parte, actuará de la siguiente forma
Limitaciones
Importante
Información importante
En EE.UU
„Guía de configuración y uso este manual
Manuales
Símbolos utilizados en este Manual
Precauciones de seguridad
„La impresora
Advertencia
Cuidado
„Cable de alimentación
„Pila
„Cortador
„Instalación/Almacenamiento
„Rollo DK etiqueta DK y cinta DK
Siga estas instrucciones para evitar daños a la impresora
Precauciones generales
„Etiquetas de película para CD/DVD
„CD-ROM y software
Se recomienda reemplazar la pila cada dos años
Índices
Localización y resolución de problemas
Para Windows
Para Macintosh
Mantenimiento
Introducción
PASO1
Lista de comprobación de accesorios
Guía de etiquetas y cinta DK
Descripción de piezas
Unidad impresora principal
„Cara frontal
„Vista desde atrás
Pantalla
„Modo de Visualización de Hora
1234 F01 2005/7/20
„Modo de Selección de Menú
Menú
Edite Plantilla
La pantalla muestra este modo cuando se edita la
Botón de operación manual
Nombre Función
Instalación del rollo DK
Rollos DK aplicables
Instalación del rollo DK
Instalación de la guía de papel
Conexión de la alimentación eléctrica
Inserte el enchufe en la toma de corriente
Ajuste del reloj/idioma/unidad
Pulse el botón ON/OFF para encender la impresora
2005/07/20 hh00
Unidades pulgada
Decida qué tipo de etiqueta desea crear
Prepare el rollo DK apropiado para la imagen de la etiqueta
Cree una etiqueta e imprímala
Impresora únicamente para imprimir
Selección de una plantilla
Impresión de una etiqueta
Edición de una plantilla Menú
Adelantar/atrasar/fijar la fecha de la plantilla Menú
Creación de una etiqueta
Selección de una plantilla
Nombre de la plantilla Contenido Muestra impresa
Se mostrará el modo de Visualización de Hora
Impresión de una etiqueta
Imprimiendo…
„Especificación del número cantidad de etiquetas a imprimir
Pulse y mantenga pulsado el botón Print Copiar
Otras prácticas funciones
Edición de una plantilla Menú
Fecha F07 2005/7/20
Hora F07 1234
Se mostrará el modo de selección de adelanto de
Fecha
+ Adelanto añade el valor especificado a la fecha actual
Confirmación del contenido antes de imprimir Menú
1234 F01
Menú Vista Previa Recibido 3x3-7/16
Impresión de etiquetas con números de etiqueta Menú
Impresión de una lista de plantillas Menú
Ajuste del reloj Menú
¿Imprimir Todas Las Plantillas?
Encontrará las instrucciones sobre cómo
Ajuste de la Hora de Verano Menú
Corte automático del rollo durante la impresión Menú
Ajuste del idioma Menú
Unidad pulgada
Ajuste del contraste de la pantalla Menú
Bloqueo del botón Menu Menú
Acerca de las plantillas descargadas
Acerca de la descarga de mensajes
Page
Descripción del software
Notas sobre la instalación
Instalación del software
Para Windows
Descripción del software
„Programa P-touch Address Book
„Controlador de impresora
Haga clic en Standard Installation Instalación estándar
Notas sobre la instalación
Instalación del software
Haga clic en Next Siguiente
Aparecerá la pantalla de información del cliente
Impresora directamente al puerto USB del PC
Haga clic en Finish Finalizar
Inicie cada software instalado
En ese momento habrá completado la instalación del software
Para Macintosh
„Fuentes
„Plantillas de formato automático
„Galería de imágenes
Revise el contenido y haga clic en Next Siguiente
Aparecerá una pantalla de información importante
Es posible seleccionar el programa que
Que no vaya a instalar
Alias
Haga clic en Continue Continuar
Aparece la pantalla del Convenio de Licencia del software
Aparece la pantalla del Convenio de Licencia
Conecte el cable USB al puerto USB del Macintosh
Aparecerá la pantalla para seleccionar la instalación
Se inicia la instalación
Macintosh se reinicia
En ese momento podrá usar la impresora
Posibles tipos de problemas
Mensajes de error y su significado
Para reemplazar la pila de litio del reloj
Especificaciones principales
Mantenimiento
Mantenimiento del cabezal de impresión
Mantenimiento del rodillo
Mantenimiento del punto de salida de las etiquetas
Deseche la hoja de limpieza después de usarla
Reemplazo de la unidad del cortador
Tenga cuidado para evitar tocar la hoja del cortador
Para reemplazar la pila de litio del reloj
Instale la pila nueva
Posibles tipos de problemas
Problema Solución
Mensajes de error y su significado
Mensaje de Causa Solución Error
El rollo DK no avanza
Correctamente Otra vez. Si la cinta DK se ha
La cinta DK se ha agotado Acabado, instale un nuevo rollo
Se agotaron las etiquetas DK Instale nuevas etiquetas DK
Especificaciones principales
„Especificaciones del producto
„Entorno operativo
Elemento Especificaciones
Accesorios sólo en Estados Unidos
„Rollos DK
Nº de Descripción Precio Producto
Descripción Precio
„Cortador de reemplazo
„Hoja de limpieza