ОБМЕТЫВАНИЕ ПЕТЕЛЬ

И ПРИШИВАНИЕ ПУГОВИЦ

KNOPFLÖCHER UNDBUTTONHOLE AND KNÖPFE NÄHENBUTTON SEWING

MAKING A BUTTONHOLE

Step


Sewn Portion


Pattern


How to Sew


Step 1


1.

Set the pattern selection dial to “a”.

(Front bar


a


2.

Lower the presser foot and sew 5 to 6 stitches.

tack)


3.

Stop the machine when the needle is at the left side of the stitches, then raise


the needle from the material.


Step 2


b


1.

Turn the pattern selection dial to “b”.

(Left side)


2.

Sew the predetermined length of the tailor’s chalk line.


3.

Stop the machine when the needle is at the left side of the stitch, then raise the


needle.


Step 3


c


1.

Turn the pattern selection dial to “c” (same position as in step 1).

(Back bar


2.

Sew 5 to 6 stitches.

tack)


3.

Stop the machine when the needle is at the right side of the stitch, then raise the


needle from the material.


Step 4


1.

Set the pattern selection dial to “d”.


2.

Sew the right side until the needle reaches the stitches sewn in step 1.

(Right side)


d


KNOPFLOCH NÄHEN


Schritt


Genähter Teil


Stichart


Nähablauf


Schritt 1


1. Stellen Sie den Musterwähler auf “a”.


2. Senken Sie den Nähfuß und nähen Sie einige Stiche.

(Vorderer


a


3. Stoppen Sie die Maschine, wenn die Nadel auf der linken Stichseite ist und drehen Sie die

Riegel)


Nadel aus dem Material.


Schritt 2


b


1.

Drehen Sie den Musterwähler auf “b”.

(Linke Raupe)


2.

Nähen Sie die Raupe entlang der vorgezeichneten Kreidelinie.


3. Stoppen Sie die Maschine, wenn die Nadel auf der linken Stichseite ist und drehen Sie die


Nadel aus dem Material.


Schritt 3


c


1.

Drehen Sie den Musterwähler auf “c” (gleiche Position wie 1).


(Hinterer


2.

Senken Sie den Nähfuß und nähen Sie einige Stiche.


Riegel)


3.

Stoppen Sie die Maschine, wenn die Nadel auf der rechten Stichseite ist und drehen Sie


die Nadel aus dem Material.


Schritt 4


1.

Stellen Sie den Musterwähler auf “d”.

(Rechte


2.

Nähen Sie die rechte Raupe, bis die Nadel die in Schritt 1 erzeugten Stiche erreicht.

Raupe)


d


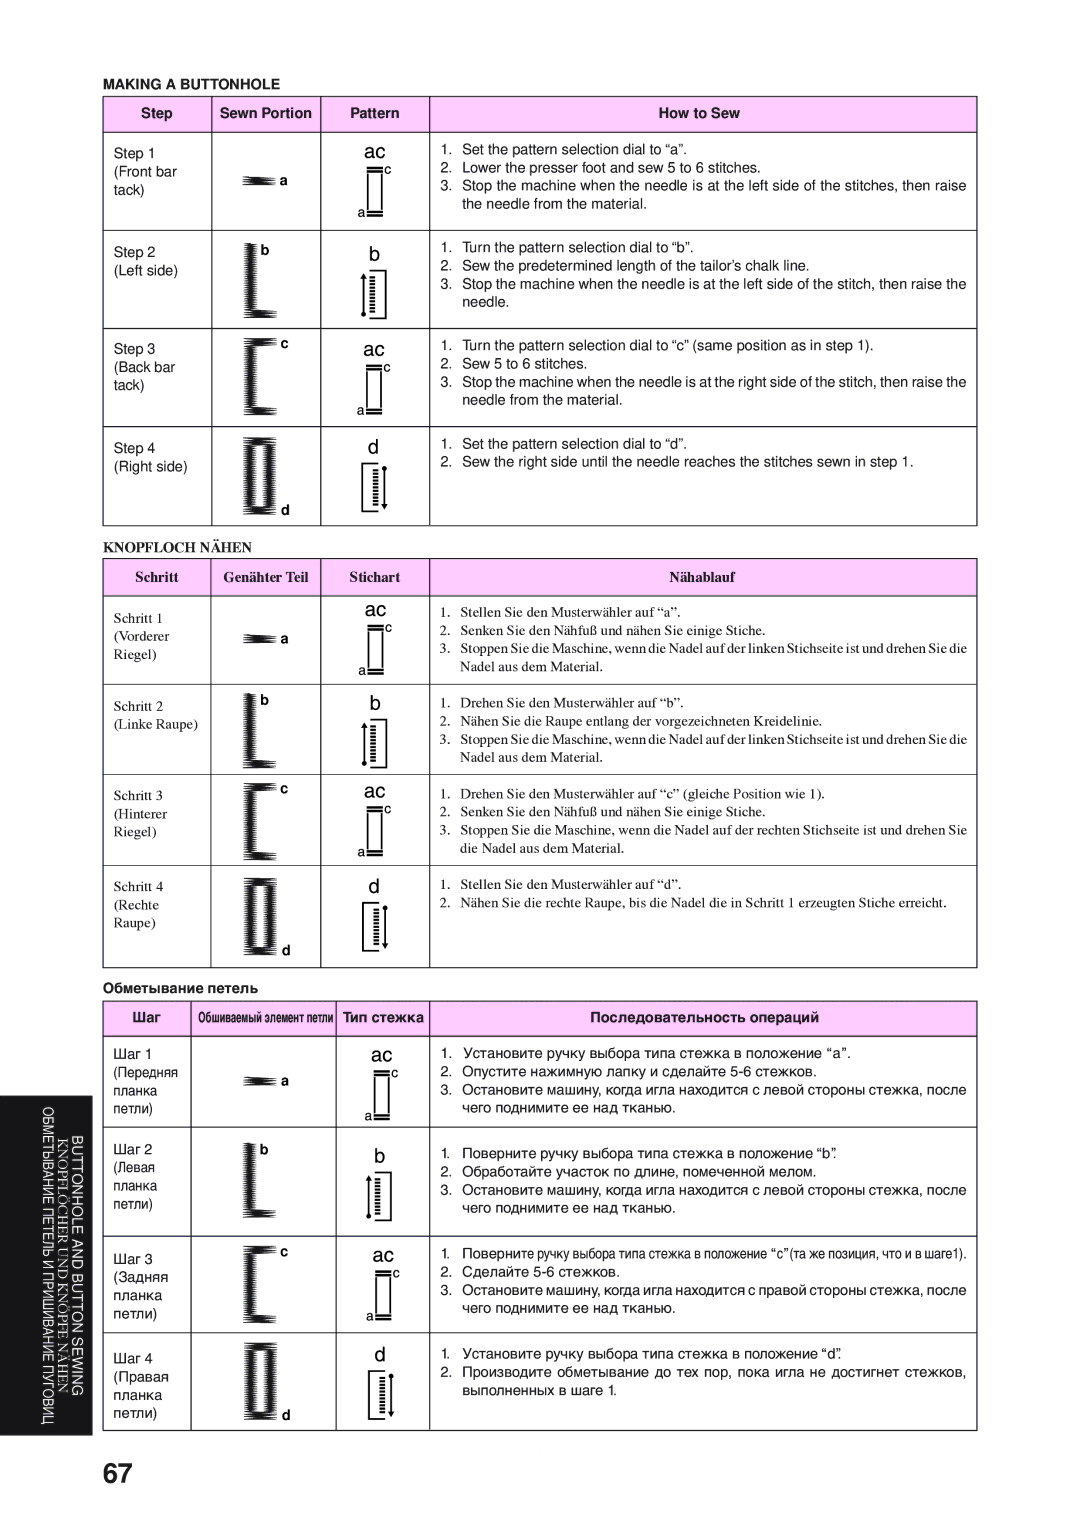
Обметывание петель


Шаг


Обшиваемый элемент петли

Тип стежка


Последовательность операций


Шаг 1


1.

Установите ручку выбора типа стежка в положение “a”.

(Передняя


a


2.

Опустите нажимную лапку и сделайте 5-6 стежков.

планка


3.

Остановите машину, когда игла находится с левой стороны стежка, после


петли)


чего поднимите ее над тканью.


Шаг 2


b


1.

Поверните ручку выбора типа стежка в положение “b”.

(Левая


2.

Обработайте участок по длине, помеченной мелом.

планка


3.

Остановите машину, когда игла находится с левой стороны стежка, после


петли)


чего поднимите ее над тканью.


Шаг 3


c


1.

Поверните ручку выбора типа стежка в положение “c”(та же позиция, что и в шаге1).


2.

Сделайте 5-6 стежков.

(Задняя


3.

Остановите машину, когда игла находится с правой стороны стежка, после

планка


чего поднимите ее над тканью.

петли)


Шаг 4


1.

Установите ручку выбора типа стежка в положение “d”.


2.

Производите обметывание до тех пор, пока игла не достигнет стежков,

(Правая


выполненных в шаге 1.

планка


петли)


d


67

Page 79
Image 79
Brother RSR-55 Обметывание петель Шаг, Тип стежка Последовательность операций, Петли Чего поднимите ее над тканью Шаг

XRX-55, STAR-230E, STAR-50, RSR-55, STAR-240E specifications

Brother has long been a prominent player in the realm of sewing machines, consistently delivering reliable products equipped with innovative features. Among its impressive line-up are the Brother STAR-240E, RSR-55, STAR-50, STAR-230E, and XRX-55. Each model embodies unique characteristics and technologies, making them excellent choices for various sewing needs.

The Brother STAR-240E is a versatile sewing machine ideal for both beginners and experienced sewists. It boasts 40 built-in stitches, including decorative options and essential utility stitches, allowing users to explore a wide array of creative projects. Its automatic needle threader saves time, while the easy-to-use interface enhances the overall user experience. The machine also features a drop feed for free motion sewing and quilting, adding to its versatility.

The RSR-55 stands out with its user-friendly design. This model is perfect for those looking for a straightforward, reliable sewing machine. Its strong motor handles various fabric types with ease, from lightweight fabrics to heavier materials. The RSR-55 also includes an adjustable stitch length and width for customized sewing, catering to individual preferences.

Sibling to the STAR-240E, the Brother STAR-50 offers a more streamlined experience. It has 50 built-in stitches and an automatic one-step buttonhole feature, making it suitable for creating professional-looking garments. Its lightweight design and compact size make it easily portable, ideal for sewing on the go.

The STAR-230E is another exceptional model that combines affordability with advanced features. It includes a top-loading bobbin system for quick changes and a variety of built-in stitches that ensure ample options for any project. The STAR-230E's LCD display allows for easy navigation through its functions, making it user-friendly for all levels.

Lastly, the XRX-55 rounds out this lineup with its focus on creating intricate designs. Equipped with advanced embroidery features, including multiple embroidery designs and a USB port for importing custom designs, the XRX-55 is perfect for those wanting to elevate their sewing projects. Its robust construction ensures reliability and longevity, making it an investment for both hobbyists and professionals alike.

In conclusion, the Brother STAR-240E, RSR-55, STAR-50, STAR-230E, and XRX-55 each bring unique strengths to the sewing table. From beginner-friendly features to advanced embroidery capabilities, these machines cater to a wide audience, establishing Brother as a leading name in the sewing machine industry.