Advanced Appendix
Playback
Main Features
Shooting
Editing
Use of genuine Canon accessories is recommended
Continuous Shooting
Table of Contents
Advanced Shooting Functions
Print Settings/Transfer Settings
Index Functions Available in Each Shooting Mode
Test Shots
Warranty Limitations
Please Read
Please see the Basic Guide p to change the language setting
Safety Precautions
Language Setting
Video Format
Store this equipment out of the reach of children Infants
Equipment
Doing so could damage the camera’s CCD or your eyesight
Battery
Is charging
Sure to attach them firmly
Others
Flash may damage eyesight
Store the equipment in a safe place
Flash
Avoid Condensation Related Problems
Preventing Malfunctions
Avoid Strong Magnetic Fields
Press the DISP. button
Pressing the DISP. button switches the display mode
Display mode changes as follows
Using the Clock
Customizing Display Information
Shooting Mode *1 *2
Before Using the Camera Basic Operations
Rec. Menu Custom Display SET button
You cannot add to the current active LCD/Viewfinder icon
LCD/Viewfinder
Shooting Info/Grid Lines/32 Guide/ Histogram
Sample Histograms
Histogram Function
Night Display
Shooting Information Shooting Mode
Information Displayed on the LCD Monitor
Basic Guide p
Playback Information Playback Mode
„Standard
„Detailed
Following information may also be displayed with some images
Overexposure Warning
Power Saving Function
Power saving function settings can be changed p
Set up Menu Time Zone SET button
Setting the World Clock
Setting the Home/World Time Zones
As in , you can set daylight
Saving time
Switching to the Destination Time Zone
Use the W or X button to select Menu button
FUNC. Menu
Menus and Settings
FUNC. Menu Rec., Play, Print, Set up, and My Camera Menus
Sets many of the functions commonly used during shooting
Rec., Play, Print, Set up and My Camera Menus
Icons shown below are the default settings
Menu List
Rec. Menu
Menu Item Options Summary Reference
Shooting info
Play Menu
Print Menu
Set up Menu
Guide p
Clock Display 10 sec 20 sec./30 sec
NTSC/ PAL
My Camera Menu
Menu Item Summary Reference
Select OK and press the SET button
Resetting Settings to Their Default Values
Set up Menu Reset All
Formatting Memory Cards
Set up Menu Format
Before Using
Camera Basic Operations
Use the W or X button to select compression
Changing the Recording Pixels and Compression Still Images
SET button * Compression
Approximate Values for Compression Settings
Approximate Values for Recording Pixels
Using the Digital Zoom Digital Tele-Converter
Digital zoom cannot be used in Wide mode
Shooting With the Digital Zoom
When using Standard
When using 1.6x or
Rec. Menu Digital Zoom Standard*/Off/1.6x/2.0x
Shooting With the Digital Tele-Converter
Setting the Red-Eye Reduction Function
Adjust the angle of view with the zoom lever and shoot
About the Digital Tele-Converter
Setting the Slow Synchro
Rec. Menu Slow Synchro On/ Off
Setting the Image Stabilizer Function
Rec. Menu is Mode Continuous*/Shoot Only/Planning/Off
Following icons appear on the LCD monitor
Continuous Shooting AF
Shoot
To Cancel Continuous Shooting
Press the / button to display , or
Press the DISP. button or the while the image is displayed
To Cancel Checking the Focus
Checking for Focus Right After Shooting
Press the shutter button halfway
Use the S, T, W or X button to change the display position
Switching between AF Frames Changing the Display Position
Press the Menu button
Using the Mode Dial
Movie Shooting
Using the Mode Dial
Press the Movie button to shoot
Page
Press the FUNC. button
Changing Movie Recording Pixels and Frame Rates
FUNC. button */ / / Recording Pixels/Frame Rate
Movie Recording Pixels/Frame Rates
Shooting Still Images while Shooting a Movie
Press the shutter button all the way to shoot the image
While this is blinking, writing is in progress
Shooting is again possible when it stops blinking
Internal memory is full, so shooting is disabled
Stays lit
Mic Level Auto*/Manual
Setting the Recording Function
Set up menu Audio
Wind Filter On/Off
Shoot the first frame of the sequence
Shooting Panoramic Images Stitch Assist
Use the W or X button to select the shooting sequence
Repeat the procedure for additional images
Use the W or X button to select Color Accent ISO button
Shooting with Color Accent Mode
Changing the Colors and Shooting
Shooting with Color Swap Mode
Complete the setting with the ISO button, and shoot
Use the W or X button to select Color Swap ISO button
Only one color can be specified
If Save Original is set to On
Saving Original Images
Rec. Menu Save Original On/Off
Shooting in the Creative Zone
Program AE
Setting the Shutter Speed
„Shutter Speed Display
Setting the Aperture
Safety Shift
About Safety Shift/Safety FE
„Aperture Setting Display
Safety FE
Manually Setting the Shutter Speed and Aperture
Selecting an AF Frame
Advanced Shooting Functions
Press the button
Following occurs when Face Detect is selected
Selecting Face Detect or Center
AF frame appears in green
Moving the AF Frame
Rec. Menu FlexiZone On*/Off
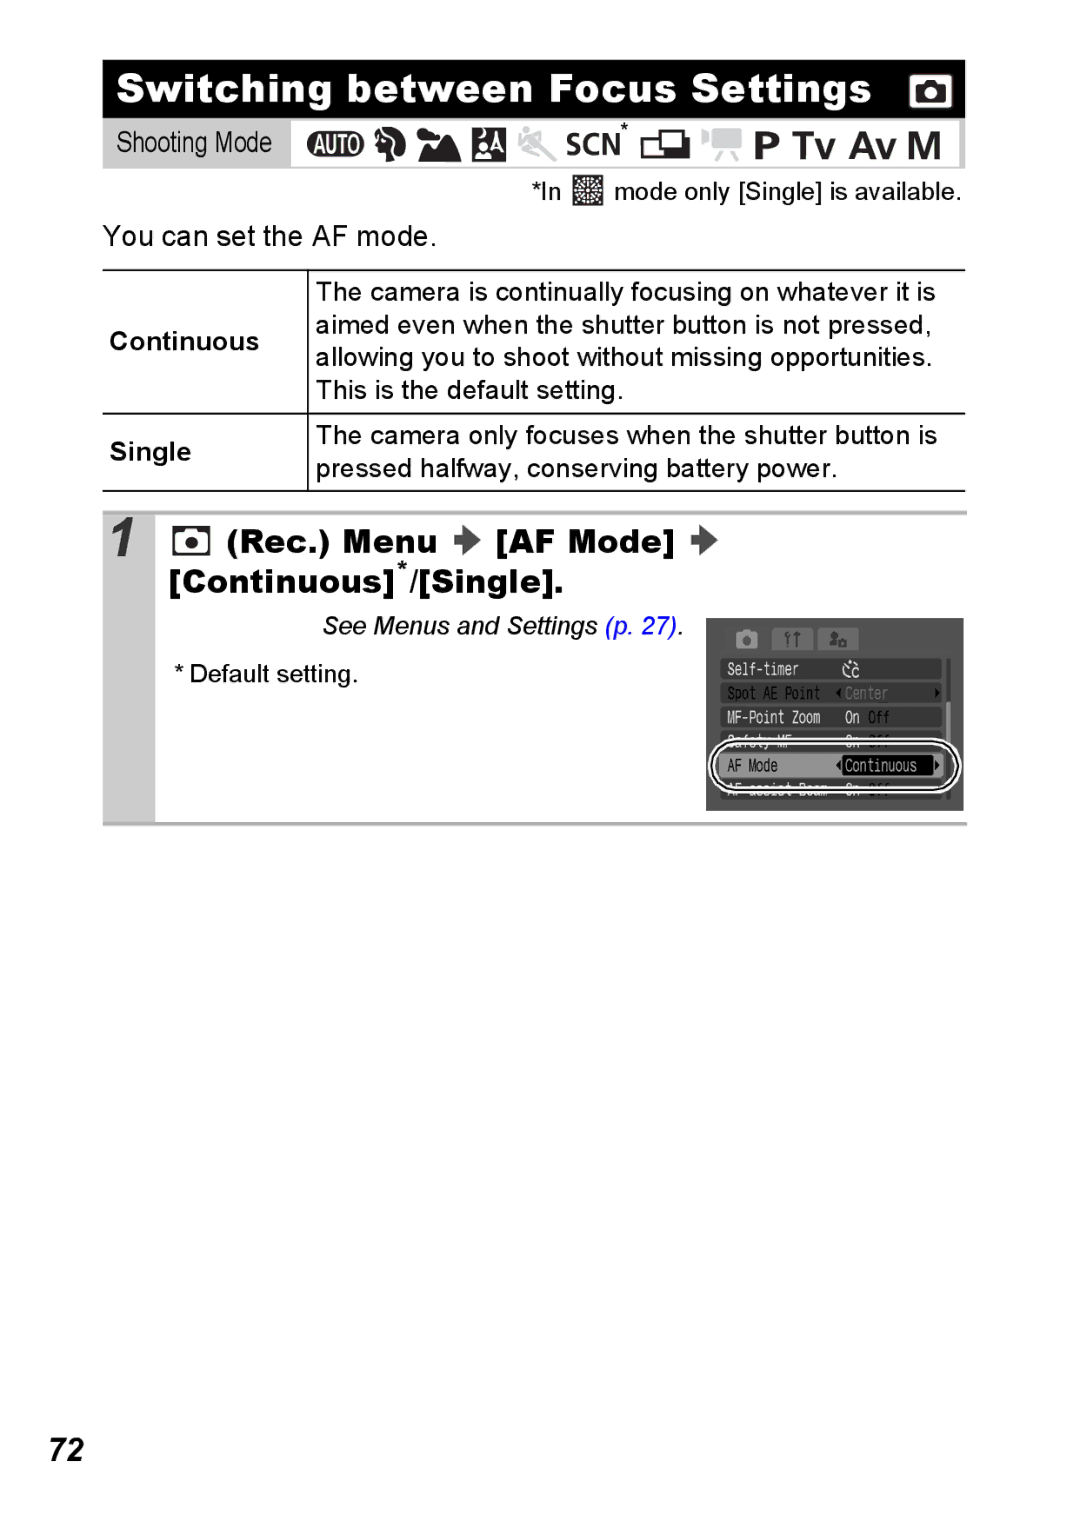
You can set the AF mode
Switching between Focus Settings
Rec. Menu AF Mode Continuous*/Single
Shooting Hard-to-Focus Subjects
Shooting with the Focus Lock
Re-aim the camera to compose the shot as desired and shoot
MF indicator will appear on the LCD monitor or viewfinder
Shooting with the AF Lock
To Release the AF Lock
Focus can be manually set
Shooting in Manual Focus Mode
To Cancel the Manual Focus
„Using the Safety MF
Using the Manual Focus in Combination with the Auto Focus
„Using the SET Button
Rec. Menu Safety MF On*/Off
Focus Bracketing Focus-BKT Mode
FUNC. Menu * BKT-OFF Focus-BKT SET button
FUNC. Menu * Evaluative
Switching between Metering Modes
To Cancel the Focus-BKT Mode
Select BKT-Off in Step
Rec. Menu FlexiZone On
Adjusting the ISO Speed
Adjusting the ISO Speed Quickly
Rec. Menu Auto ISO Shift On/ Off
Press the shutter button halfway
Adjusting the Exposure Compensation
To Cancel the Exposure Compensation
To Release the AE Lock
Locking the Exposure Setting AE Lock
Exposure is fixed Appears on the LCD monitor or viewfinder
Changing Shutter Speed and Aperture Value Combinations
To Release the FE Lock
Shooting with FE Lock
Raise the flash Press the button and set it to flash on
To Cancel the AEB Mode
Auto Exposure Bracketing AEB Mode
Adjust the compensation range with the W or Button
FUNC. Menu *BKT-Off AEB SET button
FUNC. Menu * Auto
Adjusting the Tone White Balance
White Balance Settings
Using the Custom White Balance
FUNC. Menu *Auto Custom
Page
Shooting in a My Colors Mode
My Colors Settings
Custom Color SET button
Setting the Camera to a Custom Color Mode
FUNC. Menu * My Colors Off
Mode
This completes the setting
Switching between Flash Adjustment Settings Shooting
Rec. Menu Flash Adjust Auto*/ Manual
Press the SET button
Compensating the Flash Adjustment/ Flash Output
FUNC. Menu +/- Flash/ Flash Output
Switching the Timing at which the Flash Fires
Rec. Menu Flash Sync 1st-curtain*/2nd-curtain
OK SET button
Saving Custom Settings
Rec. Menu Save Settings
Rec. Menu Set Shortcut button
Registering Settings to the Shortcut Button
Registering a Function
Select in Step
Using the Shortcut Button
To Cancel the Shortcut button
Setting the Auto Rotate Function
Set up Menu Auto Rotate On*/Off
Creating a Folder the Next Time You Shoot
Set up Menu Create Folder
Creating an Image Destination Folder
100
Setting the Day or Time for Automatic Folder Creation
101
Set up Menu File Numbering Continuous*/Auto Reset
Resetting the File Number
File Number Reset Function
102
File and Folder Numbers
103
Press the zoom lever toward
To Cancel the Magnified Display
Viewing Magnified Images
Use the S, T, W or X button to move around the image
Viewing Images in Sets of Nine Index Playback
Switching between Sets of Nine Images
To Cancel the Jump Bar
105
106
Organizing Images by Category My Category
Play Menu
Directly
Use the S or T button to select a search key
Jumping to Images
Single image playback mode, press the button
107
108
When erasing an image with Erase in the Play menu
Display the Images
Select Play and press the SET button
Viewing Movies
Display a movie and press the SET button
109
Slow Motion You can use the W button to slow down or
Operating the Movie Control Panel
110
Select Save and press the SET button
Editing Movies
Select Edit in the movie control panel Press the SET button
111
Select New File or Overwrite and press the SET button
112
Images can be rotated clockwise 90 or 270 in the display
Rotating Images in the Display
113
Playback with Transition Effects
114
115
Red-Eye Correction Function
Select Start and press the SET button
Examples
116
117
Adding My Colors Effects
Adding Correction Frames
You can add up to a maximum of 35 correction frames
Select OK, and press the SET button
118
119
Attaching Sound Memos to Images
Press the button while playing back images
Sound memo control panel will display
Sound Memo Panel
120
121
Sound-Only Recording Sound Recorder
Select Record and press the SET button
Use the W or X button to select and press the SET button
Sound Recorder Panel
122
123
Automated Playback Slide Shows
Use the S, T, W or X button to select
Automated Playback of Memory Card Images
Transition Effects
124
Pressing the SET button again
Select a date/category/folder to playback
125
126
Selecting Images for Playback
Select , or and press the SET button
Selecting All Images
Play Time
Adjusting the Play Time and Repeat Settings
127
Repeat
128
Protecting Images
Select a method and press the SET button
If you select All Images, proceed to Step
Select
Pressing the Menu button will end the setting
129
130
Viewing Images on a TV Set
Select Protect and press the SET button
131
132
Erasing Images
Select an option and press the SET button
Press the Menu button Select OK and press the SET button
133
Print Menu Select a menu item
Setting the Dpof Print Setting
When selecting Select All Images go to Step
134
135
Selection methods differ for the Print Type settings p
Settings
Select Images & Qty
136
Print Settings/Transfer Settings
Setting the Print Style
Print Menu Print Settings SET button
137
138
Play Menu SET button
Setting the Dpof Transfer Settings
Single Images
Select Order and press the SET button
140
All the Images on a Memory Card
Select Mark all and press the SET button
Select Theme to set all to the same settings
Changing My Camera Settings
Customizing the Camera My Camera Settings
My Camera Menu Menu Item
Select or and press the DISP. button
Registering My Camera Settings
My Camera Menu Menu Item to register
142
143
Start-up, Operation, Self-timer and Shutter Sounds
Select an image or record a sound
Start-up Image
Sounds come from the camera interior
Camera
Camera will not operate
144
145
When the power is turned on
LCD monitor/Viewfinder
Appears
Display flickers
Bar of light red, purple appears on the LCD Monitor
146
Camera will not record
Shooting
Noise displays./Subject’s movements are irregular
147
148
Image is blurred or out of focus
Subject in recorded image is too dark
Image contains noise
149
Continuous shooting slows down
White dots appear on the image
Eyes appear red
Recording images to memory card takes a long time
Buffer Warning p displays frequently on the LCD monitor
Shooting Movies
Lens will not retract
151
Movies cannot be edited
Playback
Cannot play back
Movies do not play back correctly
Batteries consumed quickly
Battery
Reading images from memory card is slow
153
154
TV monitor output
Printing with a direct print compatible printer
155
156
157
158
Battery Handling Precautions
Battery Handling
Battery Charge
159
Never use batteries that look like this
160
Batteries may be short circuited
161
Handling the Memory Card
SD Memory Card or Sdhc Memory Card Write Protect Tab
Do not use or store memory cards in the following locations
Formatting
162
Using the Power Kits Sold Separately
163
164
165
166
Using a Compact Power Adapter Kit Sold Separately
Plug in the power cord firmly as far as it will go
„Tele-converter TC-DC58B
Using Conversion Lenses Sold Separately
„Wide Converter WC-DC58A
167
168
„Close-up Lens 500D 58mm
„Lens Adapter/Hood Kit LAH-DC20
Shooting Area
Attaching a Lens/Lens Hood
169
170
171
Converter Settings
Rec. Menu Converter Off*/ WC-DC58A/TC-DC58B/500D
172
Using an Externally Mounted Flash Sold Separately
Speedlites
Red appears on the LCD monitor or viewfinder
Speedlite 220EX, 430EX or 580EX
Turn the shooting mode dial to the desired mode
173
Flash is charged when its pilot lamp lights up
174
High-Power Flash HF-DC1
175
176
177
Replacing the Date Battery
„Batteries
178
Lens
Camera Care and Maintenance
Camera Body
Viewfinder and LCD Monitor
180
Specifications
PowerShot S5 is
181
Metering System
182
Audio data Wave stereo
183
Possible to jump to every tenth or hundredth
184
MTP, PTP
Test Conditions
Battery Capacity
185
Memory Cards and Estimated Capacities
186
187
Movie
Estimated Sound Recorder File Sizes and Recording Times
MultiMediaCard
Image Data Sizes Estimated
188
SD Memory Card
189
NiMH Battery NB-3AH
Battery Charger CB-5AH/CB-5AHE
Wide Converter WC-DC58A Sold Separately
Compact Power Adapter CA-PS700 Sold Separately
190
Tele-converter TC-DC58B Sold Separately
Conversion Lens Adapter LA-DC58E Sold Separately
191
Close-up Lens 500D 58mm Sold Separately
Lens Hood LH-DC40
Numerics
192
193
26, Basic
194
186
195
172
196
Disclaimer
Trademark Acknowledgments
Functions Available in Each Shooting Mode
197
198
199
AEB
CEL-SG7DA210

 (Rec.) Menu
  [AF Mode]
  [Continuous]*/[Single].