Christie Digital Systems CSP70 Before You Begin Use Auto Setup Auto, Size and Position Menu

Models: CSP70

1 122
Download 122 pages 63.8 Kb
Page 32
Image 32

Section 3: Operation

Before You Begin

' Use Auto Setup ( Auto )


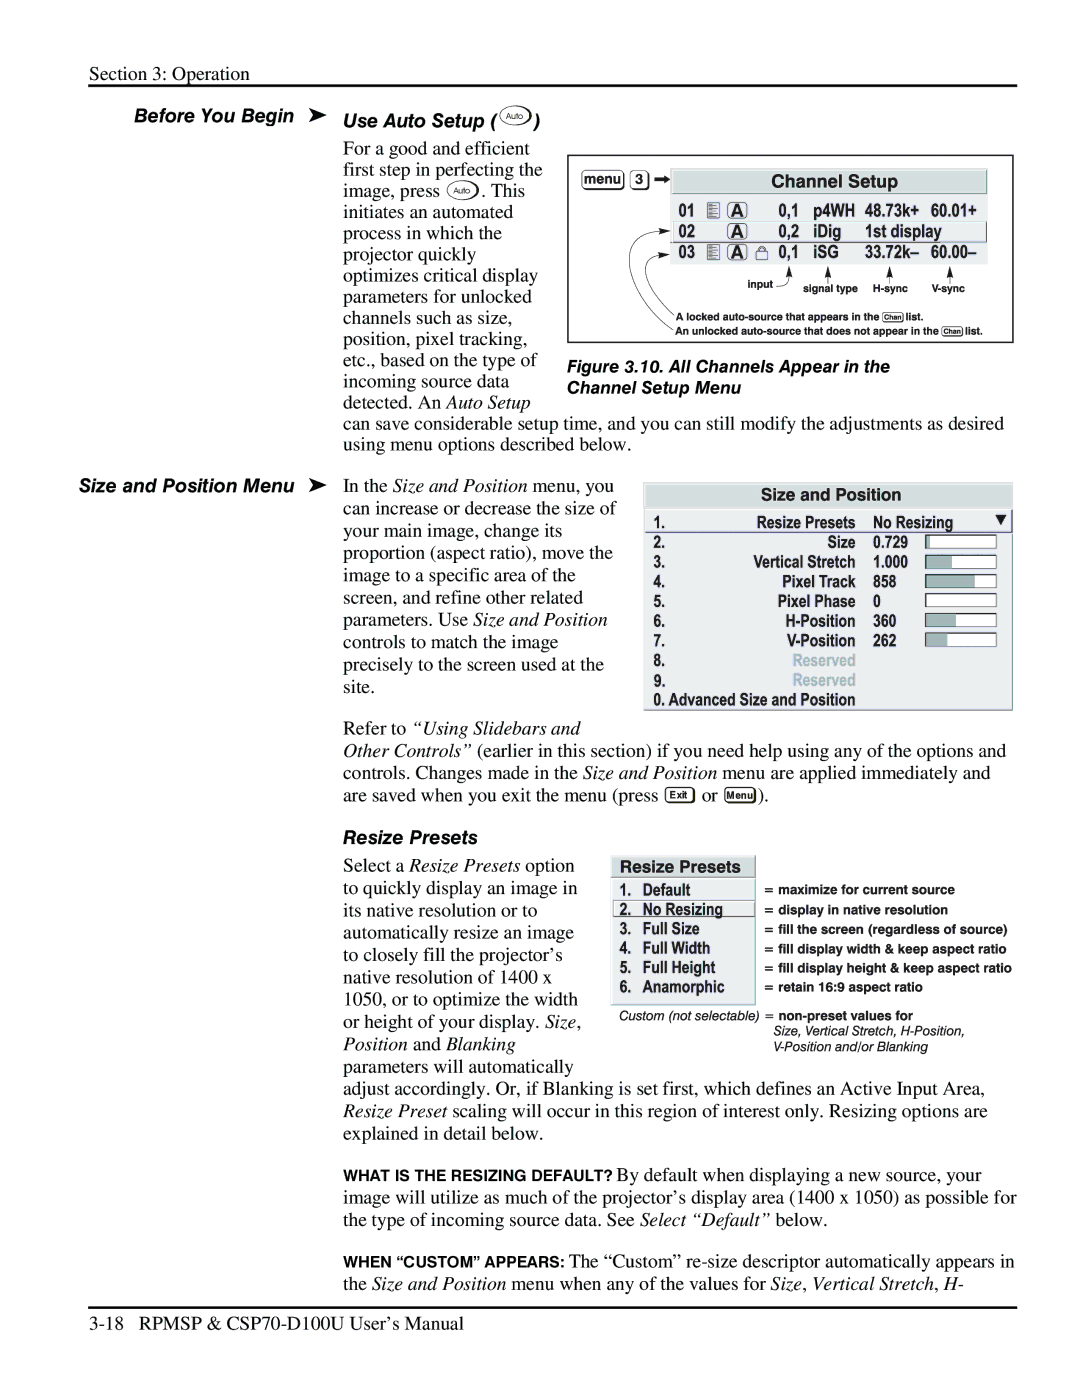
For a good and efficient


first step in perfecting the


image, press Auto . This


initiates an automated


process in which the


projector quickly


optimizes critical display


parameters for unlocked


channels such as size,


position, pixel tracking,


etc., based on the type of

Figure 3.10. All Channels Appear in the


incoming source data


Channel Setup Menu


detected. An Auto Setup


can save considerable setup time, and you can still modify the adjustments as desired


using menu options described below.

Size and Position Menu

' In the Size and Position menu, you


can increase or decrease the size of


your main image, change its


proportion (aspect ratio), move the


image to a specific area of the


screen, and refine other related


parameters. Use Size and Position


controls to match the image


precisely to the screen used at the


site.


Refer to “Using Slidebars and


Other Controls” (earlier in this section) if you need help using any of the options and


controls. Changes made in the Size and Position menu are applied immediately and


are saved when you exit the menu (press Exit or Menu ).


Resize Presets


Select a Resize Presets option


to quickly display an image in


its native resolution or to


automatically resize an image


to closely fill the projector’s


native resolution of 1400 x


1050, or to optimize the width


or height of your display. Size,


Position and Blanking


parameters will automatically


adjust accordingly. Or, if Blanking is set first, which defines an Active Input Area,


Resize Preset scaling will occur in this region of interest only. Resizing options are


explained in detail below.


WHAT IS THE RESIZING DEFAULT? By default when displaying a new source, your


image will utilize as much of the projector’s display area (1400 x 1050) as possible for


the type of incoming source data. See Select “Default” below.


WHEN “CUSTOM” APPEARS: The “Custom” re-size descriptor automatically appears in


the Size and Position menu when any of the values for Size, Vertical Stretch, H-

3-18 RPMSP & CSP70-D100U User’s Manual

Page 32
Image 32
Christie Digital Systems CSP70 user manual Before You Begin Use Auto Setup Auto, Size and Position Menu, Resize Presets

CSP70 specifications

Christie Digital Systems has long been regarded as a leader in visual display technology, and the CSP70 is a standout product in their portfolio. This innovative projector is designed to cater to professional environments such as corporate meetings, educational institutions, and event venues that require high-quality image projection.

One of the most notable features of the CSP70 is its impressive brightness. With a high lumen output, the CSP70 ensures vibrant and clear images even in well-lit conditions. This is particularly important for environments where ambient light can interfere with image quality. The projector employs advanced DLP (Digital Light Processing) technology, which enhances color fidelity and contrast, producing sharp and detailed visuals that capture the audience's attention.

The CSP70 is also highly versatile, supporting a wide range of resolutions including 4K. This ability to display high-definition content makes it ideal for presentations that require fine detail and clarity. Whether used for corporate presentations, educational lectures, or immersive multimedia experiences, the projector delivers exceptional performance.

Another key characteristic of the CSP70 is its connectivity options. Featuring multiple input sources, including HDMI, DisplayPort, and various legacy connections, it ensures seamless integration with a variety of devices and media formats. This flexibility allows users to easily switch between sources without hassle, enhancing the efficiency of presentations and collaborations.

Moreover, the CSP70 incorporates advanced imaging technologies, including HDR (High Dynamic Range) support, which expands the color range and contrast ratio, providing stunning visuals that are more lifelike. The projector also boasts an extended lifespan, thanks to its robust design and efficient cooling system, minimizing maintenance interruptions and maximizing uptime.

In addition to its technical specifications, the CSP70 is designed with user-friendliness in mind. The intuitive interface allows for easy setup and operation, making it an excellent choice for users of all skill levels. Overall, the Christie Digital Systems CSP70 stands out as a powerful and adaptable projection solution, making it a go-to choice for professionals seeking reliability, quality, and versatility in their visual presentations.