December
Maintenance and Service Guide
Compaq Armada 110 and Compaq Evo N110
Document Part Number
Maintenance and Service Guide Third Edition December
Document Part Number
1 Product Description
Contents
2 Troubleshooting
4 Removal and Replacement Preliminaries
3 Illustrated Parts Catalog
3.1 Serial Number Location 3.2 Computer System Major Components
3.3 Plastics Kit Components 3.4 Hardware Kit Components
5 Removal and Replacement Procedures
6 Specifications A Connector Pin Assignments
B Power Cord Set Requirements
C Screw Listing Index
Figure 1-1 Compaq Armada 110 and Evo N110
1.1 Models and Features
Product Description
Models
Computer models are shown in Table1-1
Compaq Armada 110 and Evo N110 Models and Model Naming Conventions
Product Description
Compaq Armada 110 and Evo N110
Models and Model Naming Conventions Continued
Product Description
243860-B21
258292-B21
243857-B21
243858-B21
Features
Displays, varying by computer model
1.2 Security
Timeout Settings
1.3 Power Management
Enabling Power Savings
Standby
Setting Standby
Hibernation
Display and Left Side Components
1.4 Computer External Components
Figure 1-2 Display and Left Side Components
1-12
Figure 1-3 Right Side and Rear Panel Components
Right Side and Rear Panel Components
a mouse. When this connector is used, both
Right Side and Rear Panel Components Continued
Figure 1-4 Keyboard Components
1-14
Caps lock key
Keyboard Components
Fn key
1-16
Figure 1-5 Top Components
Top Components
Top Components Continued
On Scroll lock is on
Figure 1-6 Bottom Components
1-18
Bottom Components
1.4 Design Overview
Troubleshooting
Using the PhoenixBIOS Setup Utility
Troubleshooting
Troubleshooting Flowcharts for Portable Computers
Troubleshooting Flowcharts Overview
2.1 Initial Troubleshooting
Is there power?
Go to Section No Power
Beeps LEDs, or error Messages?
2.2 No Power, Part
Power up
Power up in docking station?
in docking
Section
2.3 No Power, Part
power supply, if applicable
2.4 No Power, Part
2.5 No Power, Part
damaged
damaged items
computer and
2.6 No Video, Part
2.7 No Video, Part
2-10
2.8 Non-Functioning Docking Station if applicable
2.9 No Operating System OS Loading
Reseat power cord in docking station and power outlet Hard drive
go to Section Diskette drive go to Section CD-/DVD-ROM
drive, go to Section Network go to Section
2.10 No OS Loading from Hard Drive, Part
Check the setup utility for correct booting order
Boot from diskette?
priority through the setup utility and reboot
2.11 No OS Loading from Hard Drive, Part
2.12 No OS Loading from Hard Drive, Part
2. Replace
2.13 No OS Loading from Diskette Drive
1. Replace
2.14 No OS Loading from CD- or DVD-ROM Drive
2.15 No Audio, Part
2-18
connections in
2.16 No Audio, Part
N Replace audio
2.17 Non-Functioning Device
Non Functioning Device Reseat device
Unplug the non-functioning device
device?
2.18 Non-Functioning Keyboard
2-21
Connect notebook to good external keyboard
keyboard or
Replace internal pointing device or
2.19 Non-Functioning Pointing Device
2-22
2.20 Network or Modem Connection
2-23
activated
in OS?
Illustrated Parts Catalog
3.1 Serial Number Location
Illustrated Parts Catalog
3.2 Computer System Major Components
Figure 3-2 Computer System Major Components
Spare Parts Computer System Major Components
Computer System Major Components continued
Spare Parts Computer System Major Components Continued
Illustrated Parts Catalog
Spare Part
Plastics Kit Components Spare Part Number
3.3 Plastics Kit Components
Figure 3-3 Plastics Kit Components
Hardware Kit Components Spare Part Number
3.4 Hardware Kit Components
Figure 3-4 Hardware Kit Components
3.5 Cable Kit Components
Figure 3-5 Cable Kit Components
Cable Kit Components Spare Part Number
3-10
Mass Storage Devices
3.6 Mass Storage Devices
Figure 3-6 Mass Storage Devices
3-12
3.7 Miscellaneous
Spare Parts Miscellaneous not illustrated
Spare Parts Miscellaneous not illustrated Continued
4.1 Tools Required
Removal and Replacement Preliminaries
4.2 Service Considerations
Plastic Parts
Cables and Connectors
4.3 Preventing Damage to Removable Drives
Avoid dropping drives from any height onto any surface
4.5 Packaging and Transporting Precautions
4.4 Preventing Electrostatic Damage
4.6 Workstation Precautions
4.7 Grounding Equipment and Methods
Non-conductive plastic bags, tubes, or boxes Metal tote boxes
Removal and Replacement Procedures
Figure 5-1 Serial Number Location
5.1 Serial Number
Removal and Replacement Procedures
5.2 Disassembly Sequence Chart
Disassembly Sequence Chart
5.3 Preparing the Computer for Disassembly
Figure 5-2 Replacing the Computer Feet
5.4 Computer Feet
Computer Feet Spare Part Number Information
5.5 Mini PCI Communication Board
5. Remove the mini PCI compartment cover
5.6 LED Cover
Figure 5-5 Removing the LED Cover
5.7 Keyboard
Keyboard Spare Part Number Information
Figure 5-6 Removing the Keyboard Screws
Reverse the above procedure to install the keyboard
Figure 5-7 Disconnecting the Keyboard Cable
6. Remove the keyboard
5-11
5-12
5.8 Optical Drive
Optical Drives Spare Part Number Information
4. Slide the optical drive out of the base enclosure
5.9 Display
Display Spare Part Number Information
5. Lift the hinge covers straight up to remove them
6. Position the computer with the front facing you
Figure 5-11 Installing the Display Screws
5-17
5.10 Heat Sink
Heat Sink Spare Part Number Information
Figure 5-12 Removing the Heat Sink Screws
5-19
4. Pull the heat sink away from the base enclosure at a
Follow these steps to replace a damaged thermal pad
5-22
5.11 Processor
Processor Spare Part Number Information
Figure 5-14 Removing the Processor
5.12 Top Cover
Top Cover Spare Part Number Information
Figure 5-15 Removing the Top Cover Screws
5-25
4. Turn the computer top side up with the front facing you
5.13 Diskette Drive
Diskette Drive Spare Part Number Information
5. Remove the diskette drive from the top cover
5-29
5.14 TouchPad
TouchPad Spare Part Number Information
3. Slide the TouchPad bracket forward
4. Lift the TouchPad bracket up and remove it from the top cover
Figure 5-18 Removing the TouchPad Bracket
5-30
Reverse the above procedure to install the TouchPad
5. Remove the TouchPad board and cable from the top cover Figure
Figure 5-19 Removing the TouchPad
5-31
5-32
5.15 Hard Drive
Hard Drive Spare Part Number Information
3. Remove the hard drive bracket 2 from the base enclosure
5.16 Disk Cell Real Time Clock RTC Battery
Disk Cell RTC Battery Spare Part Number Information
5-35
Reverse the above procedure to install the disk cell RTC battery
Figure 5-21 Removing the Disk Cell Battery
5-36
5.17 Fan
Fan Spare Part Number Information
Reverse the above procedure to install the fan
3. Disconnect the fan cable from the system board
4. Remove the fan bracket 3 and fan 4 from the base enclosure
Figure 5-22 Removing the Fan
Figure 5-23 Routing the Fan Cable
5-38
5.18 System Board
System Board Spare Part Number Information
5-40
4. Turn the base enclosure top side up with the front facing you
Figure 5-24 Removing the Exterior System Board Screws
7. Remove the optical drive alignment rail
Reverse the above procedure to install the system board
9. Make sure the PC Card eject button 1 is fully depressed Figure
Figure 5-26 Removing the System Board
5-42
Figure 5-27 Routing the Microphone Cable
5-43
Computer
Specifications
This chapter provides physical and performance specifications
Specifications
Computer Continued
Relative Humidity non-condensing
Shock
14.1-inch XGA, TFT Display
12.1-inch SVGA, TFT Display
Logical configuration
10.0-GB Hard Drive
20.0 GB
15.0 GB
Physical configuration
10.0-GB Hard Drive Continued
Buffer size3
Disk rotational speed
Diskette Drive
Diskette size
Light
Height
CD-ROM Drive
DVD-ROM Drive
AC Adapter
6-10
Battery Packs
System DMA
Hardware DMA
System Function
6-12
System Interrupts
System I/O Addresses
6-14
System I/O Addresses Continued
6-16
System Memory Map
Table A-2 Microphone
Connector Pin Assignments
Table A-1 Stereo Speaker/Headphone
Table A-4 RJ-11 Modem
Connector Pin Assignments
Table A-3 Keyboard/Mouse
Table A-5 RJ-45 Network Interface
Table A-6 Universal Serial Bus
Table A-7 Serial
Table A-8 External Monitor
Table A-9 Parallel
General Requirements
Power Cord Set Requirements
3-Conductor Power Cord Set
Country-Specific Requirements
3-Conductor Power Cord Set Requirements-By Country
1. The flexible cord must be HAR Type HO5VV-F
Screw Listing
Table C-1 M2.5 × 5 Screw
Table C-2 M2.5 × 4.5 Screw
Screw Listing
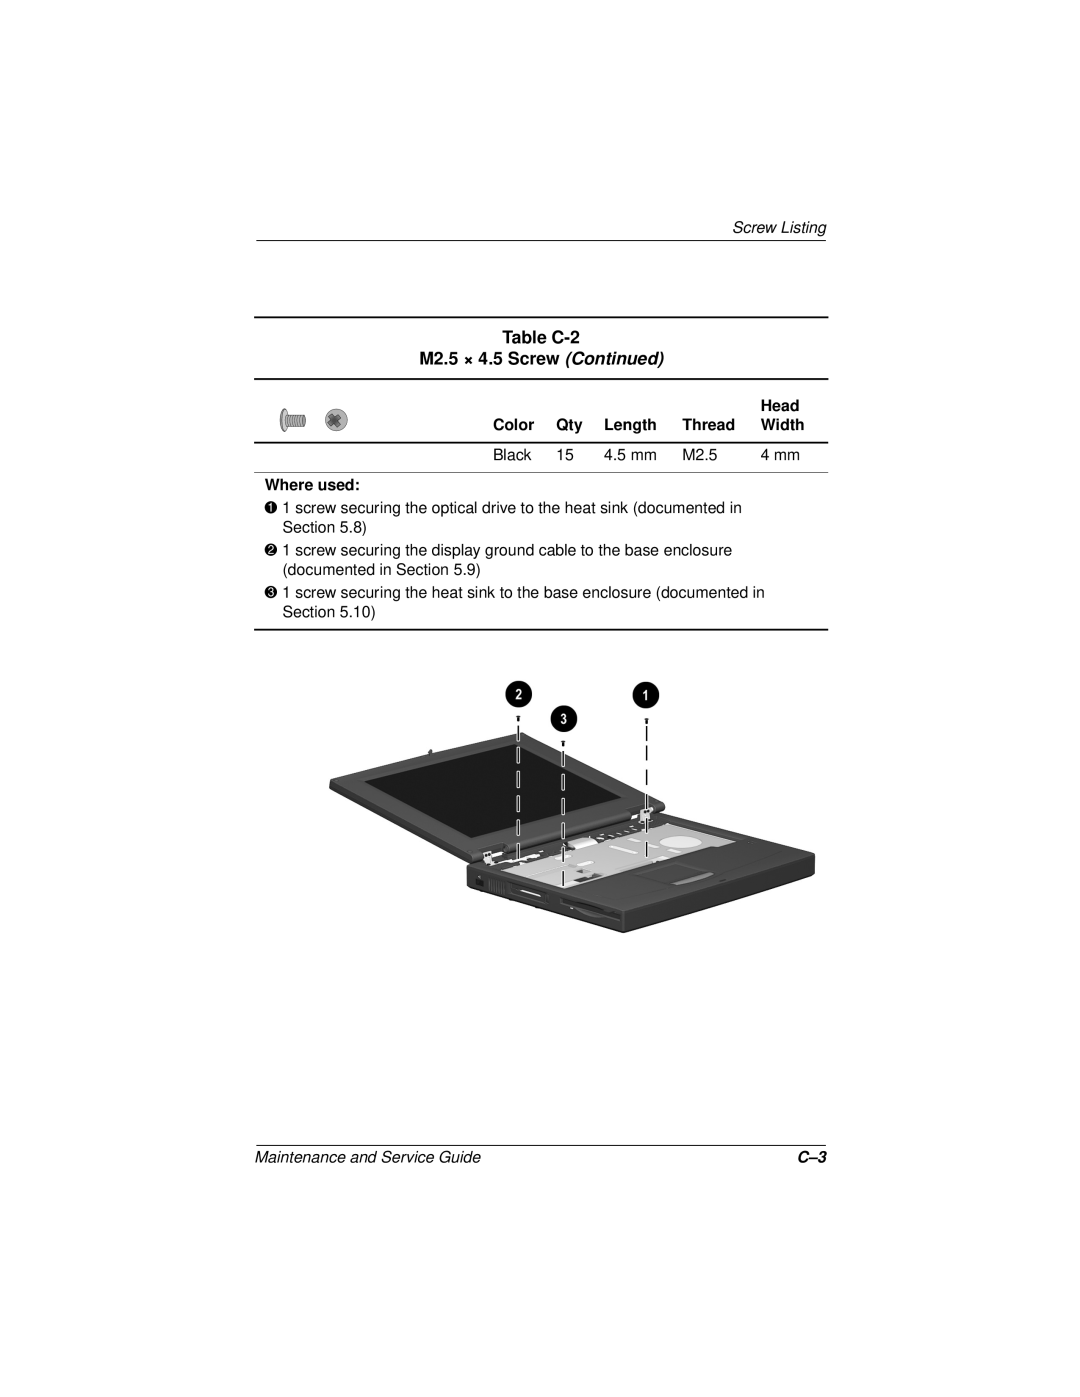
Table C-2 M2.5 × 4.5 Screw Continued
Table C-2 M2.5 × 4.5 Screw Continued
Screw Listing
Screw Listing
Maintenance and Service Guide
Table C-2 M2.5 × 4.5 Screw Continued
Table C-2 M2.5 × 4.5 Screw Continued
Table C-3 M2.5 × 7 Screw
Table C-3 M2.5 × 7 Screw Continued
Screw Listing
Table C-4 M2.5 × 5.5 Screw
C-10
Index
Page
Page
Page
Index-5
Index-6