INSTALLATION—FREESTANDING

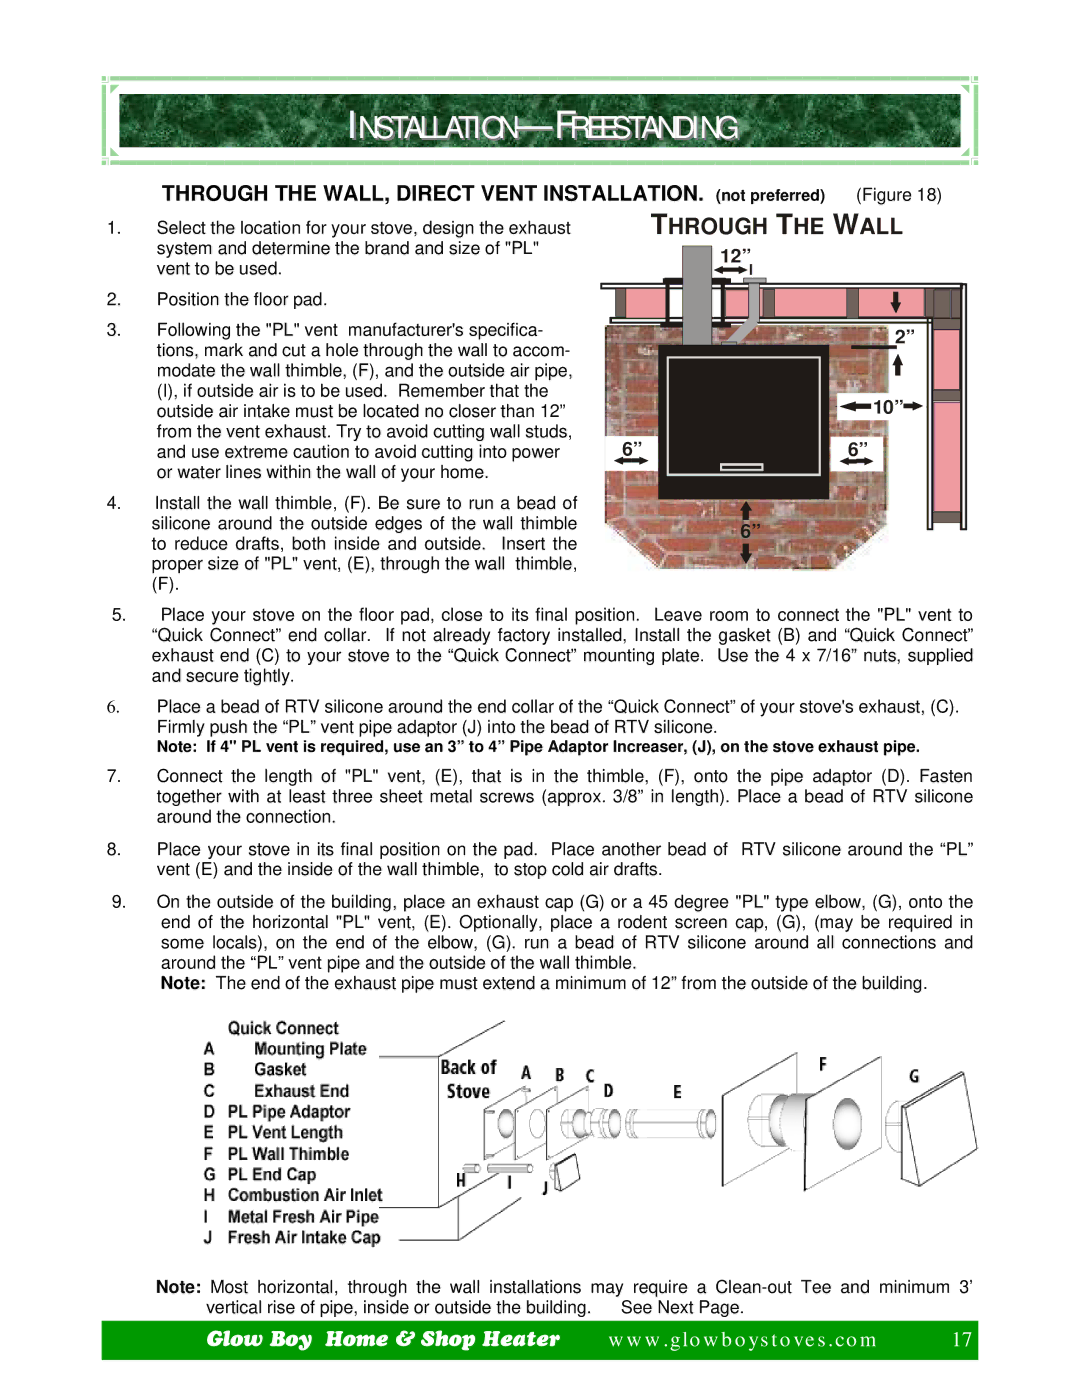
THROUGH THE WALL, DIRECT VENT INSTALLATION. (not preferred) (Figure 18)

1.

Select the location for your stove, design the exhaust

THROUGH THE WALL


system and determine the brand and size of "PL"


vent to be used.

2.

Position the floor pad.

3.

Following the "PL" vent manufacturer's specifica-


tions, mark and cut a hole through the wall to accom-


modate the wall thimble, (F), and the outside air pipe,


(I), if outside air is to be used. Remember that the


outside air intake must be located no closer than 12”


from the vent exhaust. Try to avoid cutting wall studs,


and use extreme caution to avoid cutting into power


or water lines within the wall of your home.

4.

Install the wall thimble, (F). Be sure to run a bead of


silicone around the outside edges of the wall thimble


to reduce drafts, both inside and outside. Insert the


proper size of "PL" vent, (E), through the wall thimble,


(F).

12”

6”

6”

6”

1”2”

10” 10”

6”

5.Place your stove on the floor pad, close to its final position. Leave room to connect the "PL" vent to “Quick Connect” end collar. If not already factory installed, Install the gasket (B) and “Quick Connect” exhaust end (C) to your stove to the “Quick Connect” mounting plate. Use the 4 x 7/16” nuts, supplied and secure tightly.

6.Place a bead of RTV silicone around the end collar of the “Quick Connect” of your stove's exhaust, (C). Firmly push the “PL” vent pipe adaptor (J) into the bead of RTV silicone.

Note: If 4" PL vent is required, use an 3” to 4” Pipe Adaptor Increaser, (J), on the stove exhaust pipe.

7.Connect the length of "PL" vent, (E), that is in the thimble, (F), onto the pipe adaptor (D). Fasten together with at least three sheet metal screws (approx. 3/8” in length). Place a bead of RTV silicone around the connection.

8.Place your stove in its final position on the pad. Place another bead of RTV silicone around the “PL” vent (E) and the inside of the wall thimble, to stop cold air drafts.

9.On the outside of the building, place an exhaust cap (G) or a 45 degree "PL" type elbow, (G), onto the end of the horizontal "PL" vent, (E). Optionally, place a rodent screen cap, (G), (may be required in some locals), on the end of the elbow, (G). run a bead of RTV silicone around all connections and around the “PL” vent pipe and the outside of the wall thimble.

Note: The end of the exhaust pipe must extend a minimum of 12” from the outside of the building.

Note: Most horizontal, through the wall installations may require a Clean-out Tee and minimum 3’

vertical rise of pipe, inside or outside the building.

See Next Page.


Glow Boy Home & Shop Heater

www.glowboystoves.com

17


Page 17
Image 17
Dansons Group CCGB 1, CCGB 2 manual Installation-Freestanding, Through the Wall

CCGB 1, CCGB 2 specifications

Dansons Group has made significant strides in the manufacturing and distribution of outdoor cooking products, particularly through their innovative brands like Dansons/BBQ and their specialty line of wood pellets. Among their offerings, CCGB 2 and CCGB 1 have garnered considerable attention for their advanced technology and user-friendly features.

CCGB 2 and CCGB 1 are two versatile outdoor grills designed to enhance the grilling experience for both novice and expert cooks. One of the main features of these grills is their precision temperature control, which allows users to set and maintain specific cooking temperatures with unparalleled accuracy. This is achieved through advanced digital thermostatic controls that monitor and adjust the heat output, ensuring consistent performance and preventing unnecessary flare-ups.

Both models boast robust construction, using high-quality materials that are resistant to corrosion and wear, ensuring longevity and durability even in challenging weather conditions. The spacious cooking area is another standout characteristic, allowing users to prepare large quantities of food simultaneously, making them ideal for gatherings and outdoor events.

The CCGB series is also equipped with a unique wood pellet system that delivers exceptional flavor to grilled foods. The ability to choose from a variety of wood pellet types allows users to customize the smokiness and richness of their dishes, enhancing the overall culinary experience. This feature is especially appealing to barbecue enthusiasts who appreciate the subtle differences that wood smoke imparts to meats and vegetables.

In terms of technology, both CCGB 2 and CCGB 1 incorporate Wi-Fi connectivity, enabling users to monitor and control their grills remotely via a mobile app. This innovative feature provides convenience, allowing users to tend to their cooking without being tethered to their grill. Additionally, the app often includes recipes, temperature presets, and cooking tips, further enhancing the grilling experience.

Safety features are also a priority in the design of CCGB 2 and CCGB 1. These grills have integrated heat shields and protective barriers to minimize the risk of burns and ensure safe operation, even for inexperienced users.

In summary, Dansons Group's CCGB 2 and CCGB 1 stand out in the market for their superior temperature control, versatile wood pellet system, durable construction, and innovative technology. These features not only simplify the grilling process but also elevate the outdoor cooking experience, making them essential tools for anyone looking to master the art of grilling.