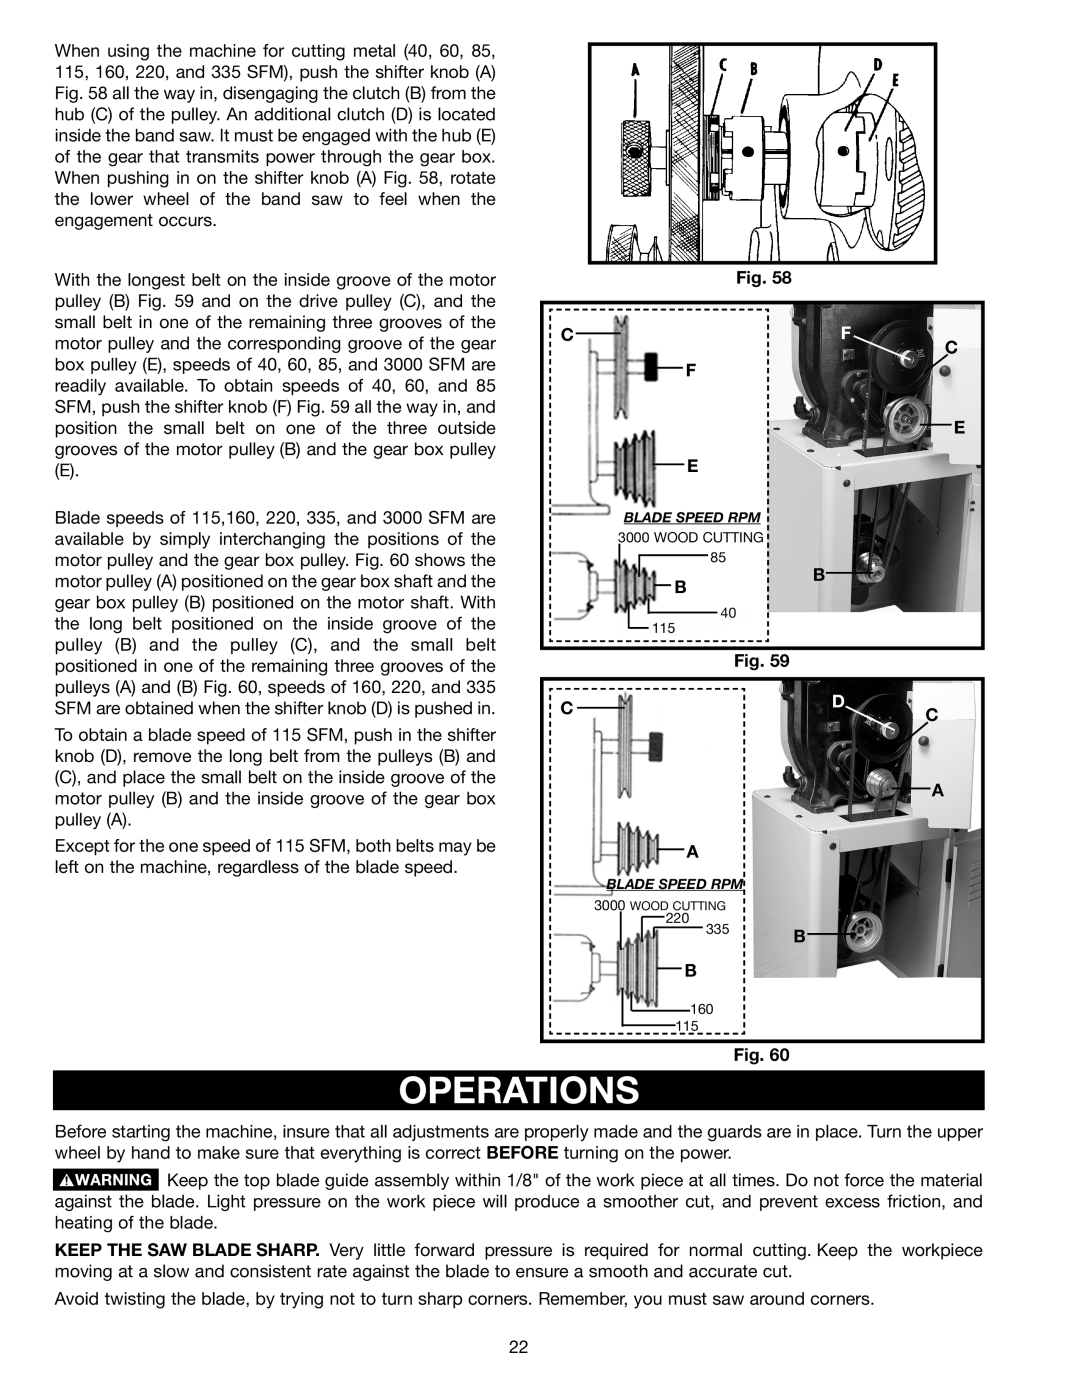
When using the machine for cutting metal (40, 60, 85, 115, 160, 220, and 335 SFM), push the shifter knob (A) Fig. 58 all the way in, disengaging the clutch (B) from the hub (C) of the pulley. An additional clutch (D) is located inside the band saw. It must be engaged with the hub (E) of the gear that transmits power through the gear box. When pushing in on the shifter knob (A) Fig. 58, rotate the lower wheel of the band saw to feel when the engagement occurs.
With the longest belt on the inside groove of the motor pulley (B) Fig. 59 and on the drive pulley (C), and the small belt in one of the remaining three grooves of the motor pulley and the corresponding groove of the gear box pulley (E), speeds of 40, 60, 85, and 3000 SFM are readily available. To obtain speeds of 40, 60, and 85 SFM, push the shifter knob (F) Fig. 59 all the way in, and position the small belt on one of the three outside grooves of the motor pulley (B) and the gear box pulley
(E).
Blade speeds of 115,160, 220, 335, and 3000 SFM are available by simply interchanging the positions of the motor pulley and the gear box pulley. Fig. 60 shows the motor pulley (A) positioned on the gear box shaft and the gear box pulley (B) positioned on the motor shaft. With the long belt positioned on the inside groove of the pulley (B) and the pulley (C), and the small belt positioned in one of the remaining three grooves of the pulleys (A) and (B) Fig. 60, speeds of 160, 220, and 335 SFM are obtained when the shifter knob (D) is pushed in.
To obtain a blade speed of 115 SFM, push in the shifter knob (D), remove the long belt from the pulleys (B) and (C), and place the small belt on the inside groove of the motor pulley (B) and the inside groove of the gear box pulley (A).
Except for the one speed of 115 SFM, both belts may be left on the machine, regardless of the blade speed.
Fig. 58
C | F |
| C |
| F |
| E |
| E |
| BLADE SPEED RPM |
| 3000 WOOD CUTTING |
| 85 |
| B |
| B |
| 40 |
| 115 |
Fig. 59
CD C
C
A
A
BLADE SPEED RPM
3000 WOOD CUTTING
220
![]() 335 B
335 B
B
160
115
Fig. 60
OPERATIONS
Before starting the machine, insure that all adjustments are properly made and the guards are in place. Turn the upper wheel by hand to make sure that everything is correct BEFORE turning on the power.
![]() Keep the top blade guide assembly within 1/8" of the work piece at all times. Do not force the material against the blade. Light pressure on the work piece will produce a smoother cut, and prevent excess friction, and heating of the blade.
Keep the top blade guide assembly within 1/8" of the work piece at all times. Do not force the material against the blade. Light pressure on the work piece will produce a smoother cut, and prevent excess friction, and heating of the blade.
KEEP THE SAW BLADE SHARP. Very little forward pressure is required for normal cutting. Keep the workpiece moving at a slow and consistent rate against the blade to ensure a smooth and accurate cut.
Avoid twisting the blade, by trying not to turn sharp corners. Remember, you must saw around corners.
22