3

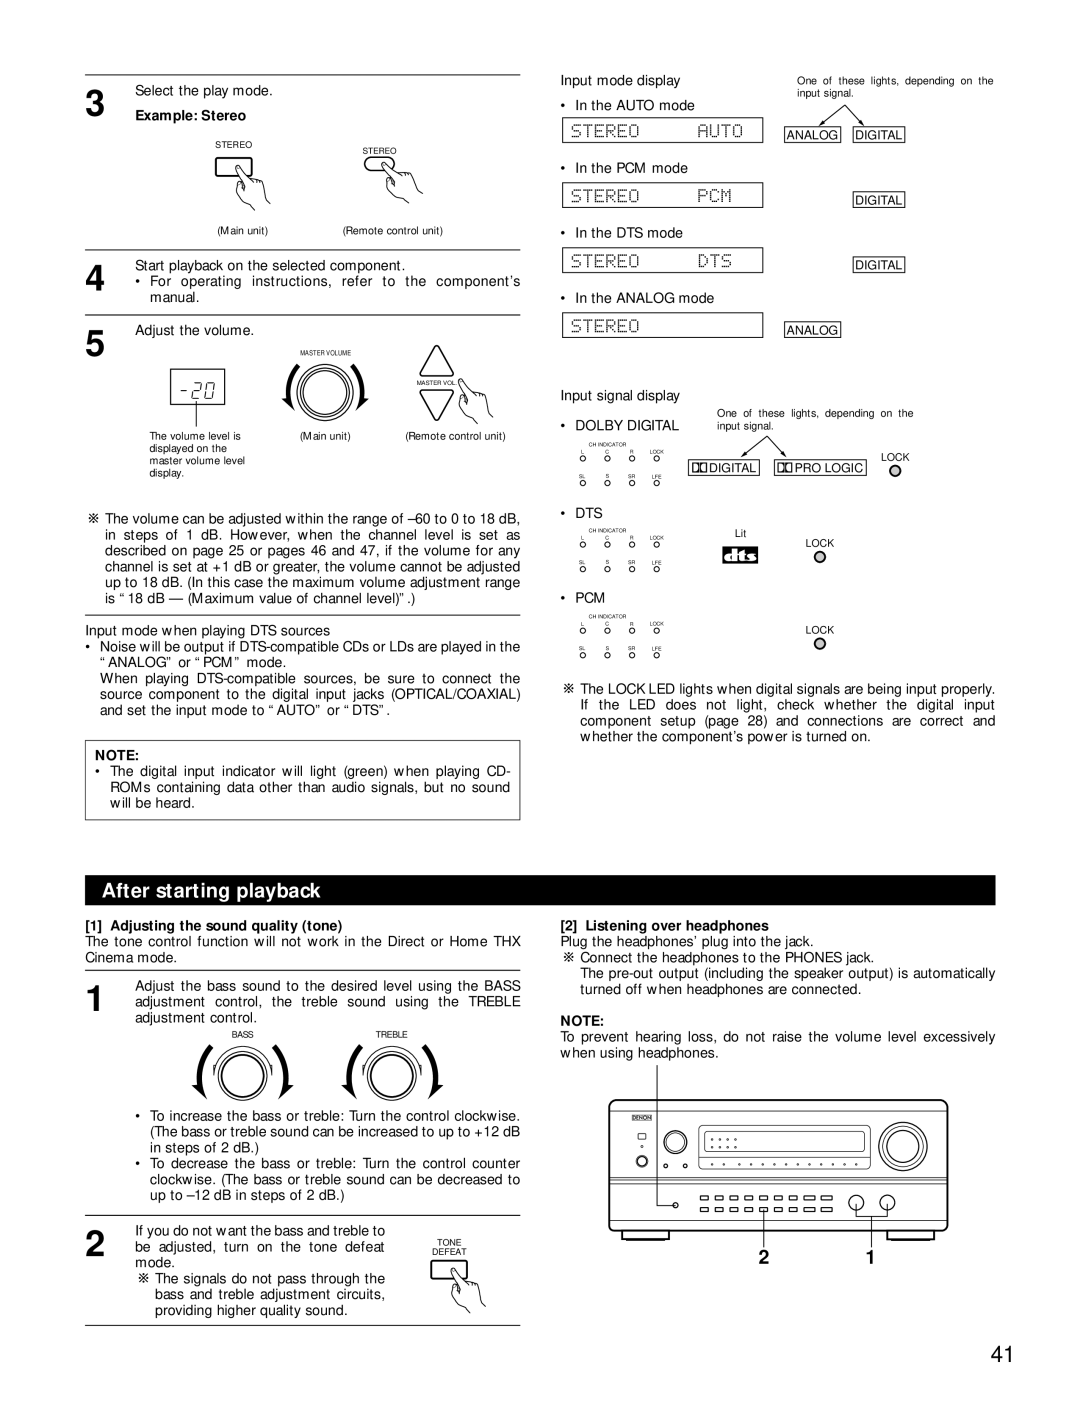
Select the play mode.


Example: Stereo


STEREO

STEREO


(Main unit)

(Remote control unit)

4

Start playback on the selected component.


• For operating instructions, refer to the component’s


manual.


5

Adjust the volume.

MASTER VOLUME


MASTER VOL.


The volume level is

(Main unit)

(Remote control unit)


displayed on the


master volume level


display.


The volume can be adjusted within the range of –60 to 0 to 18 dB, in steps of 1 dB. However, when the channel level is set as described on page 25 or pages 46 and 47, if the volume for any channel is set at +1 dB or greater, the volume cannot be adjusted up to 18 dB. (In this case the maximum volume adjustment range is “18 dB — (Maximum value of channel level)”.)

Input mode when playing DTS sources

Noise will be output if DTS-compatible CDs or LDs are played in the “ANALOG” or “PCM” mode.

When playing DTS-compatible sources, be sure to connect the source component to the digital input jacks (OPTICAL/COAXIAL) and set the input mode to “AUTO” or “DTS”.

NOTE:

The digital input indicator will light (green) when playing CD- ROMs containing data other than audio signals, but no sound will be heard.

After starting playback

[1] Adjusting the sound quality (tone)

The tone control function will not work in the Direct or Home THX Cinema mode.

1

Adjust the bass sound to the desired level using the BASS

adjustment control, the

treble sound using the TREBLE


adjustment control.


BASS

TREBLE

To increase the bass or treble: Turn the control clockwise. (The bass or treble sound can be increased to up to +12 dB in steps of 2 dB.)

To decrease the bass or treble: Turn the control counter clockwise. (The bass or treble sound can be decreased to up to –12 dB in steps of 2 dB.)

If you do not want the bass and treble to

2

be adjusted, turn on the tone defeat

TONE

DEFEAT

mode.


The signals do not pass through the bass and treble adjustment circuits, providing higher quality sound.

Input mode display


One of these lights, depending on the

• In the AUTO mode


input signal.


ANALOG DIGITAL


• In the PCM mode


DIGITAL


• In the DTS mode


DIGITAL


• In the ANALOG mode


ANALOG


Input signal display


• DOLBY DIGITAL


One of these lights, depending on the


input signal.


CH INDICATOR


L

C

R

LOCK


LOCK


SL

S

SR

LFE


DIGITAL


PRO LOGIC


• DTS


CH INDICATOR


Lit


L

C

R

LOCK


LOCK


SL

S

SR

LFE


• PCM

CH INDICATOR

L C R LOCK

LOCK

SL S SR LFE

The LOCK LED lights when digital signals are being input properly. If the LED does not light, check whether the digital input component setup (page 28) and connections are correct and whether the component’s power is turned on.

[2] Listening over headphones

Plug the headphones’ plug into the jack.

Connect the headphones to the PHONES jack.

The pre-out output (including the speaker output) is automatically turned off when headphones are connected.

NOTE:

To prevent hearing loss, do not raise the volume level excessively when using headphones.

21

41

Page 41
Image 41
Denon AVR-4800 manual After starting playback, Example Stereo, Adjusting the sound quality tone, Listening over headphones

AVR-4800 specifications

The Denon AVR-4800 is a high-performance home theater receiver that has left a lasting impact on audiophiles and home entertainment enthusiasts since its launch. A product of Denon's legacy in audio technology, the AVR-4800 caters to individuals who seek an immersive listening experience while enjoying their favorite movies, music, and gaming.

One of the standout features of the Denon AVR-4800 is its powerful multi-channel amplification. The receiver supports an impressive configuration of up to 7.1 channels, delivering a total output of 100 watts per channel. This level of amplification ensures that even the most demanding audio tracks are delivered with clarity and depth, creating an enchanting surround sound environment. The ability to connect various speakers allows for a customizable sound setup, catering to the needs of diverse home theater configurations.

The AVR-4800 supports several audio formats and technologies, including Dolby Digital, DTS, and Dolby Pro Logic II. This compatibility allows users to experience high-quality sound reproduction across various media formats, whether they are watching a blockbuster movie or listening to their favorite music. With a comprehensive suite of surround sound processing options, the receiver ensures an immersive audio experience that draws listeners into the action.

Furthermore, the AVR-4800 features Denon's proprietary AL24 processing, which enhances the audio signal by providing wider dynamic ranges and reduced distortion. This technology captures nuanced details in music and film soundtracks, resulting in a richer and more engaging listening experience. The inclusion of digital signal processing and tone controls allows users to tailor the sound according to their preferences, ensuring that every user can achieve their ideal audio setup.

The AVR-4800 also includes a range of connectivity options. It boasts multiple analog and digital inputs, allowing users to connect various devices, such as Blu-ray players, gaming consoles, and streaming devices. The receiver features video scaling capabilities, enabling it to upscale standard-definition video to high-definition output for better picture quality while watching films or shows.

Overall, the Denon AVR-4800 combines advanced audio technologies, impressive amplification, and versatile connectivity to provide an exceptional home theater experience. Its commitment to sound quality and user-friendly features make it a notable choice for anyone looking to elevate their entertainment setup. Whether you're a casual viewer or a serious audiophile, the AVR-4800 promises to deliver an auditory experience that is nothing short of mesmerizing.