D10-200
Important Safety Information
Owners Record
Limited 90 Day Warranty
FCC Information
Directv Protection Plan
Getting started
Box contents
Getting started
Front panel controls and lights
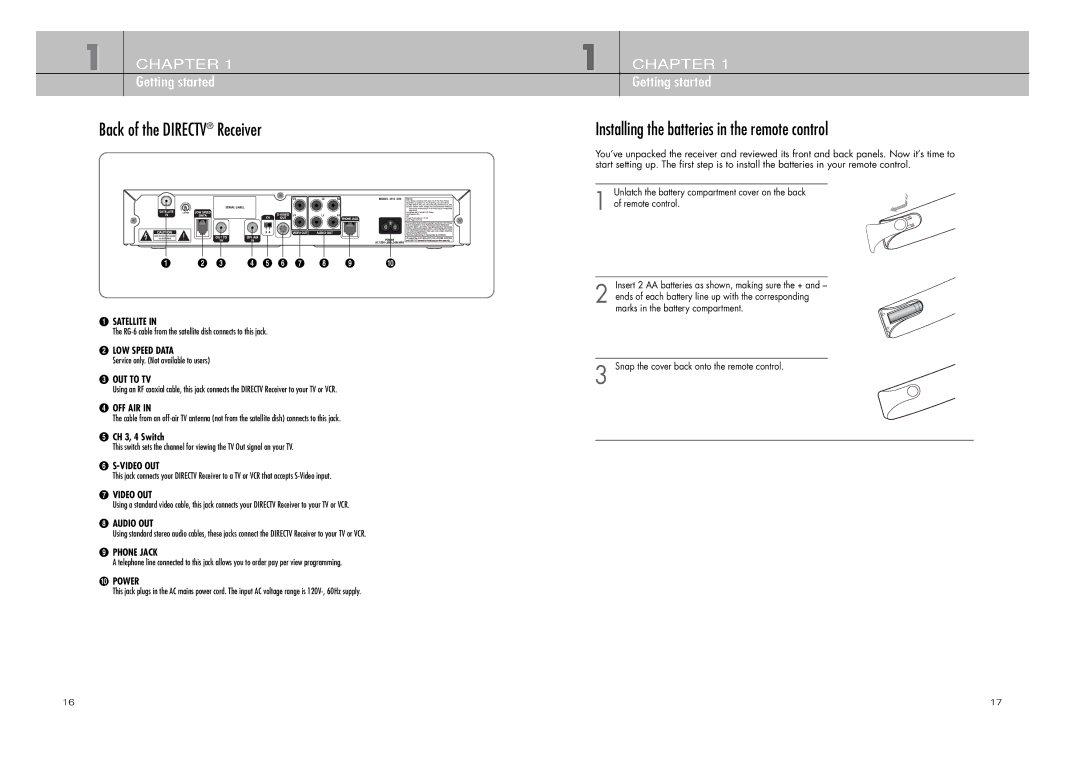
Back of the Directv Receiver
Installing the batteries in the remote control
Setting up and connecting
Inserting the Access Card
Before making connections
Antenna terminals cable not included
Jacks and cables
Connecting your Directv Receiver
Connection option a
To watch Directv programming
Connection option B
Connection option C
Connection option D
Connection option E
Turning on the Directv Receiver for the first time
Sections that follow detail each of these procedures
Memorizing Channels
Acquiring the correct dish pointing angles
Setting the dish type
Checking the satellite signal strength
To check your satellite signal strength, follow these steps
To manually set the dish type
Using Auto Detection to set the dish type
Testing the Directv Receiver
To start the System Test, follow these steps
Testing the Signal Strength
Activating your Directv account Upgrades
To start the Signal Strength test, follow these steps
Remote control overview
See Programming the remote control
Watching TV
Adjusting the volume
Changing channels
Getting information on the TV program you are watching
Program Detail Screen
Finding out what’s on the Guide
Program Detail Screen actions
To view the Program Detail Screen
To display or clear the Guide
Using the Guide
Searching for programs
Searching by Credits, Title, or Text
To tune to a program or channel listed in the Guide
Pay per view programs
Choosing an alternate audio format for a program
Searching by Category
Identifying pay per view programs
Ordering pay per view programs
Reviewing your pay per view purchases
To order a pay per view program
Viewing your Future Purchase list
Scheduling program reminders
Program reminders
Reviewing and modifying reminders
You can set to help you manage your TV viewing
User profile basics
User profiles
Editing user profile names
There are five user profiles you can choose
Editing channel lists
Setting ratings limits
Setting ratings limits for movies
Setting the ratings limits for TV programs
Allowing or blocking pay per view purchases
Setting a pay per view spending limit
Setting the screen color and translucency
Setting the current user profile
Locking and unlocking your Directv System
Settings, preferences, and upgrades
Reading your mail
To lock or unlock the system, follow these steps
Setting the screen format for widescreen broadcasts
Setting system preferences
Setting the default screen color and translucency
To set the Screen Format preference, follow these steps
Setting the Default Audio preference
Turning the Caller ID feature on or off
Reviewing and controlling Caller ID
Setting the Local Time options
Identifying callers
Reviewing your Caller ID list
Viewing information on automatic system upgrades
Installing a new Access Card
Programming the remote control
Programming the remote control
Programming your remote control
TV Setup TV Power, VOL and Mute
Volume Lock
Operating a device with the programmed remote control
Global Volume Unlock
Factory Default
DirecTV Satellite Receivers
Code lists
Television
Receivers
LXI
VCR
STS
Digital Video Disc DVD
Troubleshooting
Appendix Troubleshooting and specifications
Specifications