Manuals
/
Eizo
/
Computer Equipment
/
Computer Monitor
Eizo
CE210W, CE240W
user manual
Dimensions
Models:
CE210W
CE240W
1
41
52
52
Download
52 pages
39.84 Kb
38
39
40
41
42
43
44
45
Troubleshooting
Specifications
Pin No Signal
Default settings
Off Timer
Safety Symbols
Monitor Power Indicator
Before Connecting
Dimension
Controls & Connectors
Page 41
Image 41
9. SPECIFICATIONS
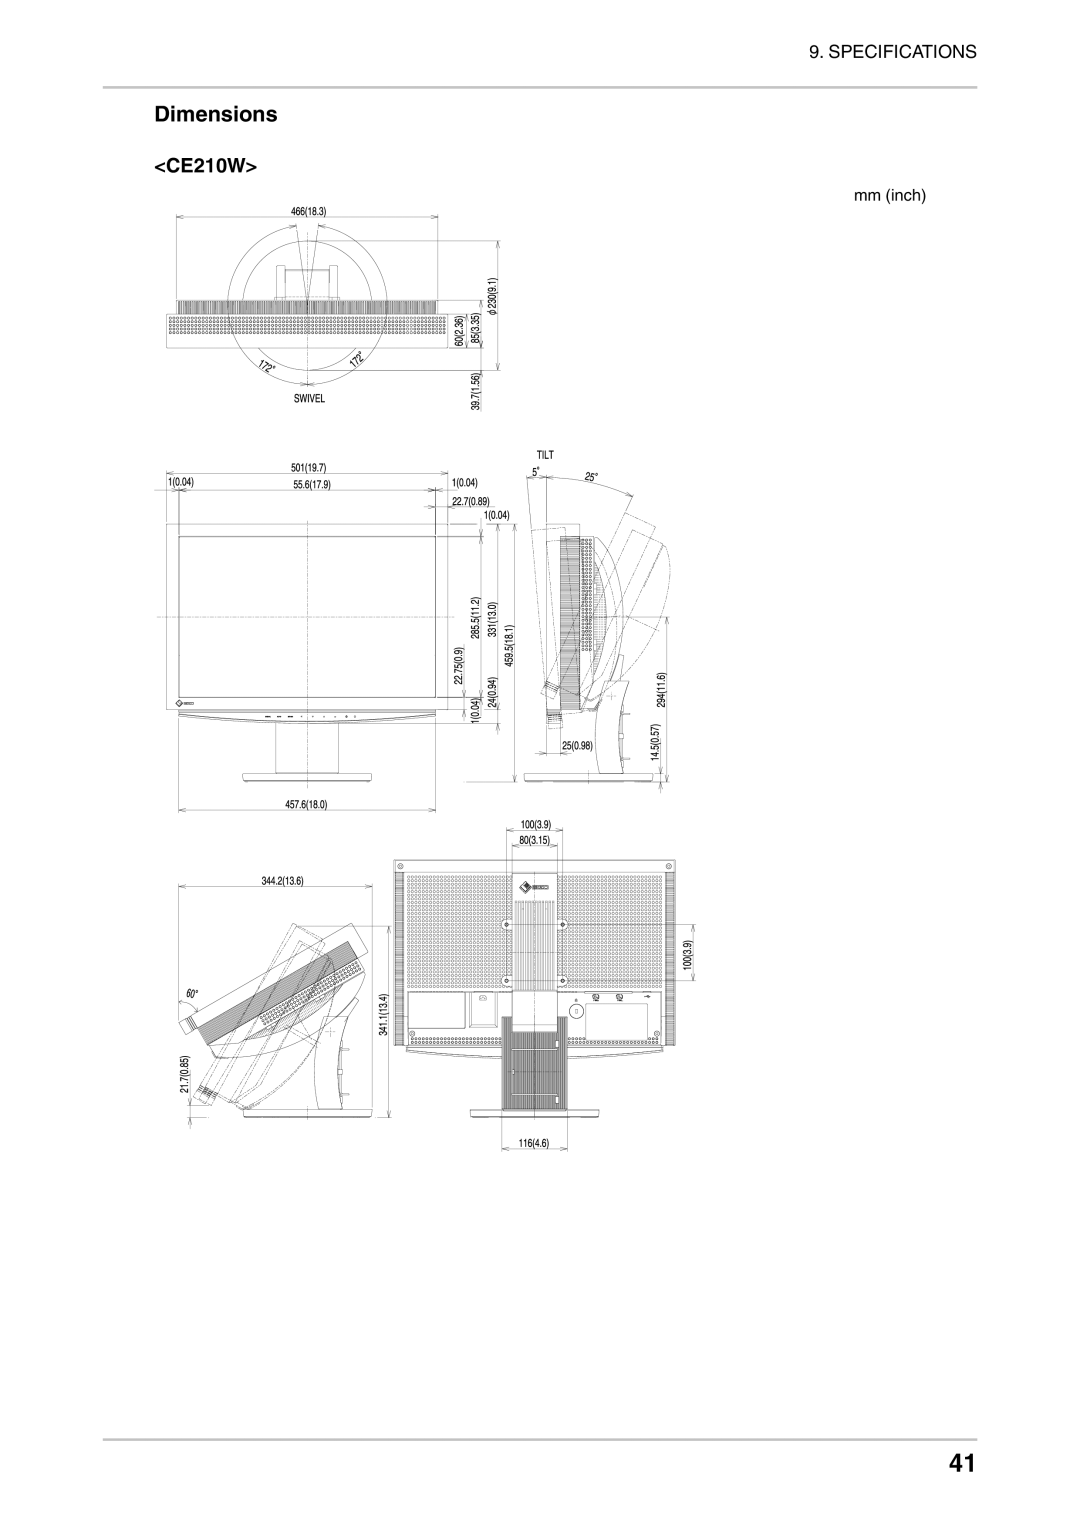
Dimensions
<CE210W>
mm (inch)
41
Page 40
Page 42
Page 41
Image 41
Page 40
Page 42
Contents
Safety Symbols Precautions Introduction
Safety Symbols
Refer all servicing to qualified service personnel
Precautions
Location of the Caution Statements
Do not open the cabinet or modify the unit
Handle the power cord with care
To disconnect the power cord, grasp the plug firmly and pull
Never touch the plug and power cord if it begins to thunder
Place the unit at the strong and stable place
Periodically clean the area around the plug
Use an easily accessible power outlet
Unplug the unit before cleaning it
Do not touch a damaged LCD panel directly with bare hands
LCD Panel
Introduction
Features
CE210W
CE240W
Package Contents
Front
Controls & Connectors
Rear / Side / Bottom CE210W is given as an example
Resolution Frequency Dot Clock Remarks
Before Connecting
Cable Connection
Analog Input CE210W
Digital Input
Connecting the Signal Cable
Analog Input
Signal Cable Connector of the PC
Cable Connection
USB Cable
Selecting the Active Input
Connecting Two PCs to the Monitor
Connecting Examples
Priority setting Performance
Making Adjustments and Settings
How to use the ScreenManager
Entering the ScreenManager
Exiting the ScreenManager
To select the Mode
ScreenManager Adjustments and Settings
FineContrast
Main menu Sub menu Reference
FineContrast Mode
Color Adjustment of the Mode Settings
Detailed Adjustments
Mode Description
Useful Functions
Adjustment Lock
Off Timer
Eizo Logo Appearing Function
Power Indicator Setting
To undisplay
To display
Screen Adjustment
Adjustment
Run the Screen Adjustment Program
Analog Input
Adjust by using Screen menu in the ScreenManager
Procedure
Adjust the output signal range Dynamic Range of the signal
Enlarge the screen size when displaying a low resolution
Displaying Lower Resolutions
Mode Function
Smooth the blurred texts of the enlarged screen
Icons Functions FineContrast Mode SRGB Custom
Color Adjustment
Adjustment Items
Menu Function Descriptions Adjustable range
Power Saving System
Power-save Setup
Monitor Power Indicator
Digital Input
Required system environment
Making USE of USB Universal Serial Bus
Connecting Examples
Attach an arm stand to the LCD monitor securely
Attaching AN ARM
100
Problems Points to check with PossibleSolutions
Troubleshooting
Same image for extended periods of time
Try executing the following method
LCD Panel
Cleaning
Cabinet
DVI-I×2
Specifications
CE240W
Beeper settings
Default settings
Dimensions
CE240W
Signal Remarks
Pin No Signal
Pin Assignment
USB Port
Glossary
SRGBStandard RGB
Temperature
TMDSTransition Minimized Differential Signaling
APPENDIX/ANHANG/ANNEXE
CE240W
For more information, please visit
FCC Declaration of Conformity
Hinweis zur Ergonomie
Recycling Information for customers in USA
Top
Page
Image
Contents