Installation Instructions

1CONNECTING THE REFRIGERATOR TO THE HOUSE WATER LINE (cont.)

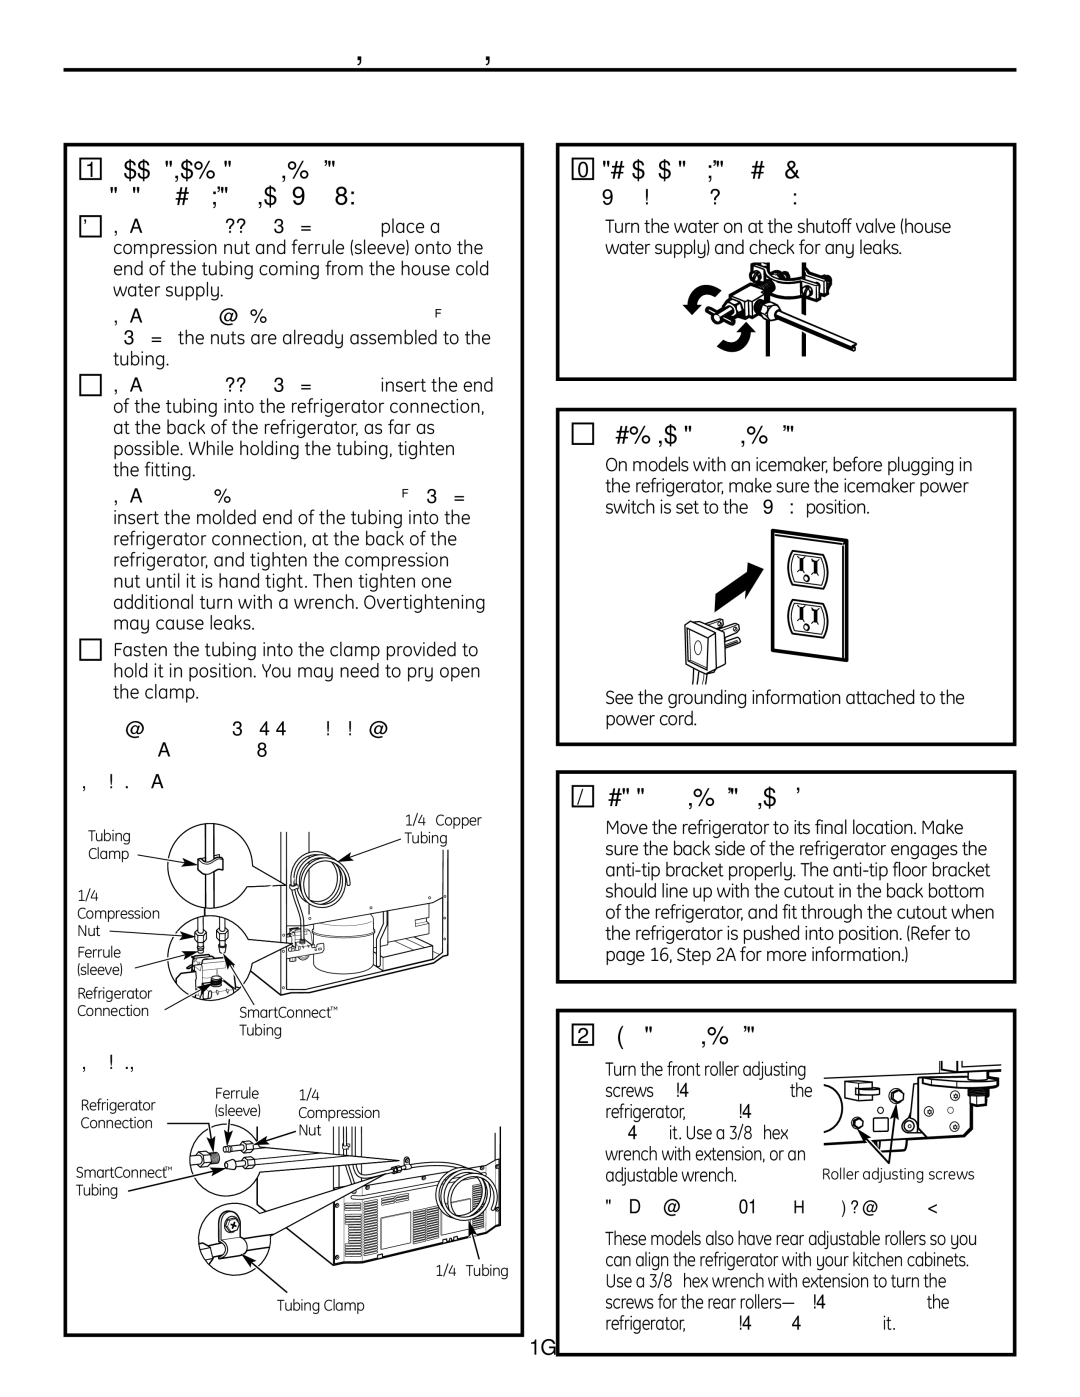
AIf you are using copper tubing, place a compression nut and ferrule (sleeve) onto the end of the tubing coming from the house cold water supply.

If you are using the GE SmartConnecttubing, the nuts are already assembled to the tubing.

BIf you are using copper tubing, insert the end of the tubing into the refrigerator connection, at the back of the refrigerator, as far as possible. While holding the tubing, tighten the fitting.

If you are using GE SmartConnecttubing, insert the molded end of the tubing into the refrigerator connection, at the back of the refrigerator, and tighten the compression nut until it is hand tight. Then tighten one additional turn with a wrench. Overtightening may cause leaks.

CFasten the tubing into the clamp provided to hold it in position. You may need to pry open the clamp.

One of the illustrations below will look like the connection on your refrigerator.

Icemaker-Ready models

Tubing

1/4Copper

Tubing

Clamp


1/4Compression Nut

Ferrule (sleeve)

Refrigerator

ConnectionSmartConnect

Tubing

Icemaker-Installed Models


Ferrule

Refrigerator

(sleeve)

1/4

Compression

Connection


Nut


SmartConnect


Tubing


1/4Tubing

Tubing Clamp

19

2TURN ON THE WATER SUPPLY

(icemaker and dispenser models)

Turn the water on at the shutoff valve (house water supply) and check for any leaks.

3PLUG IN THE REFRIGERATOR

On models with an icemaker, before plugging in the refrigerator, make sure the icemaker power switch is set to the O (off) position.

See the grounding information attached to the power cord.

4PUT THE REFRIGERATOR IN PLACE

Move the refrigerator to its final location. Make sure the back side of the refrigerator engages the anti-tip bracket properly. The anti-tip floor bracket should line up with the cutout in the back bottom of the refrigerator, and fit through the cutout when the refrigerator is pushed into position. (Refer to page 16, Step 2A for more information.)

5 LEVEL THE REFRIGERATOR

Turn the front roller adjusting screws clockwise to raise the refrigerator, counterclockwise

to lower it. Use a 3/8hex wrench with extension, or an

adjustable wrench.

Roller adjusting screws

To adjust the rollers on 21‘ Counter Depth models:

These models also have rear adjustable rollers so you can align the refrigerator with your kitchen cabinets. Use a 3/8hex wrench with extension to turn the screws for the rear rollers—clockwise to raise the refrigerator, counterclockwise to lower it.

Page 19
Image 19
GE 225D1804P001 Turn on the Water Supply, Plug in the Refrigerator, PUT the Refrigerator in Place, Level the Refrigerator

225D1804P001 specifications

The GE 225D1804P001 is a cutting-edge electric motor that stands out in its class due to its innovative design and advanced technologies. This particular motor exemplifies General Electric's commitment to excellence, blending efficiency, reliability, and performance in one compact device.

One of the main features of the GE 225D1804P001 is its robust construction, designed to withstand demanding industrial environments. The motor is built with high-quality materials that enhance its durability, making it suitable for continuous operation under heavy loads. Its weather-resistant exterior allows it to perform seamlessly in adverse conditions, further extending its lifespan.

In terms of technology, this motor incorporates state-of-the-art variable frequency drive (VFD) compatibility, which enables precise speed control and energy efficiency. The VFD technology allows users to adjust the motor’s speed according to the specific needs of their applications, resulting in energy savings and reduced wear and tear on machinery.

The GE 225D1804P001 also features high starting torque, which is essential for applications requiring a strong initial force to overcome inertia. This characteristic makes it ideal for heavy machinery and equipment within manufacturing, automotive, and industrial sectors. Additionally, the motor's optimized rotor design contributes to improved performance, ensuring effective torque delivery and lower operational costs.

Another significant characteristic of this model is its low noise operation. Unlike many electric motors, the GE 225D1804P001 is engineered to minimize vibrations and sound levels, creating a more comfortable working environment. This feature is particularly beneficial for facilities that operate in close proximity to populated areas or sensitive environments.

Moreover, the ease of maintenance is a noteworthy aspect of this electric motor. It is designed with accessible components, allowing technicians to perform routine checks and repairs without extensive downtime. This user-friendly design not only enhances operational efficiency but also contributes to the overall cost-effectiveness of ownership.

In summary, the GE 225D1804P001 electric motor combines innovation, efficiency, and reliability, making it an exceptional choice for a wide range of industrial applications. With features like VFD compatibility, high starting torque, robust construction, and low noise operation, it continues to set new standards in the electric motor industry, satisfying the needs of modern manufacturing and industrial processes.