Step 9

~imble (aRati to tie wdl or floor)

FlexDud

Blowe

L~Ho” C’amp

>*Blower

Scr

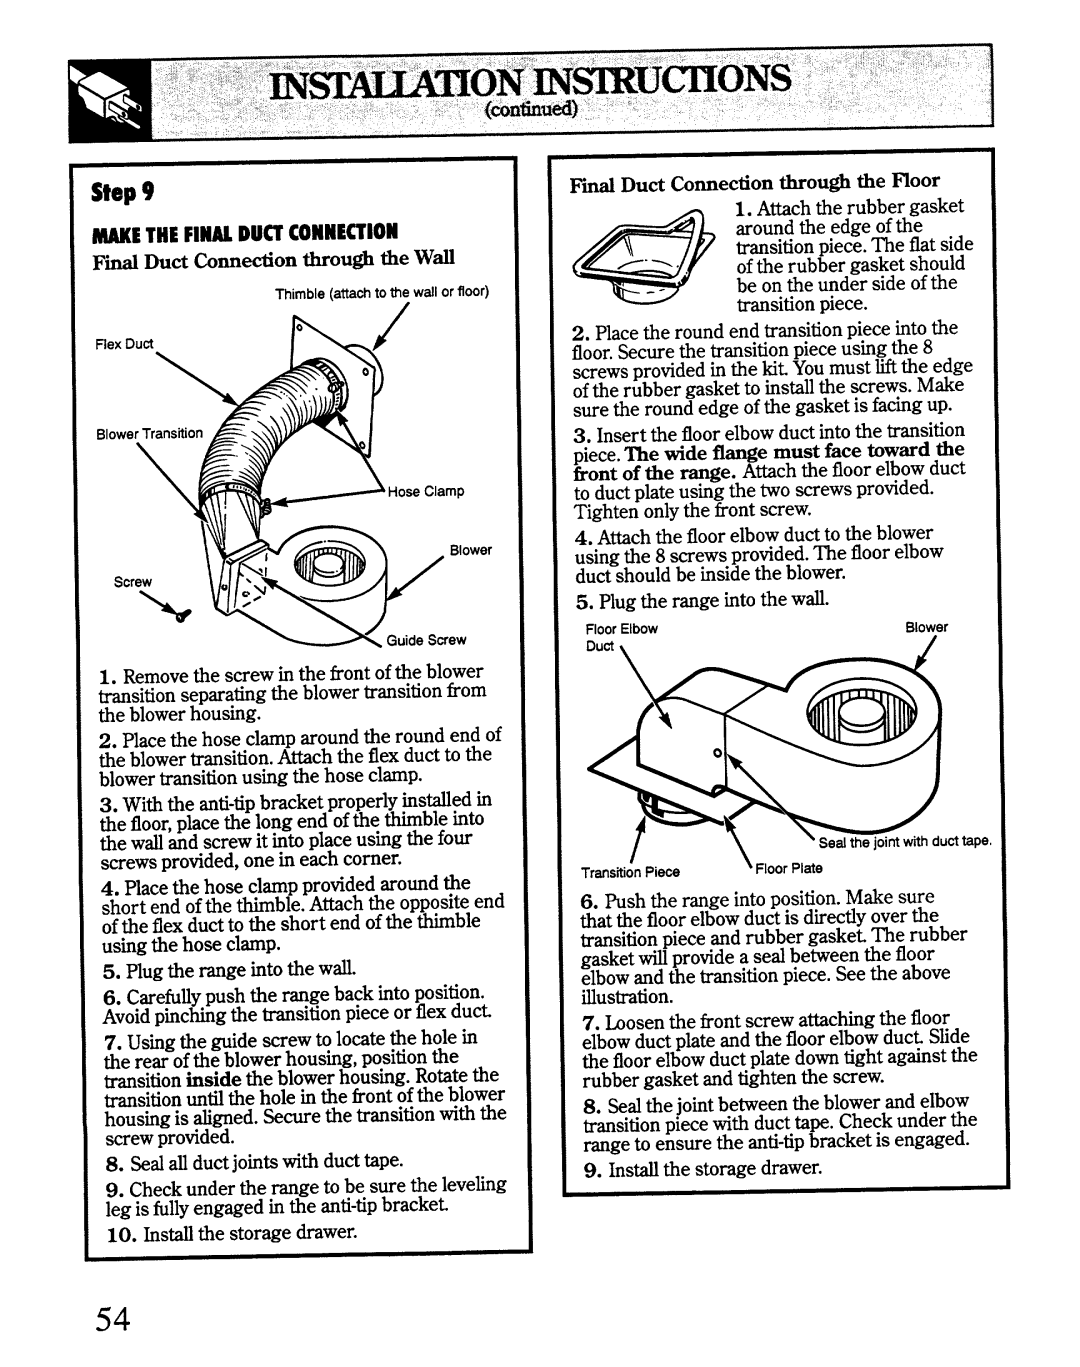
1.Removethe screw in the front of the blower transition separating the blower transition from the blower housing.

2.Place the hose clamp around the round end of the blower transition. Attach the flex duct to the blower transition using the hose clamp.

3.With the anti-tipbracket properly instied in the floor,place the long end of the thimble hto the wd and screw it into place using the four screws provided, one in each corner.

4.Place the hose clamp provided around the short end of the thimble. Attach the opposite end of the flex duct to the short end of the thimble using the hose clamp.

5.Plug the range into the wd.

6.CarefuUypush the range back into position. Avoidpinching the transition piece or flex duct

7.Using the guide screw to locate the hole in the rear of the blower housing, position the

transitionhside the blowerhousing.Rotatethe transitionunti the hole in the frontofthe blower housingis tigned. Securethe transitionwiththe screwprovided.

8.Sed au ductjointswithducttape.

9.Checkunder the range to be sure the levehg leg is fullyengagedin the anti-tipbracket

10.hsti the storagedrawer.

Fii

Duct Connection tiou@ the moor


1. Attachthe rubbergasket


aroundthe edge of the


\

transitionpiece. me flatside


/“\.

of the rubbergasket should

e

--

be on the under side of the


transitionpiece.

2.Placethe roundend transitionpieceintothe floor.Securethe transitionpieceusingthe 8 screwsprovidedin tie kit YoumustM the edge ofthe rubber gasketto installthe screws.Make surethe roundedge ofthe gasketis facingup.

3.Insert the floorelbowductintothe transition piece.me tide flze must face towardthe

front of the -e.Attach the floor elbow duct to duct plate using the two screws provided. Tighten only the front screw.

4.Attach the floor elbow duct to the blower using the 8 screws provided. me floor elbow duct should be inside the blower.

5.Plug the range into the wd.

FloorElbow

Blower

Duet\

/

tape,

TranstionPie@ \ FloorPlate

6.Pushthe rmge intoposition.Makesure that the floorelbowductis directiyoverthe transitionpieceand rubber gasket me rubber gasketfi providea sed be~een the floor elbowandthe transitionpiece.Seethe above Uustration.

7.hosen the frontscrewattachingthe floor

elbowductplateandthe floorelbowduct Sfide the floorelbowductplatedowntight againstthe rubbergasketandtightenthe screw.

8.Sed the jointbetweenthe blowerand elbow trmsitionpiecewithducttape.Checkunder the rangeto ensurethe anti-tipbracketis engaged.

9.Insti the storagedrawer.

54

Page 54
Image 54
GE JSP69 warranty ~Ho C’amp

JSP69 specifications

The GE JSP69, an innovative range of kitchen appliances, epitomizes the latest advancements in cooking technology. This model is a part of General Electric's profile series, designed specifically to meet the needs of modern households. Its sleek design and user-friendly features make it an ideal choice for both novice cooks and seasoned chefs alike.

One of the standout features of the GE JSP69 is its advanced convection cooking technology. This feature ensures even heat distribution throughout the oven, leading to perfectly cooked meals every time. The convection oven also reduces cooking times, making it convenient for busy families or individuals who are always on the go. Additionally, the oven is equipped with multiple cooking modes, including bake, broil, and steam, giving users versatility in meal preparation.

The JSP69 comes with a self-cleaning option, making it hassle-free to maintain. This innovative feature uses high temperatures to burn off spills and splatters, allowing for easy cleanup without the need for harsh chemicals. Furthermore, the oven's interior is designed with a smooth, non-porous surface that resists stains and can be easily wiped down.

Another notable aspect of the GE JSP69 is its smart technology integration. With built-in Wi-Fi connectivity, users can control their oven remotely using a smartphone app. This means you can preheat your oven, adjust cooking settings, or monitor cooking progress from anywhere in your home. This feature increases convenience and allows for better meal preparation planning.

The range also includes an efficient cooktop with a combination of sealed burners and a griddle. The burners provide consistent and reliable heat, and their sealed design ensures that spills are contained and cleanup is simplified. The griddle provides an additional cooking surface, perfect for making pancakes or grilling sandwiches.

In terms of design, the GE JSP69 boasts a modern aesthetic with a stainless-steel finish and a sleek, intuitive control panel. The oven is built with practicality in mind, featuring a large capacity that accommodates multiple dishes at once, making it perfect for entertaining guests or preparing family meals.

In summary, the GE JSP69 is a highly efficient and versatile kitchen appliance that combines innovative cooking technology with user-friendly features. With its convection cooking, self-cleaning capability, smart technology integration, and practical design, it is poised to meet the demands of any contemporary kitchen. Whether you are baking, roasting, or steaming, the GE JSP69 is designed to deliver culinary excellence every time.