Installation Instructions

3ELECTRICAL CONNECTIONS (CONT.)

B. Usage Situations where Appliance Power Cord will be Disconnected Frequently.

Do not use an adapter plug in these situations because disconnecting of the power cord places undue strain on the adapter and leads to eventual failure of the adapter ground terminal. The customer should have the two- prong wall receptacle replaced with a three-prong (grounding) receptacle by a qualified electrician before using the appliance.

The installation of appliances designed for mobile home installation must conform with the Manufactured Home Construction and Safety Standard, Title 24 CFR, Part 3280 (formerly the Federal Standard for Mobile Home Construction and Safety, Title 24, HUD, Part 280) or,

5ASSEMBLE SURFACE BURNERS (CONT.)

Make sure the slot in the

burner head is positioned

over the electrode.

Hole


or


Electrode

Electrode

Slot

Front right burner (on some models)

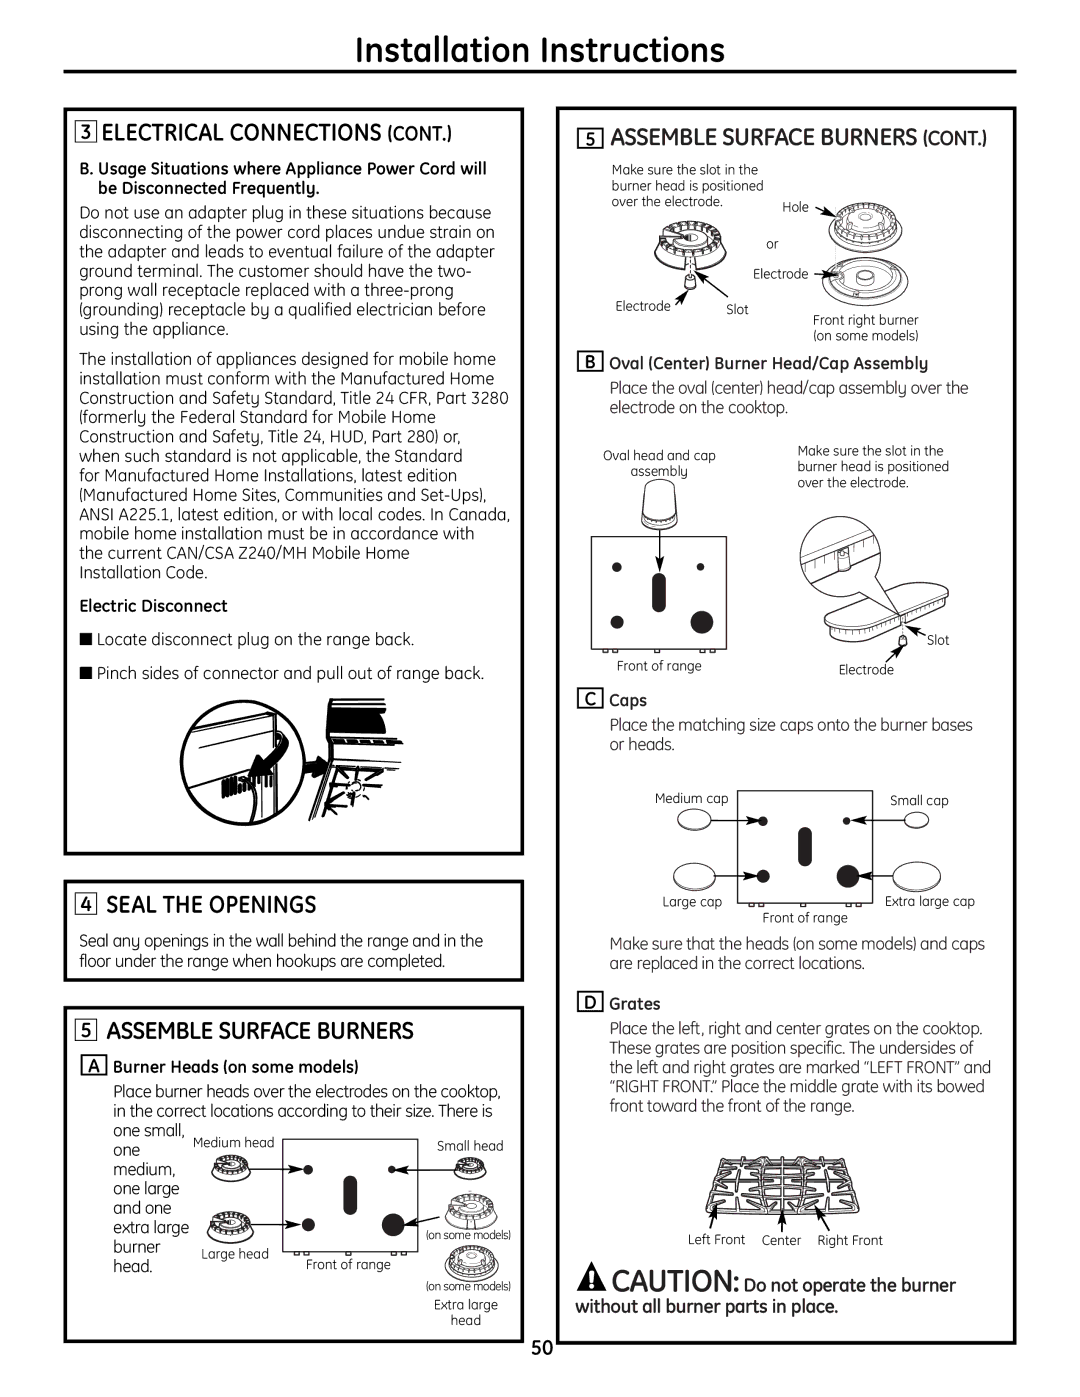
BOval (Center) Burner Head/Cap Assembly

Place the oval (center) head/cap assembly over the electrode on the cooktop.

when such standard is not applicable, the Standard for Manufactured Home Installations, latest edition (Manufactured Home Sites, Communities and Set-Ups), ANSI A225.1, latest edition, or with local codes. In Canada, mobile home installation must be in accordance with the current CAN/CSA Z240/MH Mobile Home Installation Code.

Electric Disconnect

Locate disconnect plug on the range back.

Pinch sides of connector and pull out of range back.

Oval head and cap

assembly

Front of range

CCaps

Make sure the slot in the burner head is positioned over the electrode.

Slot

Electrode

4SEAL THE OPENINGS

Seal any openings in the wall behind the range and in the floor under the range when hookups are completed.

5ASSEMBLE SURFACE BURNERS

ABurner Heads (on some models)

Place burner heads over the electrodes on the cooktop, in the correct locations according to their size. There is

one small,

one

Medium head

Small head


medium,


one large


and one


extra large


(on some models)

burner


Large head


head.

Front of range


(on some models)

Extra large

head

50

Place the matching size caps onto the burner bases or heads.

Medium cap

Small cap

Large cap


Extra large cap


Front of range

Make sure that the heads (on some models) and caps are replaced in the correct locations.

DGrates

Place the left, right and center grates on the cooktop. These grates are position specific. The undersides of the left and right grates are marked “LEFT FRONT” and “RIGHT FRONT.” Place the middle grate with its bowed front toward the front of the range.

Left Front Center Right Front

CAUTION: Do not operate the burner without all burner parts in place.

Page 50
Image 50
GE PGB910, PGB975, PGB918, PGB908, PGB916, PGB900, JGBP89, JGBP92 Seal the Openings, Assemble Surface Burners

JGBP92, JGBP89, PGB900, PGB916, PGB908 specifications

The GE Profile series of gas ranges, including the PGB975, PGB918, PGB910, PGB908, and PGB916, showcases advanced cooking technology combined with a sleek design to elevate culinary experiences. These ranges are equipped with innovative features that cater to both amateur cooks and seasoned chefs.

The PGB975 is the flagship model, boasting a powerful 20,000 BTU tri-ring burner, perfect for high-temperature cooking and quick boiling. One of its standout features is the integrated air fryer, which allows users to achieve crispy and delicious meals without the excess oil commonly associated with traditional frying methods. The combination of convection and traditional baking modes further enhances cooking versatility, enabling perfectly baked dishes every time.

The PGB918 offers a similar high-performance experience but adds the convenience of a built-in smart technology interface. With Wi-Fi connectivity, users can control their oven remotely, preheat from anywhere, and receive notifications when cooking is complete. The model’s precision cooking modes ensure that food is cooked to perfection with minimal effort.

On the other hand, the PGB910 is designed for those who prioritize ease of use. Its intuitive control panel simplifies operations, and the large oven capacity accommodates multiple dishes at once. This range features a self-cleaning option, saving time and effort in kitchen maintenance.

The PGB908 is an aesthetic delight, offering a modern take on classic gas cooking. Its sleek design is complemented by a powerful oven performance with even baking technology, ensuring all dishes are cooked uniformly. This model is particularly popular for its seamless integration into contemporary kitchen designs.

Lastly, the PGB916 emphasizes efficiency and quality. It is equipped with advanced temperature management systems, ensuring precise heat distribution across all cooking surfaces. The continuous cast-iron grates facilitate easy movement of pots and pans, while the durable construction ensures longevity and reliability.

Overall, GE Profile ranges combine robust performance with smart features to enhance daily cooking tasks. Their commitment to quality and innovation makes the PGB975, PGB918, PGB910, PGB908, and PGB916 stand out in the competitive landscape of modern kitchen appliances. These ranges not only cater to a variety of culinary needs but also elevate the aesthetics of any kitchen space.