Installation Instructions

10INSTALLING THE ANTI-TIP DEVICE

WARNING!

Range must be secured with an approved Anti-Tip device.

Unless properly installed, the range could be tipped by you or a child standing, sitting or leaning on an open door.

After installing the Anti-Tip device, verify that it is in place by carefully attempting to tilt the range forward.

This range has been designed to meet all recognized industry tip standards for all normal conditions.

The use of this device does not preclude tipping of the range when not properly installed.

If the Anti-Tip device supplied with the range does not fit this application, use the universal Anti-Tip device WB2X7909.

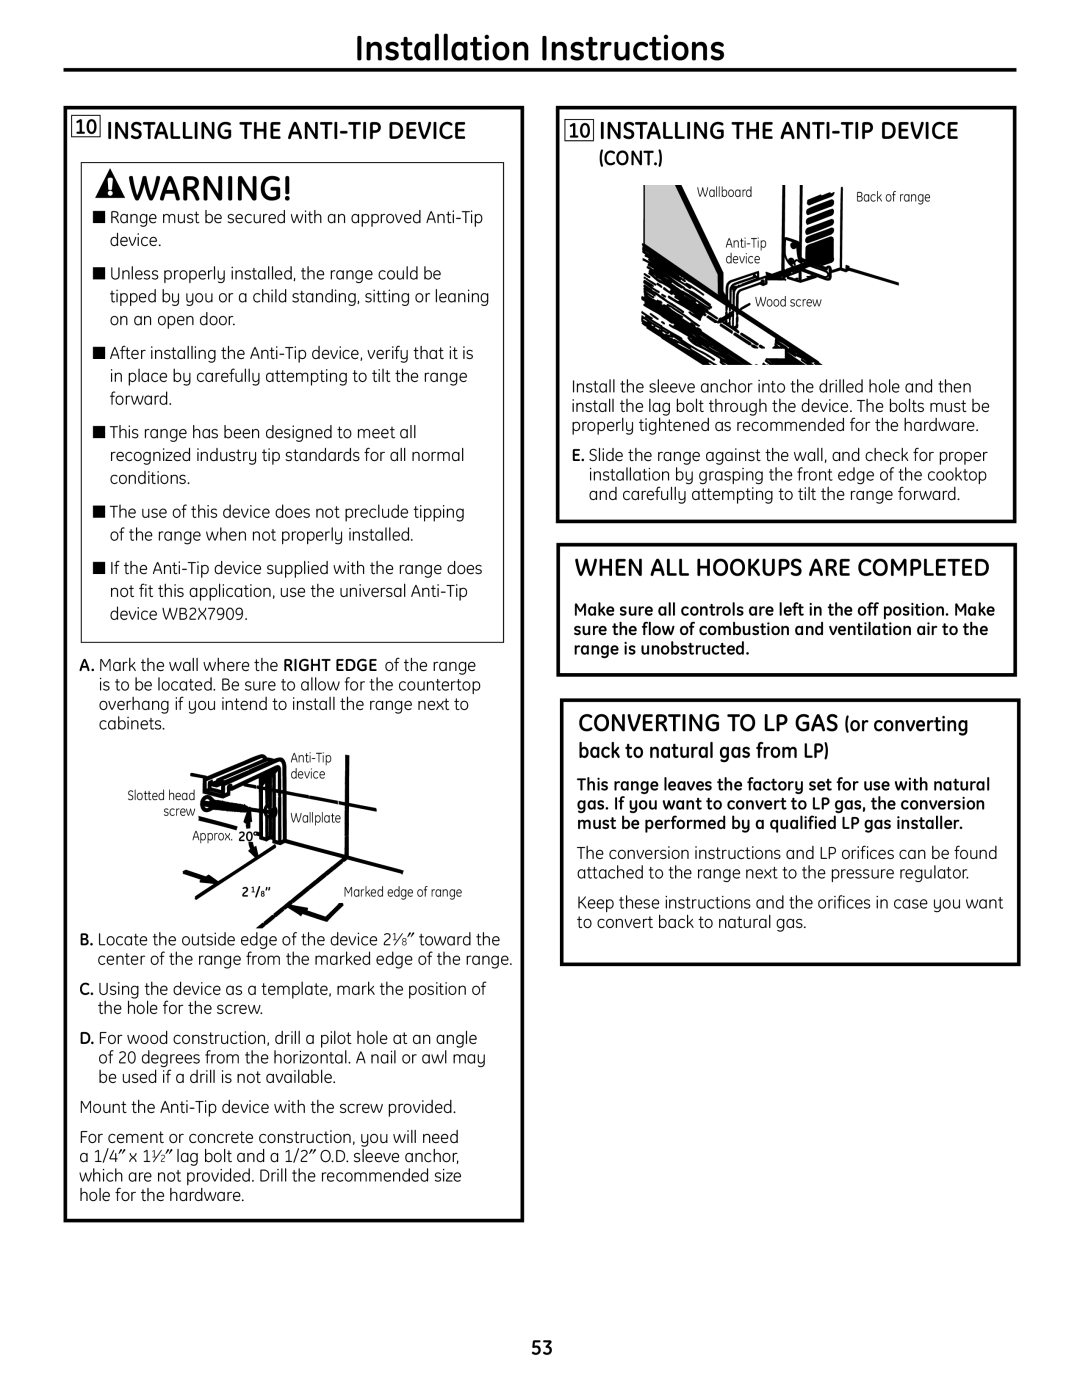
A.Mark the wall where the RIGHT EDGE of the range is to be located. Be sure to allow for the countertop overhang if you intend to install the range next to cabinets.


Anti-Tip


device

Slotted head


screw

Wallplate


Approx. 20°


2 1/8Marked edge of range

B. Locate the outside edge of the device 218toward the center of the range from the marked edge of the range.

C. Using the device as a template, mark the position of the hole for the screw.

D. For wood construction, drill a pilot hole at an angle of 20 degrees from the horizontal. A nail or awl may be used if a drill is not available.

Mount the Anti-Tip device with the screw provided.

For cement or concrete construction, you will need a 1/4x 112lag bolt and a 1/2O.D. sleeve anchor, which are not provided. Drill the recommended size hole for the hardware.

10INSTALLING THE ANTI-TIP DEVICE

(CONT.)

Wallboard

Back of range


Anti-Tip device

Wood screw

Install the sleeve anchor into the drilled hole and then install the lag bolt through the device. The bolts must be properly tightened as recommended for the hardware.

E. Slide the range against the wall, and check for proper installation by grasping the front edge of the cooktop and carefully attempting to tilt the range forward.

WHEN ALL HOOKUPS ARE COMPLETED

Make sure all controls are left in the off position. Make sure the flow of combustion and ventilation air to the range is unobstructed.

CONVERTING TO LP GAS (or converting

back to natural gas from LP)

This range leaves the factory set for use with natural gas. If you want to convert to LP gas, the conversion must be performed by a qualified LP gas installer.

The conversion instructions and LP orifices can be found attached to the range next to the pressure regulator.

Keep these instructions and the orifices in case you want to convert back to natural gas.

53

Page 53
Image 53
GE PGB900, PGB975, PGB918, PGB910, PGB908, PGB916, JGBP89, JGBP92 Installing the ANTI-TIP Device, When ALL Hookups are Completed

JGBP92, JGBP89, PGB900, PGB916, PGB908 specifications

The GE Profile series of gas ranges, including the PGB975, PGB918, PGB910, PGB908, and PGB916, showcases advanced cooking technology combined with a sleek design to elevate culinary experiences. These ranges are equipped with innovative features that cater to both amateur cooks and seasoned chefs.

The PGB975 is the flagship model, boasting a powerful 20,000 BTU tri-ring burner, perfect for high-temperature cooking and quick boiling. One of its standout features is the integrated air fryer, which allows users to achieve crispy and delicious meals without the excess oil commonly associated with traditional frying methods. The combination of convection and traditional baking modes further enhances cooking versatility, enabling perfectly baked dishes every time.

The PGB918 offers a similar high-performance experience but adds the convenience of a built-in smart technology interface. With Wi-Fi connectivity, users can control their oven remotely, preheat from anywhere, and receive notifications when cooking is complete. The model’s precision cooking modes ensure that food is cooked to perfection with minimal effort.

On the other hand, the PGB910 is designed for those who prioritize ease of use. Its intuitive control panel simplifies operations, and the large oven capacity accommodates multiple dishes at once. This range features a self-cleaning option, saving time and effort in kitchen maintenance.

The PGB908 is an aesthetic delight, offering a modern take on classic gas cooking. Its sleek design is complemented by a powerful oven performance with even baking technology, ensuring all dishes are cooked uniformly. This model is particularly popular for its seamless integration into contemporary kitchen designs.

Lastly, the PGB916 emphasizes efficiency and quality. It is equipped with advanced temperature management systems, ensuring precise heat distribution across all cooking surfaces. The continuous cast-iron grates facilitate easy movement of pots and pans, while the durable construction ensures longevity and reliability.

Overall, GE Profile ranges combine robust performance with smart features to enhance daily cooking tasks. Their commitment to quality and innovation makes the PGB975, PGB918, PGB910, PGB908, and PGB916 stand out in the competitive landscape of modern kitchen appliances. These ranges not only cater to a variety of culinary needs but also elevate the aesthetics of any kitchen space.