Section 7

DIAGNOSTIC TESTS

Excitation Circuit Breaker (CB3). Connect one test lead to one end of Wire 2A and the other test lead to the other end of the same wire. The meter should read continuity.

RESULTS:

If continuity was NOT measured across each wire, repair or replace the wires as needed.

If continuity WAS measured, proceed to Test 6.

TEST 6- CHECK FIELD BOOST

DISCUSSION:

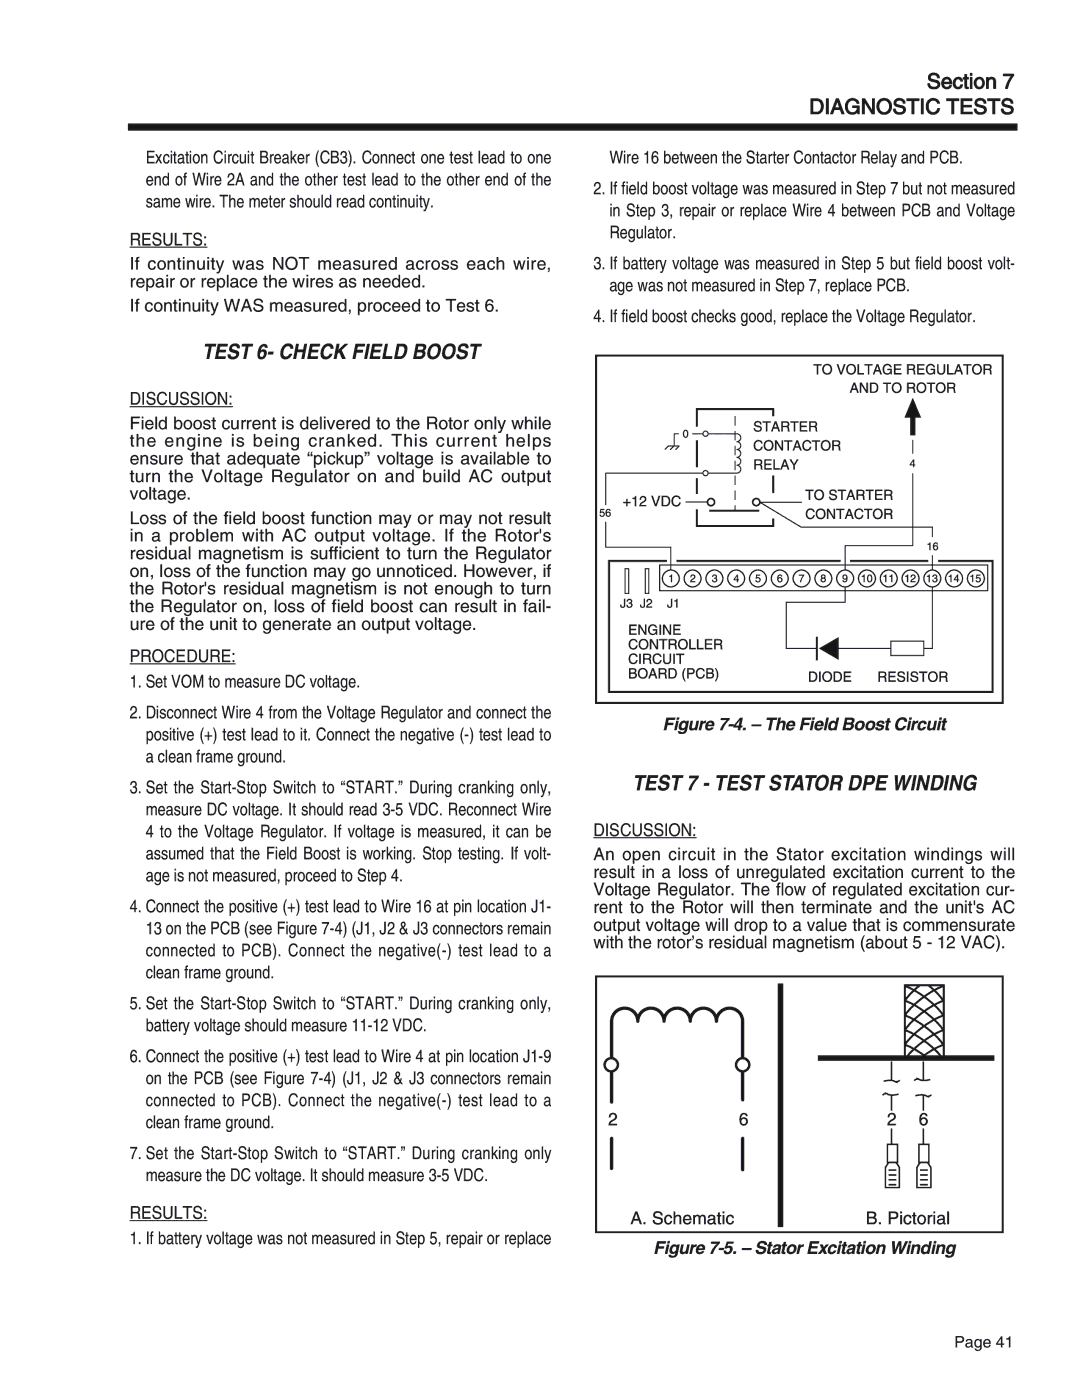
Field boost current is delivered to the Rotor only while the engine is being cranked. This current helps ensure that adequate “pickup” voltage is available to turn the Voltage Regulator on and build AC output voltage.

Loss of the field boost function may or may not result in a problem with AC output voltage. If the Rotor's residual magnetism is sufficient to turn the Regulator on, loss of the function may go unnoticed. However, if the Rotor's residual magnetism is not enough to turn the Regulator on, loss of field boost can result in fail- ure of the unit to generate an output voltage.

PROCEDURE:

1.Set VOM to measure DC voltage.

2.Disconnect Wire 4 from the Voltage Regulator and connect the positive (+) test lead to it. Connect the negative (-) test lead to a clean frame ground.

3.Set the Start-Stop Switch to “START.” During cranking only, measure DC voltage. It should read 3-5 VDC. Reconnect Wire 4 to the Voltage Regulator. If voltage is measured, it can be assumed that the Field Boost is working. Stop testing. If volt- age is not measured, proceed to Step 4.

4.Connect the positive (+) test lead to Wire 16 at pin location J1- 13 on the PCB (see Figure 7-4) (J1, J2 & J3 connectors remain connected to PCB). Connect the negative(-) test lead to a clean frame ground.

5.Set the Start-Stop Switch to “START.” During cranking only, battery voltage should measure 11-12 VDC.

6.Connect the positive (+) test lead to Wire 4 at pin location J1-9 on the PCB (see Figure 7-4) (J1, J2 & J3 connectors remain connected to PCB). Connect the negative(-) test lead to a clean frame ground.

7.Set the Start-Stop Switch to “START.” During cranking only measure the DC voltage. It should measure 3-5 VDC.

RESULTS:

1. If battery voltage was not measured in Step 5, repair or replace

Wire 16 between the Starter Contactor Relay and PCB.

2.If field boost voltage was measured in Step 7 but not measured in Step 3, repair or replace Wire 4 between PCB and Voltage Regulator.

3.If battery voltage was measured in Step 5 but field boost volt- age was not measured in Step 7, replace PCB.

4.If field boost checks good, replace the Voltage Regulator.

Figure 7-4. – The Field Boost Circuit

TEST 7 - TEST STATOR DPE WINDING

DISCUSSION:

An open circuit in the Stator excitation windings will result in a loss of unregulated excitation current to the Voltage Regulator. The flow of regulated excitation cur- rent to the Rotor will then terminate and the unit's AC output voltage will drop to a value that is commensurate with the rotor’s residual magnetism (about 5 - 12 VAC).

Figure 7-5. – Stator Excitation Winding

Page 41

Page 43
Image 43
Generac Power Systems 75, 55, 65 manual Test 6- Check Field Boost, Test 7 Test Stator DPE Winding

65, 75, 55 specifications

Generac Power Systems has established itself as a leader in power generation, offering a range of high-performance generators suited for residential and commercial applications. Among its lineup, the Generac 55, 65, and 75 kW generators stand out for their reliability, efficiency, and advanced features.

The Generac 55 kW generator is designed to provide a powerful backup solution for medium to large homes or small businesses. It features a robust engine that delivers dependable performance while maintaining fuel efficiency. One of its key characteristics is the True Power Technology, which produces clean and stable power, ensuring that sensitive electronic devices run smoothly without risk of damage. This generator is equipped with a fully automatic transfer switch, allowing for seamless power transition during outages, with minimal disruption.

Moving to the 65 kW model, it offers increased capacity while retaining the fundamental qualities of the 55 kW version. This unit is particularly suited for larger homes or commercial applications that require greater power demands. The 65 kW generator utilizes Generac’s G-Force engine, known for its durability and reduced maintenance needs. Advanced features such as remote monitoring capabilities allow users to check the generator's status from anywhere, providing peace of mind and convenience.

The 75 kW generator takes performance to the next level, making it ideal for even more significant power needs. It is engineered for both quiet operation and enhanced performance, accommodating a wide range of requirements from residential to larger commercial operations. The 75 kW model includes a full-load voltage regulation system that maintains stable power output under varying loads, safeguarding appliances and equipment.

All three models incorporate advanced air-cooled technology, which enhances their efficiency and operational lifespan. Additionally, their corrosion-resistant enclosures ensure durability even in harsh weather conditions, making them suitable for diverse environments. The intuitive LCD display on each unit provides critical information, including runtime hours and maintenance reminders, empowering users with easy access to the generator's performance data.

Overall, Generac Power Systems' 55, 65, and 75 kW generators represent a commitment to quality, reliability, and innovation in backup power solutions. They are designed to meet the demands of modern power consumption while ensuring peace of mind through robust engineering and advanced technology. Whether for home use or commercial applications, these generators provide an effective means to stay prepared for unexpected power outages.