Chapter 1— Getting Started

Top Bank Switch Number

Bottom Bank Switch Number

Serial I/F


OFF


O = OFF

ON


1 = ON

1

2

3

4

5

6

7 8

Baud Rate Selection


115200

1

1

1


57600

O

1

1


38400

1

O

1


19200

O

O

O


9600

1

O

O


4800

O

1

O


2400

1

1

O


1200


Parity Selection


Even*


O

O

Odd


1

O

None


O

1


Number of Data Bits


O

7 Bit*


8 Bit


1


Reserved


O O

Default settings are noted with an*


OFF


O = OFF


1 = ON

ON

1

2

3

4

5

6

7

8

Multi-Drop Address Selection


O

O

O

O

O


*A


B1 O O O O

CO 1 O O O

D1 1 O O O

EO O 1 O O

F1 O 1 O O

GO 1 1 O O

H1 1 1 O O

IO O O 1 O

J1 O O 1 O

KO 1 O 1 O

L1 1 O 1 O

MO O 1 1 O

N

1

O

1

1

O

O

O

1

1

1

O

P

1

1

1

1

O

QO O O O 1

R1 O O O 1

SO 1 O O 1

T1 1 O O 1

UO O 1 O 1

V1 O 1 O 1

W

O

1

1

O

1


X

1

1

1

O

1


Y

O

O

O

1

1


Z

1

O

O

1

1


0

O

1

O

1

1


1

1

1

O

1

1


2

O

O

1

1

1


3

1

O

1

1

1


4

O

1

1

1

1


5

1

1

1

1

1


Protocol Selection


O

XON/XOFF*


Intermec Protocols


1


XON/XOFF Selection


O

No Status Response*


With Status Response


1


Media Type


O

Direct Thermal*


Thermal Transfer Ribbon


1


Default settings are noted with an*


3400U.020


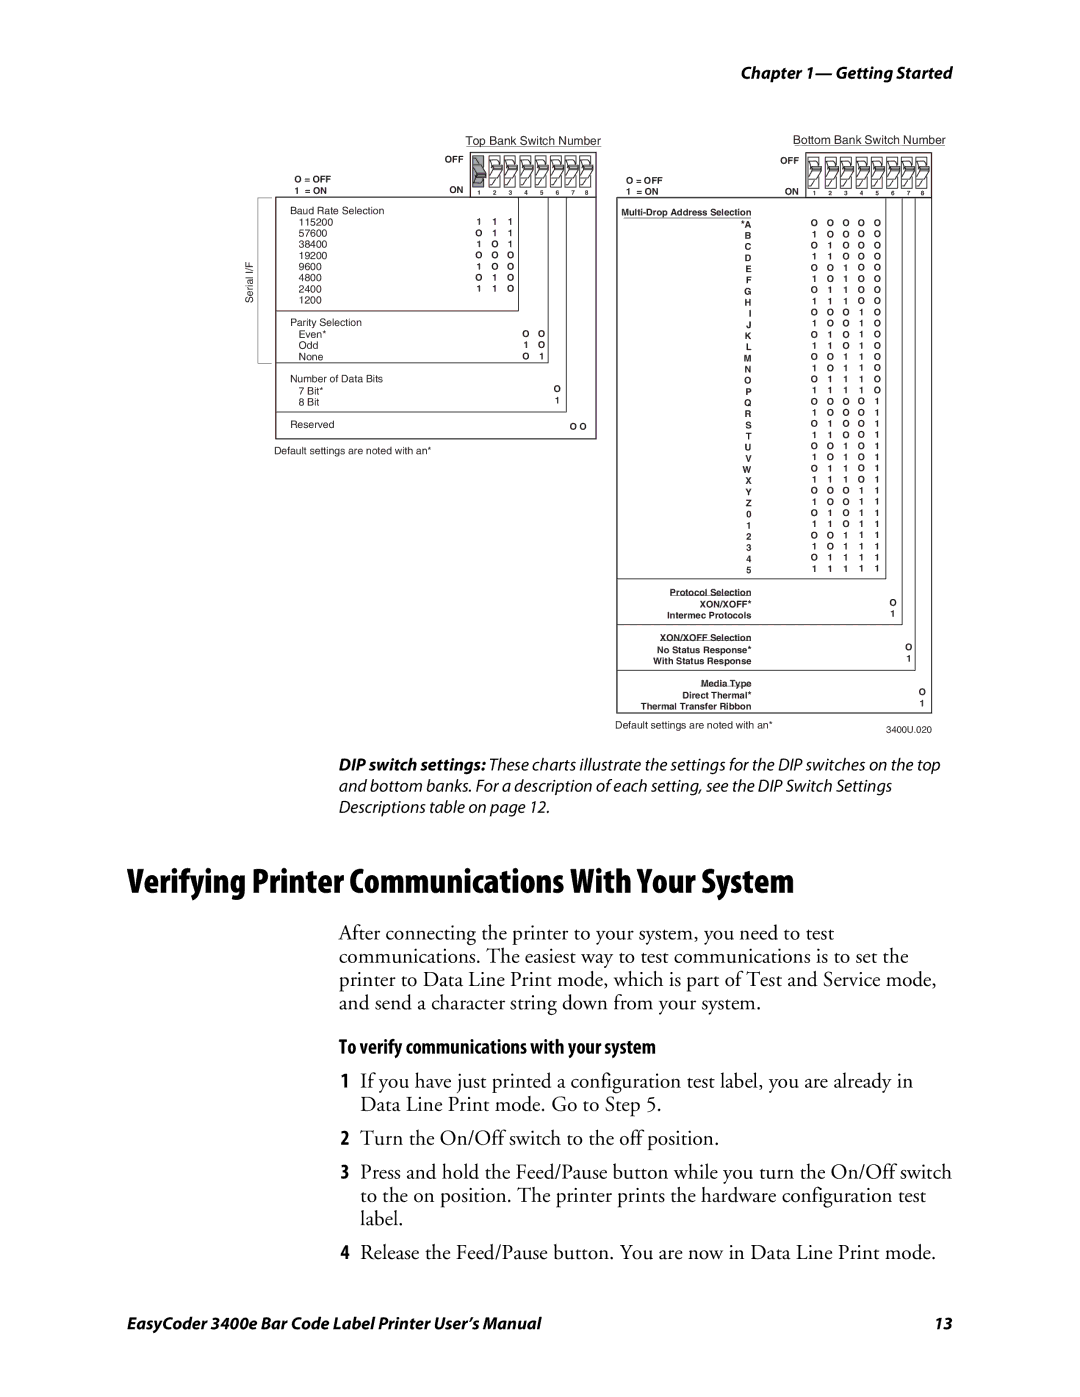
DIP switch settings: These charts illustrate the settings for the DIP switches on the top and bottom banks. For a description of each setting, see the DIP Switch Settings Descriptions table on page 12.

Verifying Printer Communications With Your System

After connecting the printer to your system, you need to test communications. The easiest way to test communications is to set the printer to Data Line Print mode, which is part of Test and Service mode, and send a character string down from your system.

To verify communications with your system

1If you have just printed a configuration test label, you are already in Data Line Print mode. Go to Step 5.

2Turn the On/Off switch to the off position.

3Press and hold the Feed/Pause button while you turn the On/Off switch to the on position. The printer prints the hardware configuration test label.

4Release the Feed/Pause button. You are now in Data Line Print mode.

EasyCoder 3400e Bar Code Label Printer User’s Manual

13

Page 25
Image 25
Genicom 3400e user manual Verifying Printer Communications With Your System, To verify communications with your system

3400e specifications

The Genicom 3400e is a robust and versatile printer designed primarily for high-volume environments, where efficiency and reliability are paramount. As part of the Genicom family of printers, the 3400e offers a range of features and technologies that cater to the needs of various industries, including corporate offices, logistics, and educational institutions.

One of the standout features of the Genicom 3400e is its impressive printing speed. Capable of producing up to 1,200 pages per hour, this printer significantly reduces wait times and enhances productivity. This speed is complemented by its advanced printing technology, which ensures high-quality output with sharp text and crisp graphics, making it suitable for printing documents ranging from simple reports to detailed presentations.

The Genicom 3400e employs dot matrix printing technology, recognized for its durability and low operational costs. Unlike laser printers that use toner, dot matrix printers utilize ink ribbons. This not only reduces the cost per page but also offers long-lasting performance for continuous printing tasks. The 3400e’s design incorporates a robust print head that can withstand rigorous use, making it an ideal choice for heavy-duty applications.

In terms of connectivity, the Genicom 3400e supports various interfaces, including parallel, serial, and USB, ensuring compatibility with numerous devices and systems. This flexibility allows businesses to integrate the printer into their existing setups without hassle. Moreover, it supports multiple paper sizes and types, enabling users to print invoices, labels, and reports seamlessly.

Another notable characteristic of the Genicom 3400e is its user-friendly interface. The printer is designed with ease of operation in mind, featuring intuitive controls and an LCD display that provides real-time information about the printer status, helping operators manage tasks efficiently.

Additionally, the printer boasts reliable performance with reduced downtime, thanks to its capability for continuous operation. Its sturdy construction and easy-to-replace components make maintenance straightforward, ensuring that businesses can rely on the Genicom 3400e for their printing needs without interruptions.

In summary, the Genicom 3400e is a powerful dot matrix printer that excels in high-volume printing scenarios, combining speed, reliability, and affordability. Its advanced features and user-centric design make it an excellent choice for organizations seeking efficient printing solutions that stand the test of time.