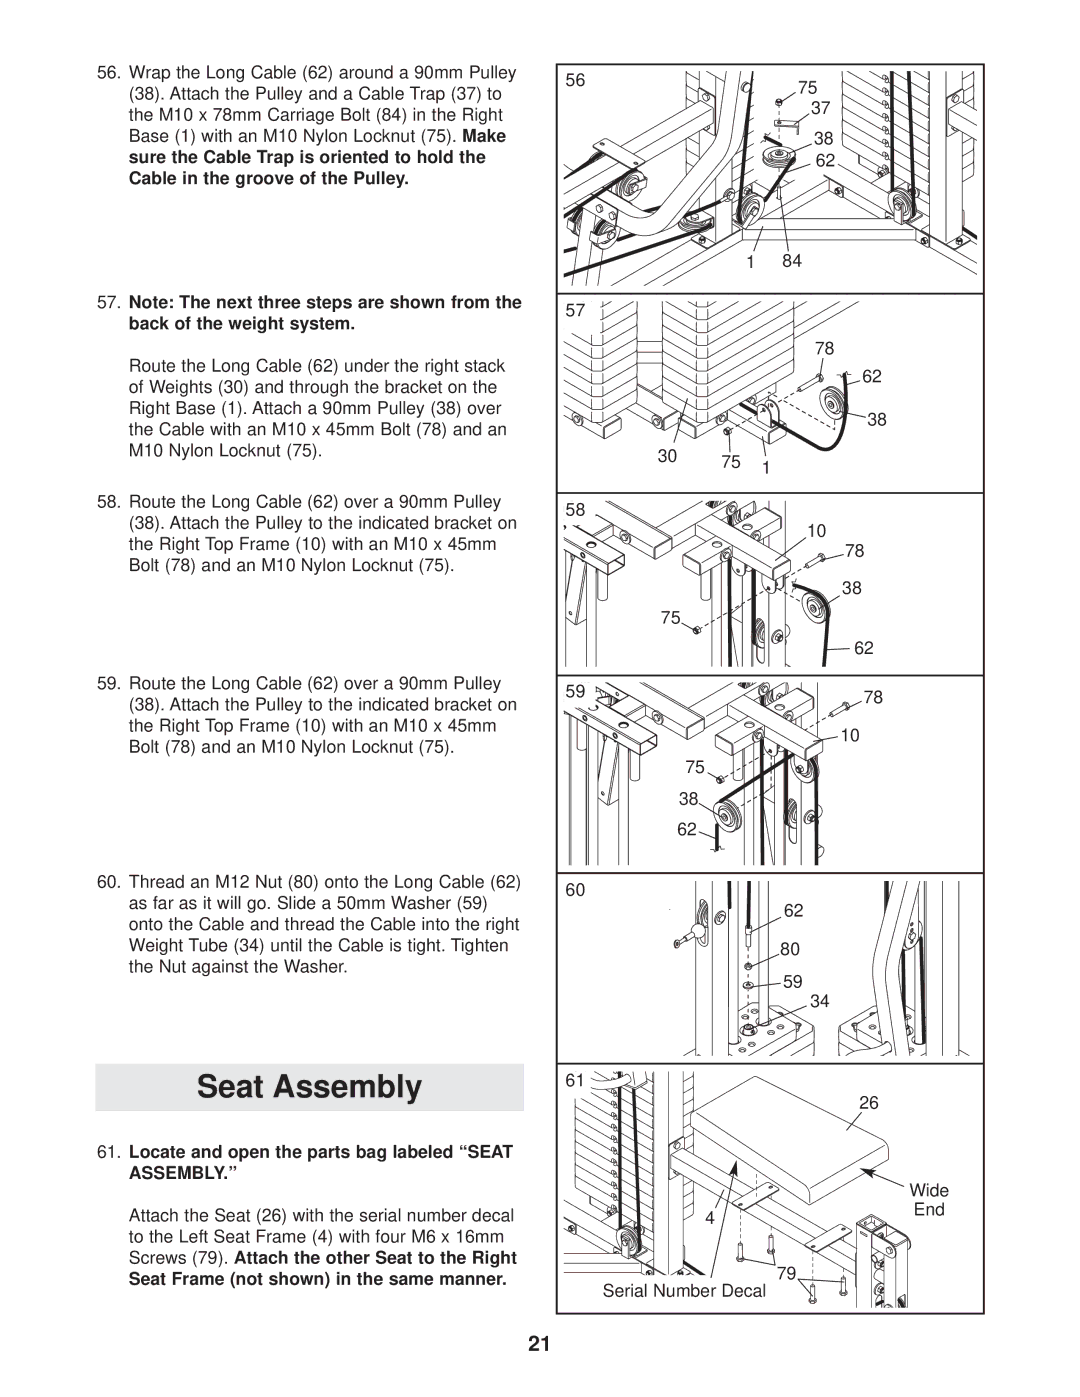
56.Wrap the Long Cable (62) around a 90mm Pulley (38). Attach the Pulley and a Cable Trap (37) to the M10 x 78mm Carriage Bolt (84) in the Right Base (1) with an M10 Nylon Locknut (75). Make sure the Cable Trap is oriented to hold the Cable in the groove of the Pulley.
57.Note: The next three steps are shown from the back of the weight system.
Route the Long Cable (62) under the right stack of Weights (30) and through the bracket on the Right Base (1). Attach a 90mm Pulley (38) over the Cable with an M10 x 45mm Bolt (78) and an M10 Nylon Locknut (75).
58.Route the Long Cable (62) over a 90mm Pulley (38). Attach the Pulley to the indicated bracket on the Right Top Frame (10) with an M10 x 45mm Bolt (78) and an M10 Nylon Locknut (75).
59.Route the Long Cable (62) over a 90mm Pulley (38). Attach the Pulley to the indicated bracket on the Right Top Frame (10) with an M10 x 45mm Bolt (78) and an M10 Nylon Locknut (75).
60.Thread an M12 Nut (80) onto the Long Cable (62) as far as it will go. Slide a 50mm Washer (59) onto the Cable and thread the Cable into the right Weight Tube (34) until the Cable is tight. Tighten the Nut against the Washer.
Seat Assembly
61.Locate and open the parts bag labeled “SEAT ASSEMBLY.”
Attach the Seat (26) with the serial number decal to the Left Seat Frame (4) with four M6 x 16mm Screws (79). Attach the other Seat to the Right
Seat Frame (not shown) in the same manner.
56 |
|
| 75 |
|
|
| |
|
|
| 37 |
|
|
| 38 |
|
|
| 62 |
|
| 1 | 84 |
57 |
|
|
|
|
|
| 78 |
|
|
| 62 |
|
|
| 38 |
30 | 75 | 1 |
|
|
| ||
|
|
| |
58 |
|
|
|
|
|
| 10 |
|
|
| 78 |
|
|
| 38 |
75 |
|
|
|
|
|
| 62 |
59 |
|
| 78 |
|
|
| |
|
|
| 10 |
75 |
|
|
|
38 |
|
|
|
62 |
|
|
|
60 |
|
|
|
|
|
| 62 |
|
|
| 80 |
|
|
| 59 |
|
|
| 34 |
61 |
|
|
|
|
|
| 26 |
|
|
| Wide |
| 4 |
| End |
|
|
| |
Serial Number Decal | 79 | ||
| |||
21 |
|
|
|
