Step 3.

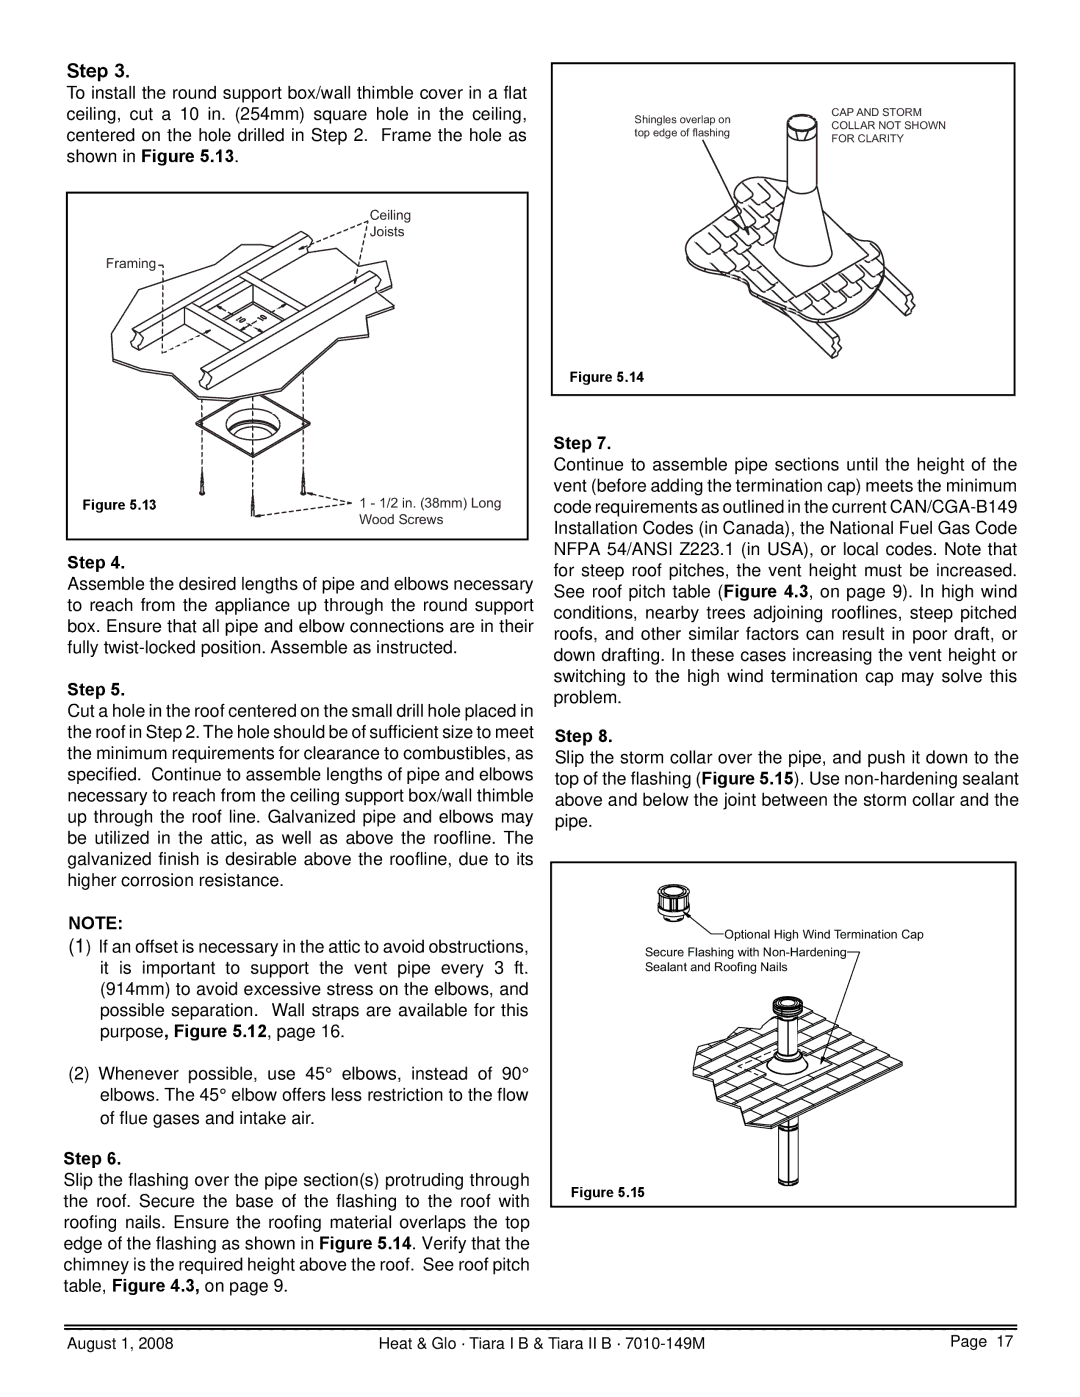
To install the round support box/wall thimble cover in a flat ceiling, cut a 10 in. (254mm) square hole in the ceiling, centered on the hole drilled in Step 2. Frame the hole as shown in Figure 5.13.

Ceiling

Joists

Framing

Figure 5.13

1 - 1/2 in. (38mm) Long


Wood Screws

Step 4.

Assemble the desired lengths of pipe and elbows necessary to reach from the appliance up through the round support box. Ensure that all pipe and elbow connections are in their fully twist-locked position. Assemble as instructed.

Step 5.

Cut a hole in the roof centered on the small drill hole placed in the roof in Step 2. The hole should be of sufficient size to meet the minimum requirements for clearance to combustibles, as specified. Continue to assemble lengths of pipe and elbows necessary to reach from the ceiling support box/wall thimble up through the roof line. Galvanized pipe and elbows may be utilized in the attic, as well as above the roofline. The galvanized finish is desirable above the roofline, due to its higher corrosion resistance.

NOTE:

(1) If an offset is necessary in the attic to avoid obstructions, it is important to support the vent pipe every 3 ft. (914mm) to avoid excessive stress on the elbows, and possible separation. Wall straps are available for this purpose, Figure 5.12, page 16.

(2)Whenever possible, use 45° elbows, instead of 90° elbows. The 45° elbow offers less restriction to the flow of flue gases and intake air.

Step 6.

Slip the flashing over the pipe section(s) protruding through the roof. Secure the base of the flashing to the roof with roofing nails. Ensure the roofing material overlaps the top edge of the flashing as shown in Figure 5.14. Verify that the chimney is the required height above the roof. See roof pitch table, Figure 4.3, on page 9.

Shingles overlap on

CAP AND STORM

COLLAR NOT SHOWN

top edge of flashing

FOR CLARITY


Figure 5.14

Step 7.

Continue to assemble pipe sections until the height of the vent (before adding the termination cap) meets the minimum code requirements as outlined in the current CAN/CGA-B149 Installation Codes (in Canada), the National Fuel Gas Code NFPA 54/ANSI Z223.1 (in USA), or local codes. Note that for steep roof pitches, the vent height must be increased. See roof pitch table (Figure 4.3, on page 9). In high wind conditions, nearby trees adjoining rooflines, steep pitched roofs, and other similar factors can result in poor draft, or down drafting. In these cases increasing the vent height or switching to the high wind termination cap may solve this problem.

Step 8.

Slip the storm collar over the pipe, and push it down to the top of the flashing (Figure 5.15). Use non-hardening sealant above and below the joint between the storm collar and the pipe.

Optional High Wind Termination Cap

Secure Flashing with Non-Hardening

Sealant and Roofing Nails

Figure 5.15

August 1, 2008

Heat & Glo · Tiara I B & Tiara II B · 7010-149M

Page 17

Page 17
Image 17
Hearth and Home Technologies TIARAI-CTO, TIARAI-CES, TIARA II-B, TIARAI-BR-B, TIARA I-B, TIARAI-BK-B owner manual Step

TIARAI-CTO, TIARAI-BK-B, TIARA II-B, TIARAI-BR-B, TIARAI-CES specifications

Hearth and Home Technologies offers a range of innovative gas and wood fireplace products, including the TIARA I-B, TIARA I-CTO, TIARA I-CES, TIARA II-B, and TIARA I-BR-B models. Each of these fireplaces combines aesthetic appeal with high functionality, creating a comfortable and stylish heating solution for any space.

The TIARA I-B is a versatile gas fireplace that features a contemporary design, perfect for modern homes. It comes with a large viewing area that showcases the beautiful flames while providing efficient heating. The model is equipped with advanced gas burner technology, ensuring a steady and even flame pattern, which enhances both the ambiance and warmth of the room.

The TIARA I-CTO boasts an innovative convection technology option, which allows for even heat distribution throughout the space. This model includes an easy-to-use remote control that enables users to adjust the flame height and heat output from across the room, providing an unparalleled level of convenience. Its sleek design can seamlessly blend into various interiors, making it a stylish choice for homeowners.

For those looking for a more efficient heating solution, the TIARA I-CES model incorporates a ceramic glass panel that enhances the fireplace's efficiency while maintaining an attractive aesthetic. The improved thermal performance allows for reduced fuel consumption and lower heating costs without compromising on warmth or style.

The TIARA II-B enhances the collection with its distinctive design and expanded features. This model comes with various decorative options, including multiple log set styles and media kits, allowing homeowners to customize their fireplace to match their unique taste. Its durable construction ensures longevity and reliability while providing warmth in colder months.

Finally, the TIARA I-BR-B is designed with a traditional aesthetic but incorporates modern technology. It delivers exceptional efficiency with the use of high-quality materials and advanced combustion technology. This fireplace not only provides a classic look but also meets modern energy efficiency standards, making it an eco-friendly choice for responsible heating.

In summary, the TIARA series from Hearth and Home Technologies combines beauty, technology, and efficiency. Each model is designed to suit different preferences and needs, ensuring that homeowners find the perfect fireplace solution. Whether you are after modern design or classic charm, the TIARA fireplaces deliver warmth and style in equal measure.