CAUTION

Ensure that existing chimney is functionally sound and clean.

Have inspection done by qualified chimney sweep or professional installer BEFORE converting to direct vent appliance.

Step 1.

Before cutting any holes, assemble the desired sections of direct vent pipe to determine the center of the masonry penetration.

Step 2.

Once the center point of the penetration has been determined, cut a 6 in. (152mm) diameter hole in the masonry. If the hole is too large, the retro connector might not mount properly; if the hole is too small, the appliance might starve for intake air. If there is a frame wall in front of the masonry wall, cut and frame a 10 in. (254mm) square opening in the wall (centered around the 6 in. (152mm) masonry opening). If there is sheet rock only (no studs) in front of the masonry the 10 in. (254mm) opening is still needed, but does not need to be framed. If the hole is framed a round support box/wall thimble is required. This allows the retro connector to mount directly on the masonry and provide the correct clearances to combustibles (Figure 5.25).

Studwall

10 in. x 10 in. (254mm x 254mm)

framed opening in wallMasonry Chimney

Retro Connector

Wall Thimble Cover

(4)Masonry Bolts (Not Included)

NOTE: For hearth applications refer to page 20, Figure 5.24 for the use of a co-axial to co-linear appliance connector.

Figure 5.25

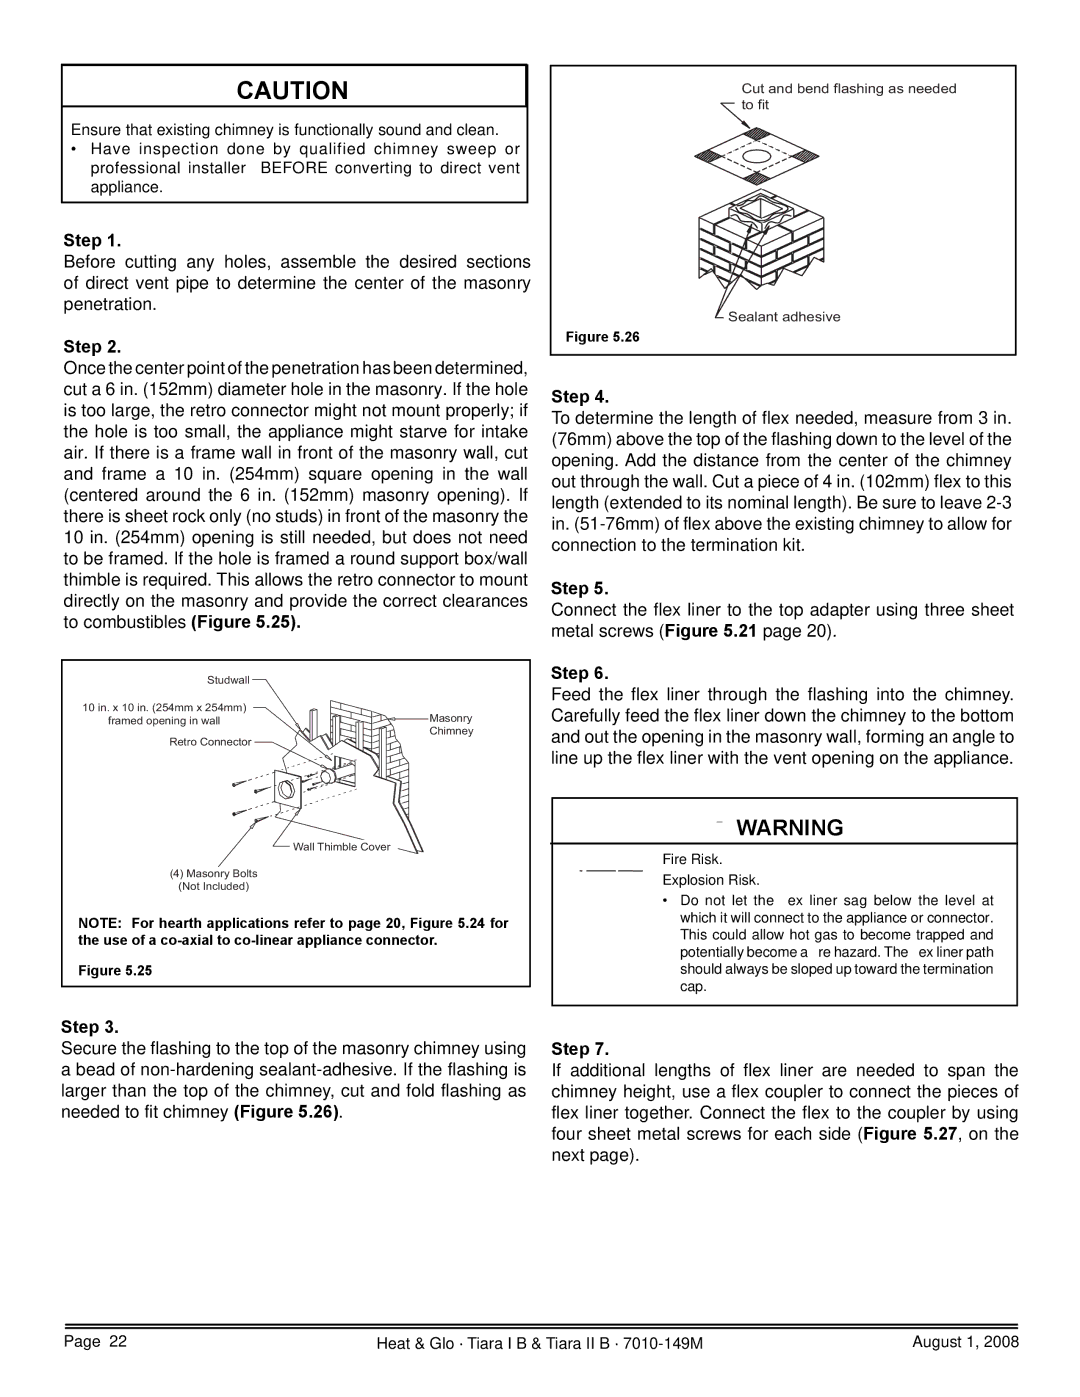
Cut and bend flashing as needed to fit

Sealant adhesive

Figure 5.26

Step 4.

To determine the length of flex needed, measure from 3 in. (76mm) above the top of the flashing down to the level of the opening. Add the distance from the center of the chimney out through the wall. Cut a piece of 4 in. (102mm) flex to this length (extended to its nominal length). Be sure to leave 2-3 in. (51-76mm) of flex above the existing chimney to allow for connection to the termination kit.

Step 5.

Connect the flex liner to the top adapter using three sheet metal screws (Figure 5.21 page 20).

Step 6.

Feed the flex liner through the flashing into the chimney. Carefully feed the flex liner down the chimney to the bottom and out the opening in the masonry wall, forming an angle to line up the flex liner with the vent opening on the appliance.

WARNING

Fire Risk.

Explosion Risk.

Do not let the flex liner sag below the level at which it will connect to the appliance or connector. This could allow hot gas to become trapped and potentially become a fire hazard. The flex liner path should always be sloped up toward the termination cap.

Step 3.

Secure the flashing to the top of the masonry chimney using a bead of non-hardening sealant-adhesive. If the flashing is larger than the top of the chimney, cut and fold flashing as needed to fit chimney (Figure 5.26).

Step 7.

If additional lengths of flex liner are needed to span the chimney height, use a flex coupler to connect the pieces of flex liner together. Connect the flex to the coupler by using four sheet metal screws for each side (Figure 5.27, on the next page).

Page 22

Heat & Glo · Tiara I B & Tiara II B · 7010-149M

August 1, 2008

Page 22
Image 22
Hearth and Home Technologies TIARAI-BK-B, TIARAI-CES, TIARA II-B Cut and bend flashing as needed to fit Sealant adhesive

TIARAI-CTO, TIARAI-BK-B, TIARA II-B, TIARAI-BR-B, TIARAI-CES specifications

Hearth and Home Technologies offers a range of innovative gas and wood fireplace products, including the TIARA I-B, TIARA I-CTO, TIARA I-CES, TIARA II-B, and TIARA I-BR-B models. Each of these fireplaces combines aesthetic appeal with high functionality, creating a comfortable and stylish heating solution for any space.

The TIARA I-B is a versatile gas fireplace that features a contemporary design, perfect for modern homes. It comes with a large viewing area that showcases the beautiful flames while providing efficient heating. The model is equipped with advanced gas burner technology, ensuring a steady and even flame pattern, which enhances both the ambiance and warmth of the room.

The TIARA I-CTO boasts an innovative convection technology option, which allows for even heat distribution throughout the space. This model includes an easy-to-use remote control that enables users to adjust the flame height and heat output from across the room, providing an unparalleled level of convenience. Its sleek design can seamlessly blend into various interiors, making it a stylish choice for homeowners.

For those looking for a more efficient heating solution, the TIARA I-CES model incorporates a ceramic glass panel that enhances the fireplace's efficiency while maintaining an attractive aesthetic. The improved thermal performance allows for reduced fuel consumption and lower heating costs without compromising on warmth or style.

The TIARA II-B enhances the collection with its distinctive design and expanded features. This model comes with various decorative options, including multiple log set styles and media kits, allowing homeowners to customize their fireplace to match their unique taste. Its durable construction ensures longevity and reliability while providing warmth in colder months.

Finally, the TIARA I-BR-B is designed with a traditional aesthetic but incorporates modern technology. It delivers exceptional efficiency with the use of high-quality materials and advanced combustion technology. This fireplace not only provides a classic look but also meets modern energy efficiency standards, making it an eco-friendly choice for responsible heating.

In summary, the TIARA series from Hearth and Home Technologies combines beauty, technology, and efficiency. Each model is designed to suit different preferences and needs, ensuring that homeowners find the perfect fireplace solution. Whether you are after modern design or classic charm, the TIARA fireplaces deliver warmth and style in equal measure.