¨E. Install the Attic Insulation Shield


Tabs bent in to


Pipe

rest against pipe

WARNING


Fire Risk


Attic Insulation Shield

• DO NOT pack insulation or other


17 in. (432 mm)

combustibles: between ceiling firestops;


6 Tabs bent

diameter

between chimney and attic insulation


in 90°

Ceiling Firestop

shield.


• ALWAYS maintain specified clearances


around chimney and ceiling firestop

Insulation

Pipe

Insulation

systems.


Install ceiling firestops as specified.

Failure to keep insulation or other material

13 in.


(330 mm)


away from chimney pipe may cause fire.


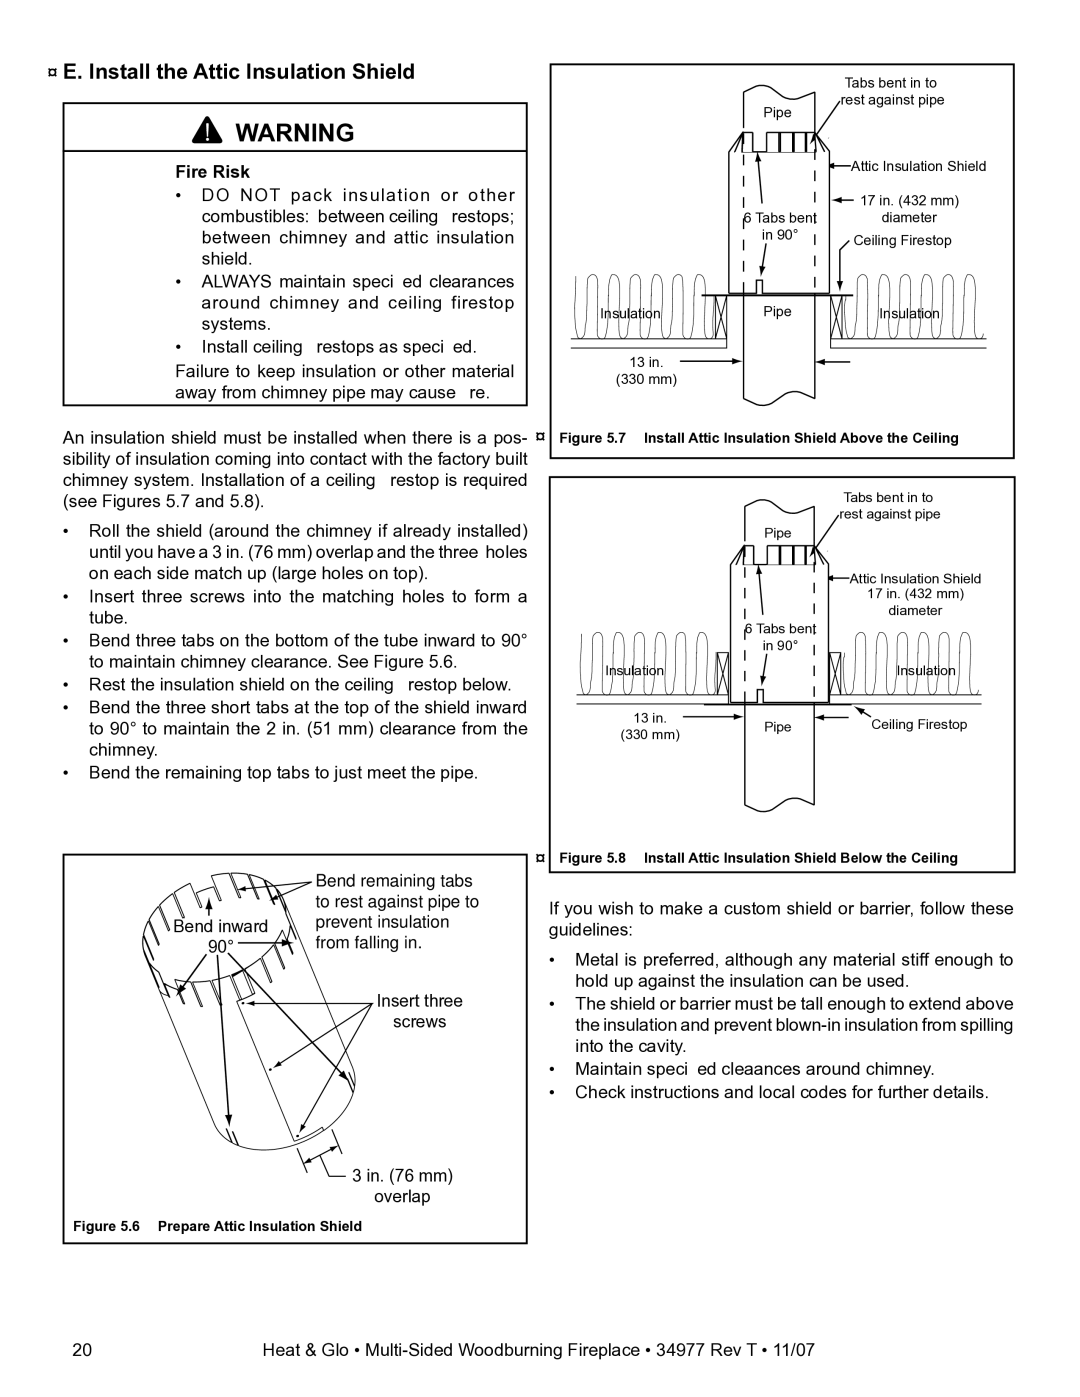
An insulation shield must be installed when there is a pos-¨Figure 5.7 Install Attic Insulation Shield Above the Ceiling

sibility of insulation coming into contact with the factory built


chimney system. Installation of a ceiling firestop is required


Tabs bent in to

(see Figures 5.7 and 5.8).


• Roll the shield (around the chimney if already installed)


rest against pipe


Pipe


until you have a 3 in. (76 mm) overlap and the three holes


on each side match up (large holes on top).


Attic Insulation Shield


• Insert three screws into the matching holes to form a


17 in. (432 mm)

tube.


diameter


6 Tabs bent


• Bend three tabs on the bottom of the tube inward to 90°


in 90°


to maintain chimney clearance. See Figure 5.6.

Insulation


Insulation

• Rest the insulation shield on the ceiling firestop below.


• Bend the three short tabs at the top of the shield inward

13 in.


Ceiling Firestop


to 90° to maintain the 2 in. (51 mm) clearance from the


Pipe


(330 mm)


chimney.


Bend the remaining top tabs to just meet the pipe.


¨ Figure 5.8 Install Attic Insulation Shield Below the Ceiling


Bend remaining tabs


to rest against pipe to


If you wish to make a custom shield or barrier, follow these


Bend inward

prevent insulation


guidelines:

from falling in.


90°


• Metal is preferred, although any material stiff enough to


Insert three


hold up against the insulation can be used.


• The shield or barrier must be tall enough to extend above


screws


the insulation and prevent blown-in insulation from spilling


into the cavity.


• Maintain specified cleaances around chimney.


• Check instructions and local codes for further details.

3 in. (76 mm) overlap

Figure 5.6 Prepare Attic Insulation Shield

20

Heat & Glo • Multi-Sided Woodburning Fireplace • 34977 Rev T • 11/07

Page 20
Image 20
Heat & Glo LifeStyle BAY-40 owner manual ¨E. Install the Attic Insulation Shield, Away from chimney pipe may cause fire

BAY-40 specifications

The Heat & Glo LifeStyle BAY-40 is a modern gas fireplace designed to deliver both style and functionality while enhancing the ambiance of any living space. Touted for its sleek design and advanced features, the BAY-40 serves as a centerpiece that combines warmth with contemporary aesthetics.

One of the most notable aspects of the LifeStyle BAY-40 is its impressive heat output, ensuring that rooms remain cozy even in the coldest months. With a variety of heat settings, users can easily adjust the temperature to their comfort level. This versatility makes it an ideal option for any home, whether for an expansive living area or a more compact setting.

The BAY-40 is equipped with an innovative IntelliFire technology that promotes ease of use and safety. This advanced ignition system eliminates the need for manual lighting, allowing users to start their fire at the push of a button. Additionally, the remote control feature offers convenience, enabling homeowners to control the fireplace from across the room, adding to the overall comfort factor.

Aesthetically, the LifeStyle BAY-40 is designed with a contemporary look in mind. Its large viewing area provides an unobstructed view of the flames, creating a warm and inviting atmosphere. The unique bay design not only enhances the visual appeal but also allows for a wider flame presentation, adding to the overall warmth of the room.

The fireplace also offers customizable options, such as different interior finishes and decorative media like glass or logs. These choices allow homeowners to tailor the fireplace to match their existing décor, contributing to a cohesive design throughout their home.

Moreover, the BAY-40 incorporates advanced safety features such as an automatic shut-off mechanism that activates in case of malfunction, ensuring peace of mind for users.

In summary, the Heat & Glo LifeStyle BAY-40 is more than just a fireplace; it’s a blend of innovation, design, and efficiency. Whether you are seeking to enhance your living space or provide warmth to your home, the BAY-40 stands out as an exceptional choice that balances modern technology with elegant aesthetics. Its range of features ensures both comfort and safety, making it a prime addition to any home.