F. Install Metal Roof Flashing

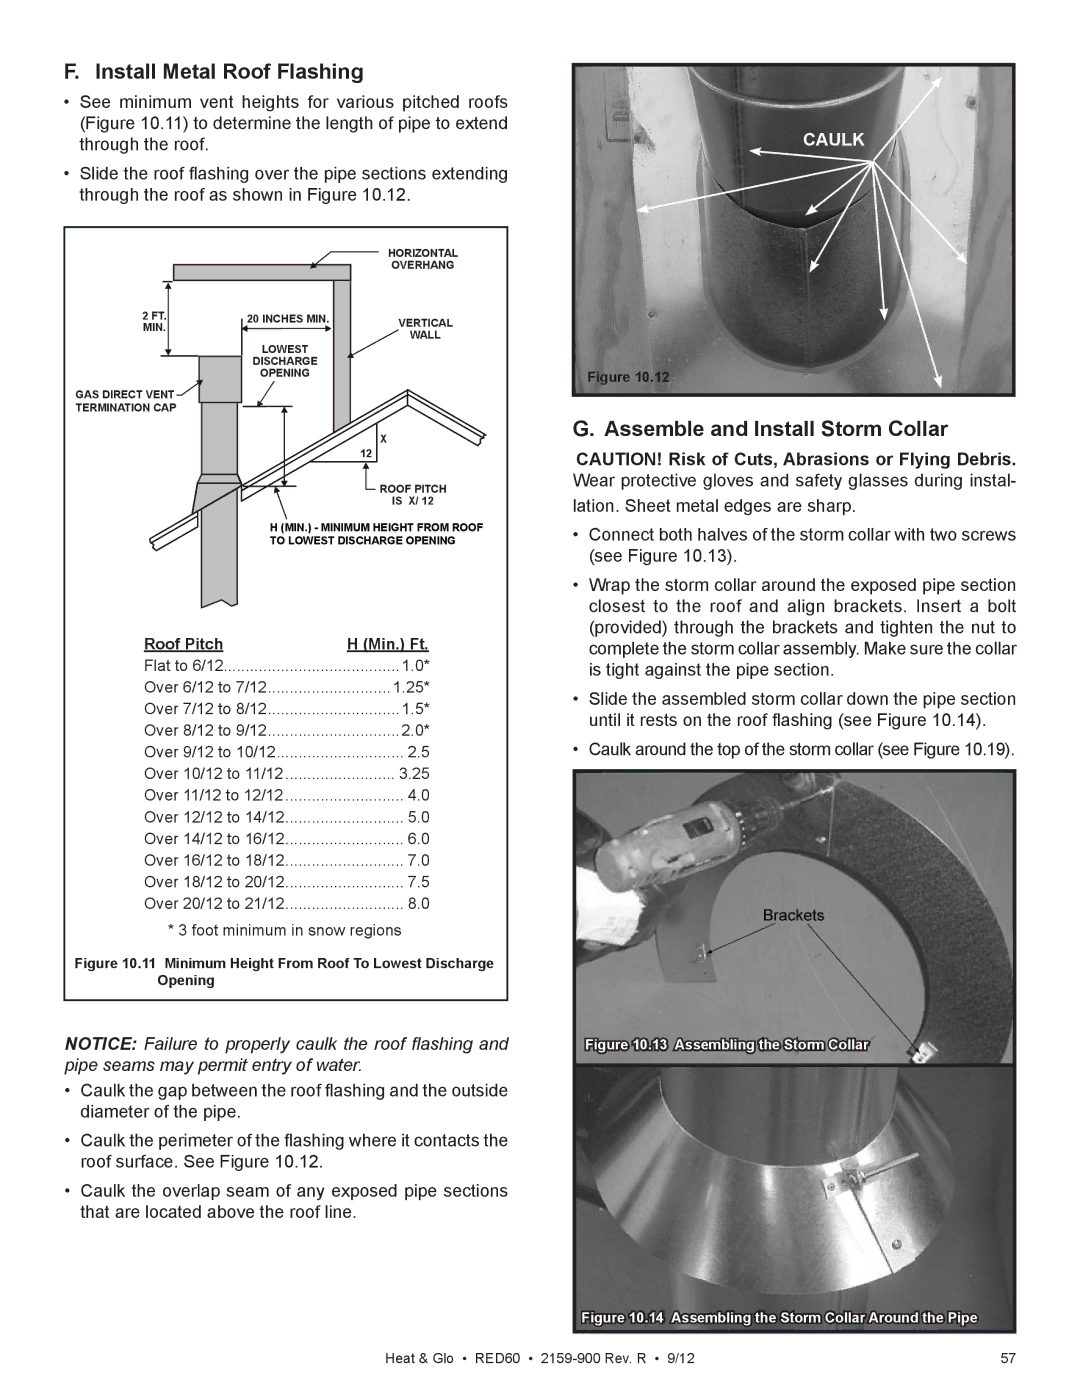
See minimum vent heights for various pitched roofs (Figure 10.11) to determine the length of pipe to extend through the roof.

Slide the roof flashing over the pipe sections extending through the roof as shown in Figure 10.12.


HORIZONTAL


OVERHANG

2 FT.

20 INCHES MIN.

VERTICAL

MIN.


WALL


LOWEST


DISCHARGE


OPENING


GAS DIRECT VENT


TERMINATION CAP


X


12


ROOF PITCH


IS X/ 12


H (MIN.) - MINIMUM HEIGHT FROM ROOF


TO LOWEST DISCHARGE OPENING

Roof Pitch


H (Min.) Ft.

Flat to 6/12........................................1.0*

Over 6/12 to 7/12............................1.25*

Over 7/12 to 8/12..............................1.5*

Over 8/12 to 9/12..............................2.0*

Over 9/12 to 10/12............................. 2.5

Over 10/12 to 11/12.......................... 3.25

Over 11/12 to 12/12............................ 4.0

Over 12/12 to 14/12........................... 5.0

Over 14/12 to 16/12........................... 6.0

Over 16/12 to 18/12........................... 7.0

Over 18/12 to 20/12........................... 7.5

Over 20/12 to 21/12........................... 8.0

* 3 foot minimum in snow regions

Figure 10.11 Minimum Height From Roof To Lowest Discharge

Opening


NOTICE: Failure to properly caulk the roof flashing and pipe seams may permit entry of water.

Caulk the gap between the roof flashing and the outside diameter of the pipe.

Caulk the perimeter of the flashing where it contacts the roof surface. See Figure 10.12.

Caulk the overlap seam of any exposed pipe sections that are located above the roof line.

CAULK

Figure 10.12

G. Assemble and Install Storm Collar

CAUTION! Risk of Cuts, Abrasions or Flying Debris. Wear protective gloves and safety glasses during instal-

lation. Sheet metal edges are sharp.

Connect both halves of the storm collar with two screws (see Figure 10.13).

Wrap the storm collar around the exposed pipe section closest to the roof and align brackets. Insert a bolt (provided) through the brackets and tighten the nut to complete the storm collar assembly. Make sure the collar is tight against the pipe section.

Slide the assembled storm collar down the pipe section until it rests on the roof flashing (see Figure 10.14).

Caulk around the top of the storm collar (see Figure 10.19).

Figure 10.13 Assembling the Storm Collar

Figure 10.14 Assembling the Storm Collar Around the Pipe

Heat & Glo • RED60 • 2159-900 Rev. R • 9/12

57

Page 57
Image 57
Heat & Glo LifeStyle RED60 2159-900 manual Install Metal Roof Flashing, Assemble and Install Storm Collar

RED60 2159-900 specifications

The Heat & Glo LifeStyle RED60 2159-900 is a modern and innovative gas fireplace that exemplifies cutting-edge design and advanced heating technology. With its sleek aesthetics and smart features, this fireplace is designed to elevate both comfort and style in any living space.

One of the main features of the RED60 is its impressive heat output. This model boasts a high efficiency rating, ensuring that homeowners can enjoy warmth without excessive energy consumption. The fireplace can deliver an output of up to 60,000 BTUs, making it suitable for both large and small areas. This efficient performance means less environmental impact, aligning with the growing emphasis on sustainability in home heating solutions.

The design of the Heat & Glo LifeStyle RED60 is another standout aspect. Its expansive glass viewing area provides a panoramic view of the flames, creating a beautiful focal point in any room. The minimalist frame enhances the contemporary aesthetic, allowing it to seamlessly complement various interior styles, from modern chic to traditional elegance.

In terms of technology, the RED60 incorporates advanced combustion systems, ensuring cleaner emissions without sacrificing performance. This technology not only contributes to a healthier indoor environment but also helps reduce the carbon footprint associated with home heating. Additionally, the fireplace features a patented heat distribution system, which optimally circulates warmth throughout the space, eliminating cold spots and enhancing overall comfort.

The RED60 also offers convenience through its intuitive remote control system. Users can easily adjust the flame height, heat output, and even set timers, providing ultimate flexibility in managing their indoor climate. For those who prefer a more hands-on approach, manual controls are also available, making it user-friendly for everyone.

Moreover, the installation process is simplified with the unit's flexible venting options, which can accommodate various configurations to suit different homes. Whether designing for a new build or retrofitting an existing space, this versatility appeals to homeowners and builders alike.

In summary, the Heat & Glo LifeStyle RED60 2159-900 is a blend of style, efficiency, and advanced technology. Its high heat output, sleek design, and intuitive controls make it an excellent choice for anyone seeking to enhance their living environment with a modern gas fireplace.