Manuals
/
Home Automation
/
Household Appliance
/
Indoor Furnishings
Home Automation
INC. Omni IIe Configuring Lighting Scenes in an HLC Room, Step, Operation
Models:
INC. Omni IIe
HOME AUTOMATION
1
29
98
98
Download
98 pages
54.77 Kb
26
27
28
29
30
31
32
33
Install
Burglar Alarm Activated
Error Beeps
Room Controller LED Indicators
Maintenance
Configuring HLC Devices
PC Access
Setup
Control Commands
Setting a Link Lighting Scenes
Page 29
Image 29
Page 28
Page 30
Page 29
Image 29
Page 28
Page 30
Contents
Document Number 20R00-50Rev. January
HOME AUTOMATION, INC
All Rights Reserved
Copyright 2001-2006Home Automation, Inc
OVERALL DESCRIPTION
INTRODUCTION
SECURITY SYSTEM OPERATION
Contents
CONTROL
TELEPHONE CONTROL
PC Access
SETUP
FEDERAL COMMUNICATION COMMISSION NOTICE
UNDERWRITERS LABORATORIES REQUIREMENTS
CANADIAN INDUSTRY CANADA NOTICE
APPENDIX A - DIAL OUT PLANNER
Page
Page
INTRODUCTION
Underwriters Laboratories UL Listing
Console Operation
OVERALL DESCRIPTION
1- OFF
2- DAY
Display Menus
Normal Top-LevelDisplay
6- UP ARROW
7- CONSOLE LED
Main Menu
Error Beeps
Trouble Beeps
To silence the beeper, press the * key
Cancel
Omni IIe Maintenance
Areas
Confirmation Beep
Arming the Security System
SECURITY SYSTEM OPERATION
0 = OFF
1 = DAY
2 = NIGHT
Using Shortcut Keys
3 = AWAY
4 = VACATION
Quick Arm
9 = RESTORE
Bypassing Zones
Restoring Zones
What Happens When the Alarm is Activated
What To Do When You Come Home
Burglar Alarm Activated
#=GOTO
Gas Alarm Activated
Fire Alarm Activated
Emergency Keys
Page
Alarm Reset
Duress Code Entered or Duress Alarm Activated
Alarm Cancel
Police Emergency
Codes
Trouble Indications
Master Code
Page
Duress Code
Panic Switches
Area Arming
Manager Code
Page
GOTO Area
Page
Testing Your System
CONTROL
Control Commands
About UPB
Page
Room Controller LED Indicators
When set to UPB, the Omni IIe controller can
HAI Lighting Control HLC Format
About Rooms
About House Controllers
About Lutron RadioRA
About CentraLite
Page
About ALC
When set to RadioRA, the Omni IIe controller can
About
House Codes
Scrolling Through Names
Unit Numbers
Controlling Units
Omni IIe Unit Numbers
Step
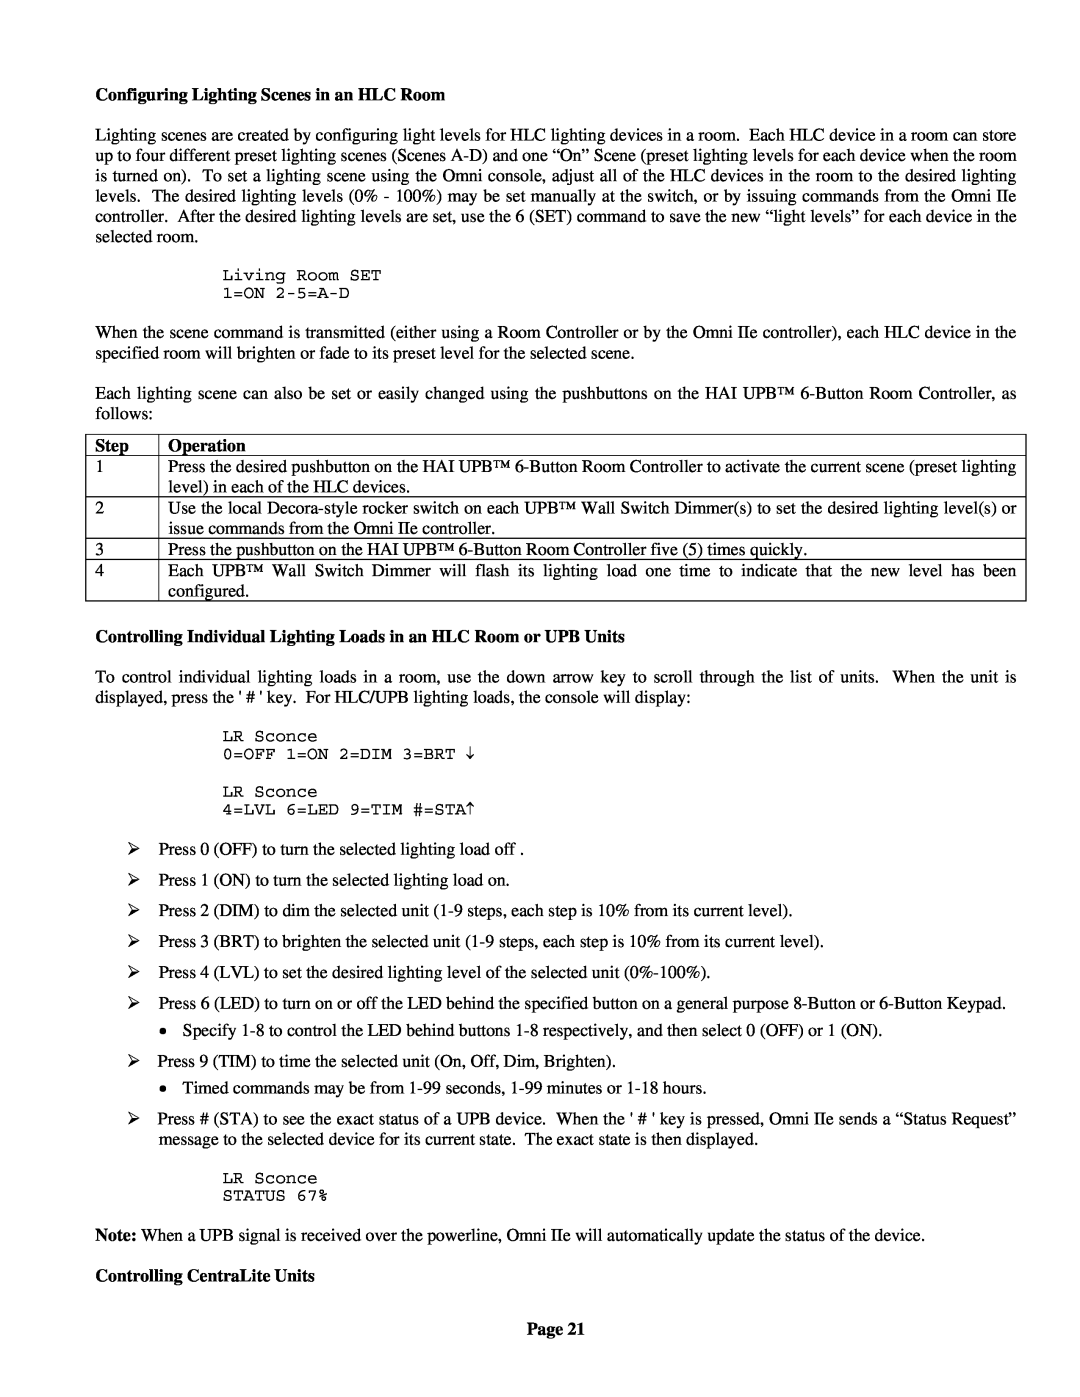
Configuring Lighting Scenes in an HLC Room
Operation
Controlling CentraLite Units Page
Page
Controlling RadioRA Units
Controlling ALC or X-10Units
Page
Ramp Command ALC
Controlling Compose Units
Scene Command Compose
Timed Commands
Status of a Unit
Internal Flags
All On / Off
Controlling Outputs
WHEN ALL ON LINK 50 ON WHEN ALL OFF LINK 50 OFF
WHEN ALL ON PHANTOM BUTTON 16 ON
All Off
All Lights On
Leviton Scene Control
Scene
Scene Set Command
Scene Commands
Scene On Command
Scene Off Command
Activating and Deactivating Links
Setting a Link Lighting Scenes
Executing Phantom Buttons
Executing CentraLite Scenes
Temperature Control
Buttons
Leave for Work Button
Dinner for Two Button
Page
HAI RC-SeriesThermostats
Page
Programmable Energy Saver Modules PESMs
Page
The following control actions are allowed on PESMs
IMPORTANT NOTES
Freeze Alarms
Indoor and Outdoor Temperature
Page
Humidity
Temperature Alarms
Temperature Control of Appliances
Page
Configuring HLC Devices using an Omni Console
Configuring HLC Devices
Status
Page
Step Operation
Setup Mode for HLC Devices
Step Operation
Step Operation
OFFHK - OFF HOOK
ONHK - ON HOOK
RING - RINGING
DEAD - DEAD PHONE LINE
Show Events Page
Event Log
Page
Messages
Show Message
Clear Message
Log Message
Say Message
Phone Message
Page
MSGNAME
ENTER MESSAGE
Telephone Interface
TELEPHONE CONTROL
In-HousePhones
Remote Phones
Alternate Method
Phone Access Denied - Remote Lockout
Main Menu
Page
2 - Security
1 - Control
3 - Button
4 - All
When a Programmable Energy Saver PESM is entered
When an HAI Communicating Thermostat is entered
6 - Status
7 - Events
8 - Phone
When the HAI Two-WayAudio Module is being used
9 - Good-Bye
Panic Button over the Phone # # # # # #
Digital Dialer
Emergency Dial-Out
Voice Dialer
How the Omni IIe Voice Dialer Works
What You Hear - If Your Omni IIe Calls You
What the Omni IIe Voice Dialer Does
Entering the Code
Page
Connecting to Network via PC Access
PC Access
Built-InEthernet Port
Omni IIe Ethernet Connections
Dynamic DNS
Local Network
192.168.0.101 Hub or HAI Omni IIeRouter
Controller
i.e
Local / Wide Area Network
i.e
Page
Set Up Codes
SETUP
Access Areas
Authority Level
Duress Code
Set Up Time
TIME
Page
1 = Add Programs
Advanced Control Programming ACP
2 = Show Programs
Page
Page
Menu
Page
Edit Programs
3 = Delete All Programs
Page
Edit Programs When
Times Programs
Page
Control Unit / Switch Press Event Buttons
Button and Event Programs
Switch
Corresponding Switch Table
Omni IIe
UPB 6-ButtonKeypad
Page
Zone Event Buttons
All On/Off Event Buttons
UPB Link Event Buttons
Alarm Event Buttons
X-10Event Buttons
Page
Page
Miscellaneous Event Buttons
Message Event Buttons Pro-Link
Switch Press Event Buttons CentraLite
Edit Program Command
Program Control Commands
Page
Program Security Commands
Unit Toggle Command
WHEN U1 SW UNIT 1 LED 3 ON
WHEN LINK 1 ON Porch Light STATUS
Program All On / All Off Commands
Program Button Commands
Program Video Commands
Program Temperature Commands
Edit Program Condition
Program Message Commands
Program Control Conditions
Page
Program Zone Conditions
Program Security Mode Conditions
Program Time Clock Conditions
Program Other Conditions
Page
SELECT CONDITION NEVER
Telephone Access
Set Up Dial
Remote Commands
Answer Outside Call
Dial Out Numbers
Dial Out Number
Dial Order
Page
Entry Delay
Set Up Arming
Exit Delay
Audible Exit Delay
Enable Quick Arm
Set up Miscellaneous
Enable Auto Bypass
All On For Alarm
Flash For Alarm
Enable Freeze Alarm
House Codes 1-4Format
FORMAT
Page
House Codes 1-4All On
Time Clocks
ZONE NAME
Latitude, Longitude, and Time Zone
Daylight Savings
Page
Controller Port Number
Controller IP Address
NUMBER
DESCRIPTION
Page
Set Up Names
Encryption Key
Set Up Address
Set Up Voice
SET UP VOICE 1=CTRL 2=ZONE 3=BTTN ↓
4=CODE 5=TEMP 6=AREA 8=MSG↑
Page
UNDERWRITERS LABORATORIES REQUIREMENTS
FIRE ESCAPE PLANNING
Page
FEDERAL COMMUNICATION COMMISSION NOTICE
Page
CANADIAN INDUSTRY CANADA NOTICE
IF YOU HAVE TROUBLE WITH YOUR PHONES
Page
APPENDIX A - DIAL OUT PLANNER
Omni IIe Voice Dial-OutPlanner
Page
INSTRUCTIONS TO CALLED PARTY
CODE CHAR
APPENDIX B - TEXT DESCRIPTION CHARACTER CODES
CODE CHAR
CODE CHAR
CODE
APPENDIX C - VOICE DESCRIPTION CODES
DESCRIPTION
CODE
DESCRIPTION
CODE
CODE
DESCRIPTION
DESCRIPTION
CODE
CODE
DESCRIPTION
CODE DESCRIPTION
CODE DESCRIPTION
CODE DESCRIPTION
Page
Page
HAI New Orleans, LA U S A
NOTE TO INSTALLER
Top
Page
Image
Contents