Manuals
/
Hoshizaki
/
Kitchen Appliance
/
Ice Maker
Hoshizaki
F-300BAF
service manual
Models:
F-300BAF
1
13
50
50
Download
50 pages
52.19 Kb
10
11
12
13
14
15
16
17
Specs
Wiring Diagram
Timer Board
Maintenance
Sanitizing Procedure Initial
Cleaning Flush Switch
Refrigerant Recovery
Safety
Sanitizing Solution
High Pressure Switch
Page 13
Image 13
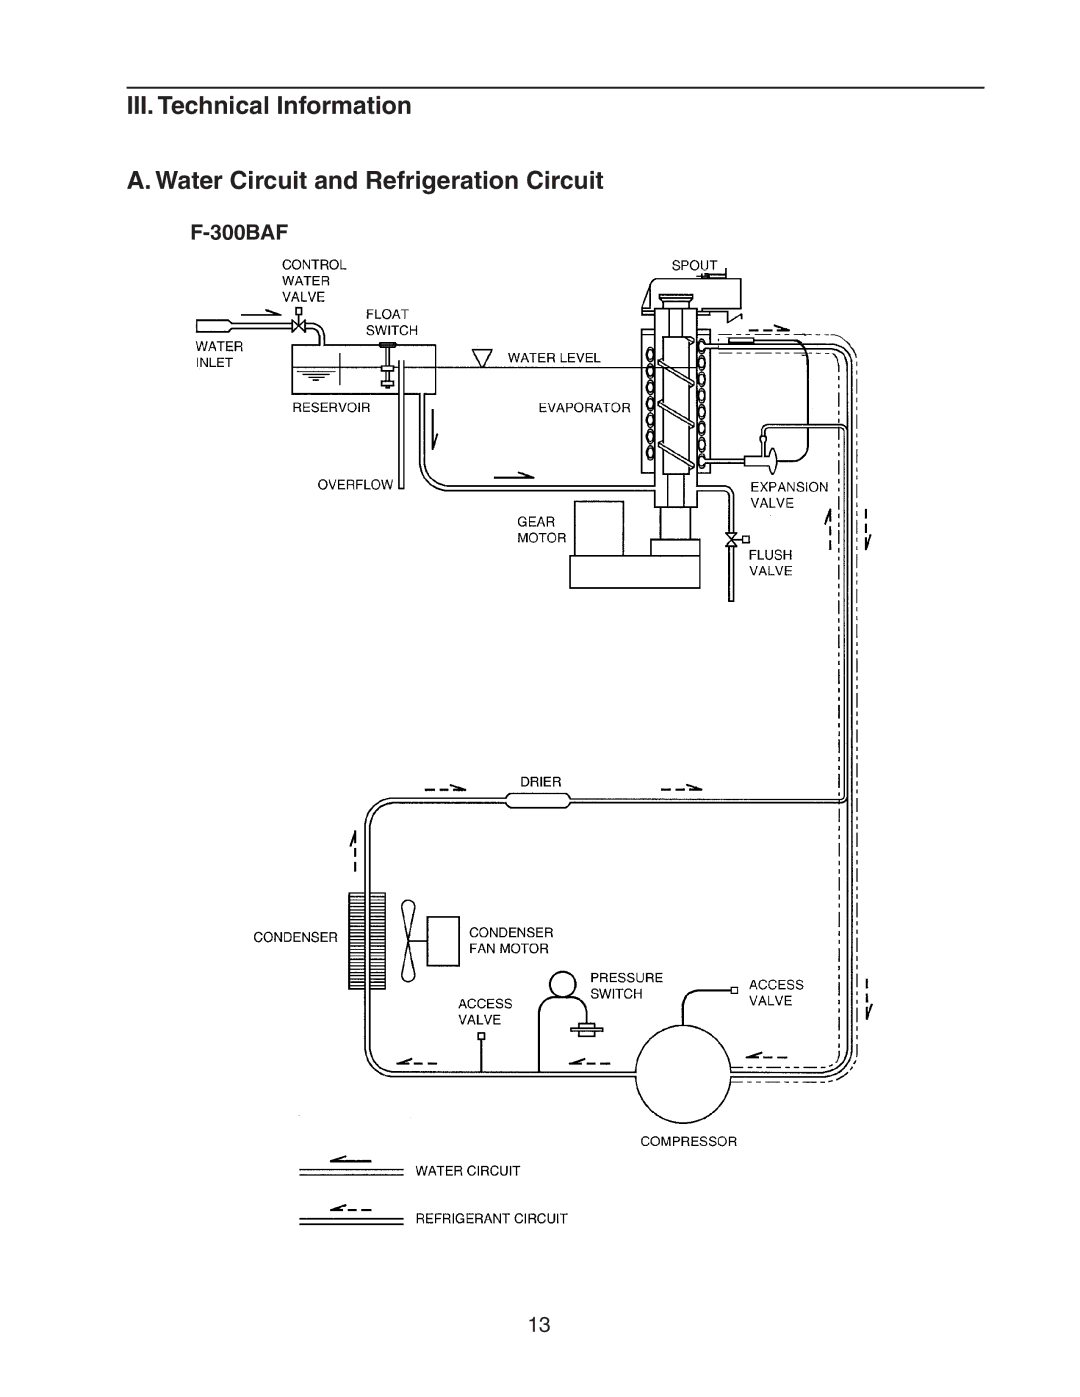
III. Technical Information
A. Water Circuit and Refrigeration Circuit
F-300BAF
13
Page 12
Page 14
Page 13
Image 13
Page 12
Page 14
Contents
Self-Contained Flaker Model 300BAF
Hoshizaki AMERICA, INC
Contents
Upper Bearing Wear Check
300BAF
Specifications Icemaker
II. General Information Construction
Ice Making Unit
Auxiliary Code K-2 and L-0
Control Box Layout
Auxiliary Code M-1 and Later
Auxiliary Code L-1 and M-0
Solid-State Timer Board Control
Timer Board
Ice Production Check
Sequence of Operation
300BAF, F-500BAF Sequence Flow Chart and Component Operation
300BAF
Auxiliary Code K-1 and Earlier
Wiring Diagram
Auxiliary Code K-2 and L-0
Auxiliary Code L-1 and M-0
Auxiliary Code M-1 and Later
Sequence of Electrical Circuit
Ice Purge Cycle
Freeze Cycle
Shutdown
Cleaning Flush Switch
Low Water Safety
Spout Safety Switch
High Pressure Switch
ICE Production
Performance Data
IV. Service Diagnosis Diagnostic Procedure
Page
No Ice Production
Diagnostic Charts
Problem Possible Cause Remedy
Low Ice Production
Other
Service for Refrigerant Lines
Removal and Replacement of Components
Refrigerant Recovery
Evacuation and Recharge R-404A
Brazing
Removal and Replacement of Compressor
Removal and Replacement of Expansion Valve
Removal and Replacement of Drier
Page
Removal and Replacement of Evaporator Assembly Components
Upper Bearing Wear Check
Removal and Replacement of Cutter
Removal and Replacement of Auger
Removal and Replacement of Extruding Head
Removal and Replacement of Evaporator
Page
Removal and Replacement of Gear Motor
6b. Lower Housing
Removal and Replacement of Inlet Water Valve
Removal and Replacement of Fan Motor
Removal and Replacement of Flush Water Valve
Page
Cleaning and Sanitizing Instructions
VI. Cleaning and Maintenance
Cleaning Solution
Cleaning Procedure
Sanitizing Solution
Sanitizing Procedure Final
Sanitizing Procedure Initial
Page
Stainless Steel Exterior
Maintenance
Storage Bin and Scoop
Air Filter
Preparing the Icemaker for Long Storage
Top
Page
Image
Contents