HP 8517B Parameter Test Set
Restricted Rights Legend
What You’ll Find in This Manual…
Warranty
Certification Warranty
Assistance
Service and Support
Safety and Regulatory Information
Instrument Markings
Safety Earth Ground
Typeface Conventions
Italics
HP 8517B S-Parameter Test Set Manual
Contents
Installation
Specifications
HP 8517B Test Set Replacement Procedures
HP 8517B Replaceable Parts
Contents-6HP 8517B S-Parameter Test Set Manual
How to Use This Manual
Getting Started
Test Set Description
Test Set Description
Option 004, HP 8517B Test Set Block Diagram
HP 8517B Test Set Options
HP 8517B Options and Descriptions
HP 8517B Test Set Options
Options HP 8517B Test Set Option Description
Verifying Test Set Operation
Test Set Operation Verification
Verifying Test Set Operation
Maintaining Measurement Accuracy
Maintaining Measurement Accuracy
Instruments Supported by This Manual
Instruments Supported by This Manual
Instrument Firmware Compatibility
Source Firmware Revision Compatibility Matrix
Service and Support Options Available
Service and Support Options
Service and Support Options Available
Option Description
Accessories
Accessories Available
HP 8517B Test Set Accessories Available
Accessories
Accessory Model Number Contents or Description
Critical Recommended Model Use Specifications
Recommended Test Equipment
Recommended Test Equipment
Recommended Test Equipment
Operating and Safety Precautions
Safety Precautions
Maximum Input Power Levels
Operating and Safety Precautions
14HP 8517B S-Parameter Test Set Manual
2Installation
Initial Inspection
Initial Inspection
RF Source Cable, Bench-top Configuration
Anti-rotation Clamps RF Source Cable, Rack Configuration
Installing the Test Set Into a System Rack
Installing the Test Set on a Bench
Recommended Static-Free Workstation Configuration
Installing the Test Set Into a System Rack
Configuring the Test Set in a System
Configuring the Test Set in a System
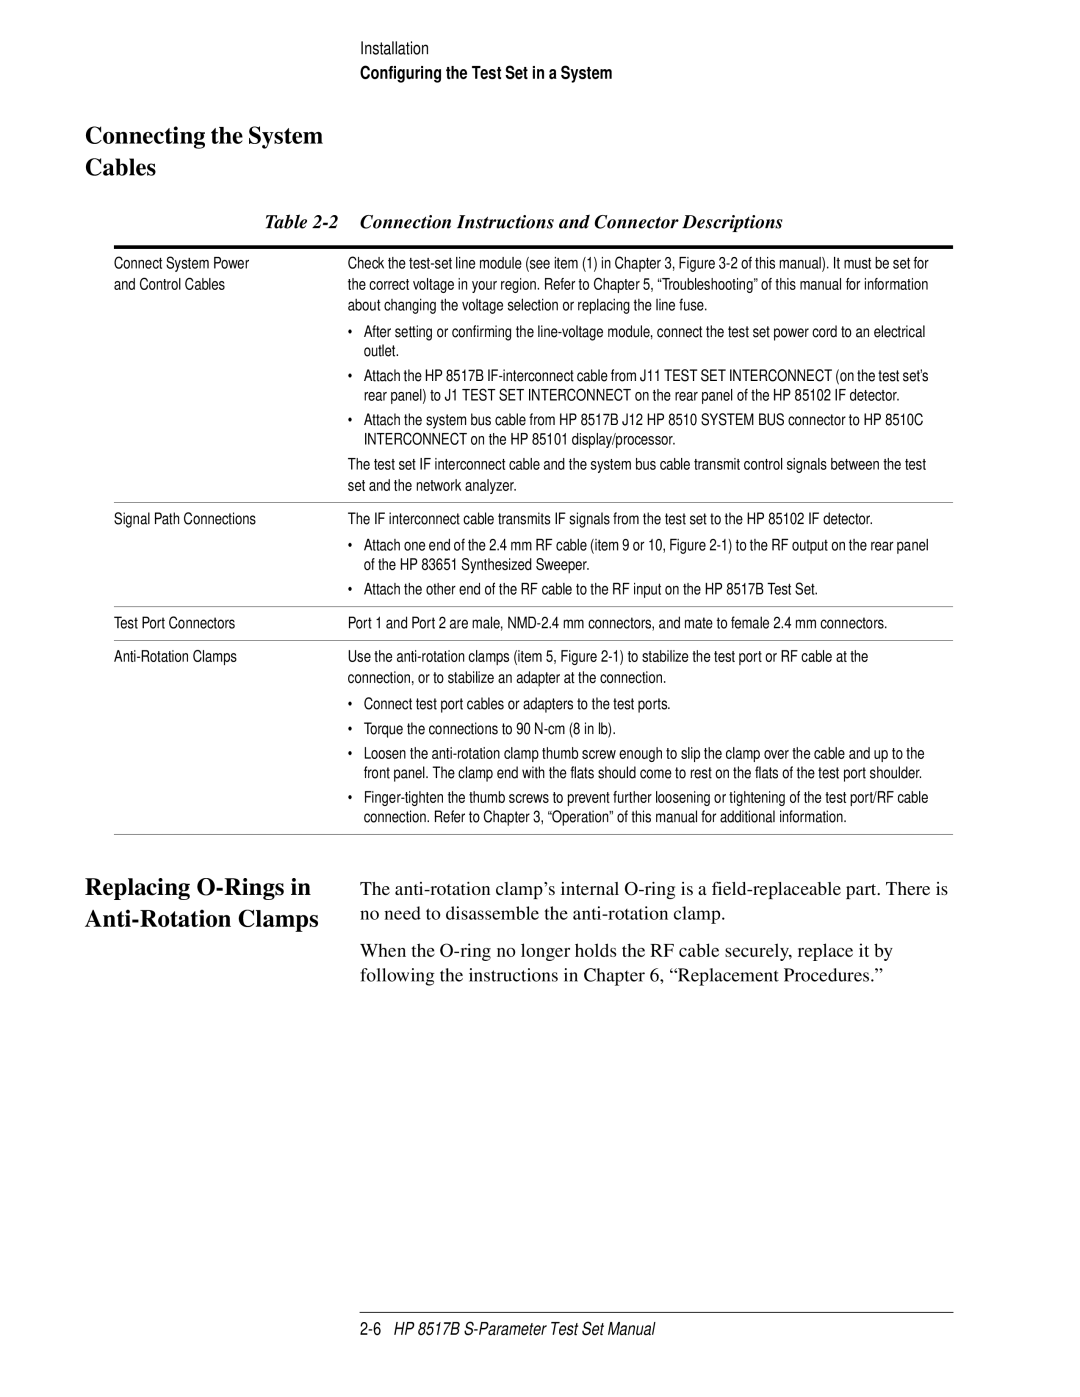
Connecting the System Cables
Connection Instructions and Connector Descriptions
Replacing O-Rings in Anti-Rotation Clamps
Packaging the Test Set
Packaging the Test Set
8HP 8517B S-Parameter Test Set Manual
Front-Panel Features
Front-Panel Description
Rear-Panel Features
Controlling Multiple Test Sets
Active devices under test
Port 1 Bias
HP 8517B S-Parameter Test Set Manual
Initialization at Power-Up Selecting a Test Set
Multiple Test-Set Connections
Selecting a Test Set When Multiple Units are Configured
With Switch #1 With Switch #2
New Address
Measurement Calibration
Measuring High-Power Devices with Option
Changing Signal Path States After System Calibration
Changing the Test Port Attenuators
Storing Trace Memories Viewing Normalized Parameters
Default to Memory
Making Operational Checks
Instrument State Local Auxiliary Menus System
Performance Verification
Using Anti-Rotation Clamps
Attach the first clamp
Using a Torque Wrench Correctly
Positioning the thumb-screw
Positioning the connector
Visually Aligning Clamp and Nut Flats
Using Anti-Rotation Clamps
Aligning the thumb-screw
Attaching the second clamp
HP 8517B S-Parameter Test Set Manual
Mechanical Specifications
Supplemental Characteristics
HP 8510/HP 8517B Mechanical Specifications
HP 8510/HP 8517B Supplemental Characteristics
3HP 8517B S-Parameter Test Set Manual
HP 8517B S-Parameter Test Set Manual
Troubleshooting the Test Set
RF Source Power
Theory of Operation
Theory of Operation
Theory of Operation
LO Signal Control
Troubleshooting Sequence
Troubleshooting Sequence
Equipment Needed But Not Supplied
Equipment Required, But Not Supplied
Equipment Type HP Part Number
Troubleshooting Procedures
Assembly
Power Supply Voltages to A15
Power Supply Voltages to A27
Power Supply Fuses and Test Points
Instrument HP-IB Switch Setting
Fuse Location
If the Self-Test Fails to Run Properly
Active LED Location
Self-Test Indication
LSN TLK SRQ REM
Using the Service Adapter
Service Adapter Connections
Service Adapter Conclusions
HP 85102 is working properly. The problem is
Results Observations
Most likely in the source or the test set. Refer to
Isolating Signal Path Problems
Unratioed Power Test
Testing Signal Paths
Drive Port
Testing Paths 5
Test switch to restore factory default conditions
10 RF Path 1 and Path 2, HP 8517B Standard Test Set
11 RF Path 3 and Path 4, HP 8517B Standard Test Set
12 RF Path 5 and Path 6, HP 8517B Standard Test Set
13 RF Path 1 through Path 4, HP 8517B Option 007 Test Set
14 RF Signal for Path 1 through Path 4, HP 8517B Option
15 RF Path 5 and Path 6, HP 8517B Option
Sample Diagnostics
Test Results for Path 1 through Path
Most Probable Failures B indicates Bad indicates Good
24HP 8517B S-Parameter Test Set Manual
HP 8517B Test Set Replacement Procedures
Performance Tests Adjustments
ESD-Safe Workstation Configuration
Replacement-Procedure Tools Needed
Tools Used for Procedure HP Part Number
Equipment Needed But Not Supplied
HP 8517B Major Assembly Location Diagram
Assembly Replacement Procedures
Initial Precautions Switch/Splitter Replacement
A18 Switch/Splitter Assembly
A14, A10 to A13 Frequency Converter Assembly
Regulator Board Replacement Filter Capacitor Replacement
A15 Regulator Board Assembly
C1 to C4 Filter Capacitors
Mm Test Port Connectors
Diagram of 2.4 mm Test Port Connector
Fan Assembly Replacement
Power Transformer
Replacement
B1 Fan Assembly
This procedure. Disconnect the ac power cord before starting
Front Panel Interface Board Replacement
Ring Replacement Anti-Rotation Clamp O-Ring Replacement
A1 Front Panel and Interface Board Assembly
Bias Tees Replacement A7 and A9 Bias Tees
Test Port Attenuator
A6 and A8 Test Port Couplers
A16 or A17 Port Attenuators
A22 Input Amplifier Assembly
Input Amplifier
Buffer Amplifier
A23 to A26 Buffer Amplifiers
Post Regulator Board Replacement
A27 Post Regulator Board Assembly
14HP 8517B S-Parameter Test Set Manual
Introduction
Rebuilt-Exchange Assemblies
Assembly Fuse Switch
Meter Electron Tube Recovery Diode, Varactor
Ordering Information
To Order Parts . . . . Fast
Manufacturer Names and Addresses
Standard Abbreviations
Depletion Mode
Decoder
Degree
Shaped hole
Male, Maximum, Mega, Mi, Milli, Mode
Hardware
Hexadecimal, Hexagon, Hexagonal
Helical
Opt Optical, Option, Optional Picoampere, Power Amplifier
Pad, Power Dissipation
Miniature
Miter
Pico Farad, Power Factor
Subminiature, A-Type Threaded Connector
Package
Plastic
Subminiature, B-Type Slip-on Connector
Subminiature, C-Type Threaded Connector
Teeth, temperature, Thickness, Time, Timed, Tooth, Typical
Ambient Temperature, Tantalum
Multipliers, Abbreviation and Description
Abbreviation Prefix Multiple
Power Cable and Plug Part Numbers
Instrument Fuses
Fuse Name Location
Part number
Low Cost Rebuilt-Exchange Procedure
Hewlett-Packard pays postage on boxes mailed in the U.S.A
Major Assembly Reference Designator and Parts Information
Description
Major Assembly Locations in the Standard HP 8517B Test Set
Cable Assembly AT1 to A10J2
Cable Assembly A8J3 to A11J2
Cable Assembly A6J3 to A12J2
Cable Assembly A8J2 to A9J2
Flexible Cable Assemblies in the Standard HP 8517B Test Set
18HP 8517B S-Parameter Test Set Manual
Miscellaneous Parts, Front Panel HP 8517B Test Set
10 Test Port Connector Assembly Components
11 Miscellaneous Parts, Rear Panel HP 8517B Test Set
Teflon Cable Sleeve
Line Module Retainer Clips
Washer-LK Intl T 3/8 in 0.377-IN-ID
Washer-LK Intl T 7/16 in 0.439-IN-ID
Detailed Views of Hardware Stack-Ups
12 Miscellaneous Parts, Top Internal View
13 Miscellaneous Parts, Motherboard
2200-0107 Machine Screws
C1 C4 0180-2671
Connector 5-PIN M Post Type
Connector Post Type 0.100-PIN-SPCG 14-CONT
Connector 5-PIN M Post Type J8 and J9
Connector-PC Edge 2-Rows XA5 XA6 to XA14 Not Assigned XA15
14 Parts Unique to HP 8517B Option 001 Test Set
Cable Assembly, A2J9 to J10A4
Cable Assembly, A2J6 to J10A2
Cable Assembly, A2J12 to J10A3
Cable Assembly, A3J3 to J10A7
Cable Assembly, A12J3 to Port 1 J13
Cable Assembly, A13J3 to Port 2J14
15 Parts Unique to HP 8417B Option 002 Test Set
Cable Assembly, AT7 to A9J1
Cable Assembly, A8J3 to A17J2
Cable Assembly, A17J1 to A11J2
16 Parts Unique to HP 8517B Option 004 Test Set
Post Regulator Board Assembly Beneath A22 Input Amplifier
17 Parts Unique to HP 8517B Option 007 Test Set
08516-60021 DB Attenuators
Input Amplifier
HP Part Number
Front Panel J7 to A22 Input Amplifier
A22 Input Amplifier to A18J5
A6 Coupler to A23
18 Parts Unique to Option 002 plus Option
19 Parts Unique to Option 004 plus Option
20 Instrument Chassis Replaceable Parts
36HP 8517B S-Parameter Test Set Manual
Index
HP 8517B S-Parameter Test Set Manual Index-1
Index-2HP 8517B S-Parameter Test Set Manual